28
18-GJ83D1-1C-EN
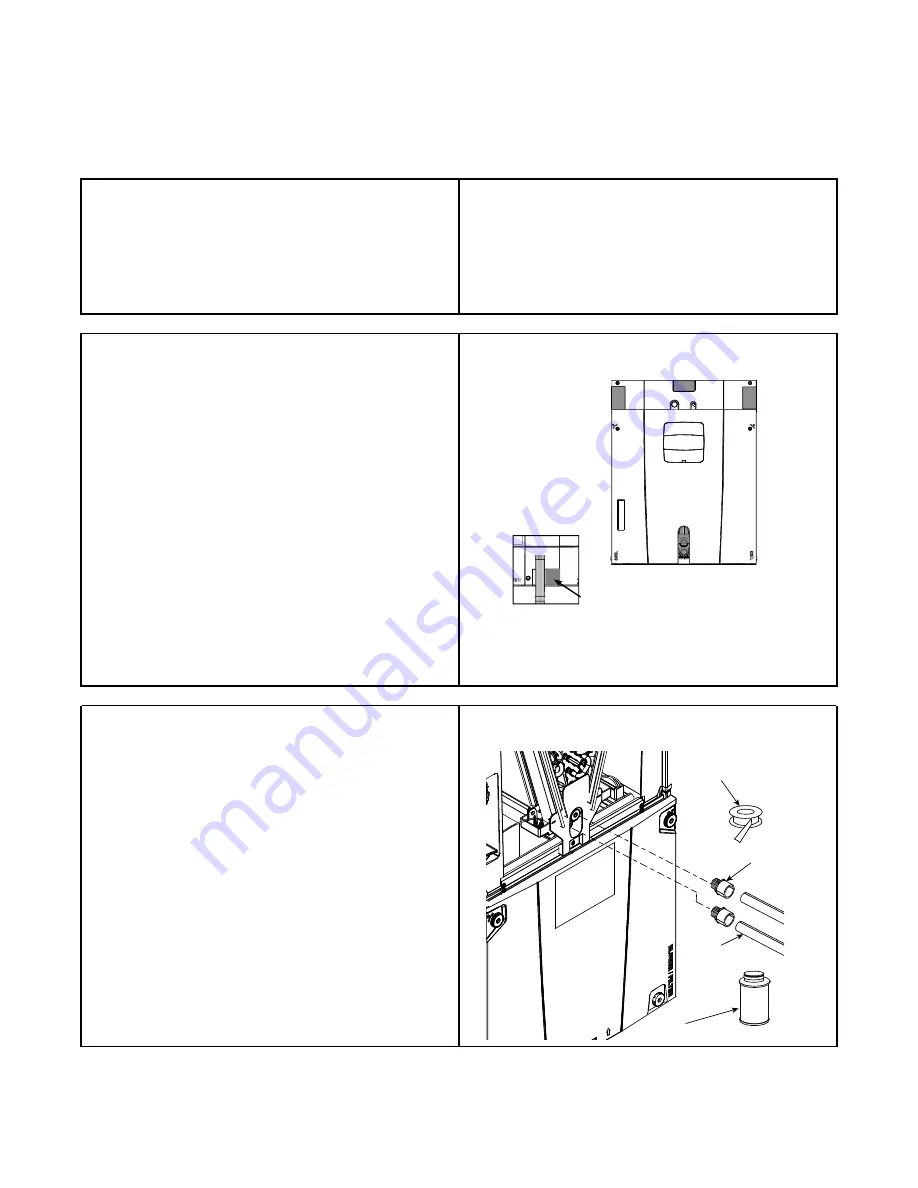
Condensate Drain Piping
Condensate Drain Piping Considerations
•
Condensate drain plumbing must comply with national, state, and
local codes.
•
Route condensate drain lines away from air handler so they do not
interfere with access panels.
•
Slope the drain lines downward a minimum of 1/4” per foot,
support per local codes.
•
Do not use reducing fittings in the condensate drain lines.
•
Do not connect the drain line to a closed drain system.
•
Do not use a torch or flame near the plastic drain pan coupling.
•
A P-trap is not required for proper drainage due to the positive
pressure of the air handler; however, it is recommended to
prevent efficiency loss of conditioned air.
Connect Condensate Drain Piping
Note:
Downflow and horizontal orientations require the Coil panel to
be removed in order to make the drain connections.
Note:
Make certain that the unit has been installed in a level position
to allow for proper draining.
1.
Select the drain connections that are oriented for your
application.
2.
Prepare the condensate drain connections.
a.
From the factory, the unit comes with plugs in both upflow
condensate drains and an additional plug in the
documentation packet.
b.
For upflow applications, remove upflow condensate plug(s)
and connect condensate piping.
c.
For all other applications, do not remove upflow condensate
plugs. Remove the cover from the needed condensate drain
connections and connect condensate piping.
d.
If the secondary condensate opening is not used, plug the
condensate opening with the fitting supplied in the
documentation pack. Use scissors to cut the air seal in half
and re-install over the unused opening.
S
P
S
P
S
P
S
P
Downflow
Condensate
Drains
H
o
r
i
z
o
n
t
a
l
L
e
f
t
C
o
n
d
e
n
s
a
t
e
D
r
a
i
n
s
H
o
r
i
z
o
n
t
a
l
R
i
g
h
t
C
o
n
d
e
n
s
a
t
e
D
r
a
i
n
s
Upflow
Condensate
Drains
Air seal
over
secondary
drain
Note:
A small amount of sealant must be applied around the drain line
(s) passing through the panel to prevent air leakage and
possible water drips.
•
Dry fit and test clearance for coil panel removal before
applying PVC/CPVC cement.
•
Use Teflon tape on the air handler drain line connections.
Do not use pipe joint compound or PVC/CPVC cement on
drain nipple.
•
Hand tighten the drain pipe.
3.
For upflow installations, connect 3/4” PVC pipe to the threaded
drain nipple with PVC/CPVC cement. 3” minimum clearance to the
condensate piping is needed for coil panel removal. Thread the
assembly into the primary drain connection (repeat for the
secondary drain connection if used).
a.
Remove panel and insert the 3/4” nipples.
b.
Reinstall the panel.
c.
Connect the condensate lines to the nipples.
Important:
For Horizontal and Downflow installations, the following
order must be observed:
Note:
A small amount of sealant must be applied around the drain line
(s) passing through the panel to prevent air leakage and
possible water drips.
PVC
CEMENT
Teflon Tape
Drain Nipple
3/4” PVC Pipe
PVC/CPVC Cement


