background image

MAINTENANCE

20

UP6RD–5–175, UP6RM–5–175, UP6RD–5–175

OIL CHANGE PROCEDURE

1. Remove the oil drain plug and allow the oil to drain into a suitable
container.

2. Replace the oil drain plug.

3. Follow the filling procedures in INSTALLATION / HANDLING
section.

BELT CHECKING AND ADJUSTMENT PROCEDURE 

Check belt tension occasionally, especially if looseness is

suspected. A quick check to determine if adjustment is proper may be
made by observing the slack side of the belt for a slight bow when the
unit is in operation. If a slight bow is evident, the belt is usually adjusted
satisfactorily.

On enclosed compressors, a belt tension measurement device can

be used to determine the tension of the belt. A belt inspection opening
is provided at the top of the blower housing.

Belt tensioning can be achieved by loosening the motor anchor

screws, pushing the motor away from the pump, and retightening the
motor anchor screws. The motor can be easily moved by placing a
prying tool beneath it. A commercially available spreader or other belt
tensioning device can also be helpful should tensioning be necessary.

On enclosed compressors, a belt tensioning bolt is provided to aid

in moving the motor.

Follow the procedures outlined below to correctly set and measure belt
tension.

1. Lay a straight edge across the top outer surface of the belt drive
from pulley to sheave.

2. At the center of the span, perpendicular to the belt, apply pressure
to the outer surface of the belt with a tension gauge. Force the belt to
the deflection indicated in the table below, and compare the reading on
the tension gauge to the figures shown.

Deflection in Inches

Min Tension (Lbs.)

Max. Tension (Lbs.)

0.17

3.0

6.0

Ensure the pulley and sheave are properly aligned and the motor
anchor screws are adequately retightened prior to restarting the
compressor.

CAUTION

Improper pulley/sheave alignment and belt tension can result in

motor overload, excessive vibration, and premature belt and/or bearing
failure.

To prevent these problems from occurring, ensure the pulley and

sheave are aligned and belt tension is satisfactory after installing new
belts or tensioning existing belts.

FILTER REPLACEMENT

1. Unscrew and remove the wing nut securing the filter housing to its
base.

2. Remove the filter housing and withdraw the old filter element.

3. Install a new filter element and replace the housing, securing it in
place with the wing nut.

ELECTRIC DRAIN VALVE

PRODUCT DESCRIPTION

The Electric Drain Valve removes condensed water and oil from the air
receiver tank. Additional drains may be installed throughout your
compressed air system, including aftercoolers, filters, drip legs and
dryers.

The Electric Drain Valve operates on a timer which can be set to
automatically drain the air receiver tank at operator–determined
intervals.

Key features include:

100% continuous duty

NEMA 4 enclosure

Adjustable time on (0.5 – 10 seconds)

Adjustable time off (0.5 – 45 minutes)

Stainless steel operator

LED to indicate electrical power is on

LED to indicate valve is open

Manual override

OPERATION

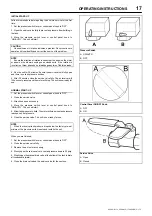
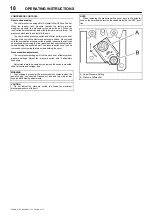
1. Open the strainer ball valve.

Strainer Ball Valve.

OPEN

CLOSED

2. Set the “time off” and “time on” knobs. See TIMER SETTINGS
(below) for an explanation of the settings.

3. During compressor operation, check for air leaks.

TIMER SETTINGS

The “time off” setting determines the interval between cycles from 30
seconds to 45 minutes. The “time on” setting determines the actual time
the compressor drains condensate.

The timer’s cycle rate and drain opening time should be adjusted to
open just long enough to discharge the condensate. The timer is
properly set when it opens and discharges condensate and then vents
air for approximately one second before closing. Adjustments  may be
made depending on many factors, including humidity and duty cycle.

TROUBLESHOOTING

TROUBLE

CAUSE

ACTION

Valve will not
close.

1. Debris in solenoid
valve prevents dia-
phragm from seating.

1. Remove solenoid
valve, disassemble,
clean and reassemble

.

2. Short in electrical
component.

2. Check and replace
power cord or timer as
needed.

Timer will not
activate

1. No electrical supply.

1. Apply power.

activate

2. Timer malfunction

2. Replace timer.

3. Clogged port.

3. Clean valve.

4 Solenoid valve
malfunction.

4. Replace solenoid
valve.

5Clogged strainer.

5. Clean strainer.

Summary of Contents for UP6RD-5-175

Page 1: ...ATE APRIL 2003 UP6RD 5 175 UP6RM 5 175 UP6RX 5 175 ENCLOSED 60Hz OPERATION AND MAINTENANCE MANUAL This manual contains important safety information and must be made available to personnel who operate...

Page 2: ......

Page 3: ...IATIONS SYMBOLS Contact Ingersoll Rand for serial number Up to Serial No From Serial No Not illustrated Option NR Not required AR As required SM Sitemaster Sitepack HA High ambient machine WC Watercoo...

Page 4: ...ipment in which non approved repair parts are installed Standard warranty conditions may be affected Ingersoll Rand reserves the right to make changes and improvements to products without notice and w...

Page 5: ...rs which can result in serious injury Never operate the compressor near flammable liquids or vapors If used to spray flammable materials keep compressor at least 20ft away from the spray area HIGH PRE...

Page 6: ...CK OIL DECAL 5 32263832 1 ROTATING FAN DECAL 6 22075618 1 SHIPPING TAG 7 56276652 1 HOT SURFACE DECAL 8 1 MOTOR LABEL 9 30286686 1 ROTATION ARROW DECAL ON TOP OF MOTOR 10 1 PARTS LABEL 11 32341075 1 S...

Page 7: ...DECAL 6 22075618 1 SHIPPING TAG 7 56276652 1 HOT SURFACE DECAL 8 1 MOTOR LABEL 9 30286686 1 ROTATION ARROW DECAL ON TOP OF MOTOR 10 1 PARTS LABEL 11 32341075 1 SAFETY LABEL 12 54499306 1 IR LOGO 13 3...

Page 8: ...one common downstream plant effective isolation valves must be fitted and controlled by work procedures so that one machine cannot accidently be pressurized over pressurized by another Compressed air...

Page 9: ...SON SELECT can be fed directly into a drainage system that has downstream sewerage treatment As waste water regulations vary by country and region it is the responsibility of the user to establish the...

Page 10: ...ONLY WHEN SWITCH IS MOUNTED UNDER PRESSURE AND VOLTAGE FREE 5 THIS SCHEMATIC APPLIES TO UNITS USING A COMBINATION PRESSURE SWITCH Three Phase Wiring CONTROL PANEL OPTIONS COIL POWER SUPPLY OPTION 1 TO...

Page 11: ...GENERAL INFORMATION 9 UP6RD 5 175 UP6RM 5 175 UP6RD 5 175 Three phase combination pressure switch Mains Motor 2 Nm Tightening torque Single phase combination pressure switch Mains Motor...

Page 12: ...INSTALLATION HANDLING 10 UP6RD 5 175 UP6RM 5 175 UP6RD 5 175 TYPICAL BASEPLATE MOUNTED COMPRESSOR mm Inches A 784 30 9 B 819 32 2 C 594 23 39 D E 335 13 19 F 614 24 2 G 12 0 472...

Page 13: ...TALLATION HANDLING 11 UP6RD 5 175 UP6RM 5 175 UP6RD 5 175 TYPICAL VERTICAL TANK MOUNTED COMPRESSOR mm Inches A 1769 69 7 B 813 32 01 C 404 15 91 D 649 25 6 E 404 15 91 F 678 26 7 G 14 2 x 22 0 56 x 0...

Page 14: ...is available for unloading and moving the compressor to the installation site NOTE Lifting equipment must be properly rated for the weight of the compressor CAUTION Lift the compressor by the shipping...

Page 15: ...nts DO NOT RUN THE COMPRESSOR WITHOUT REMOVING THE SHIPPING BLOCKS AND SHIPPING SCREWS A Shipping screws both ends 2 B Wooden shipping blocks 2 LOCATION IN THE PLANT WARNING FOR COMPRESSORS EQUIPPED W...

Page 16: ...ls not included in the list contact your dealer Materials Compatibility List Suitable VitonR TeflonR Epoxy Glass Filled Oil Resistant Alkyd Fluorosilicone Fluorocarbon Polysulfide 2 Component Urethane...

Page 17: ...165 150 40 NOTE If you use a petroleum based compressor lubricant at start up and decide to convert to ALL SEASON SELECT lubricant later the compressor valves must be thoroughly decarbonized and the...

Page 18: ...ting temperature S _C 0 40 S _F 32 104 Compressor RPM 1475 MOTOR Nominal power 5HP 3 7kW Speed RPM 3450 Enclosure NEMA1 Insulation class F Amps See spec label Starts per hour 6 GENERAL DATA Oil Sump c...

Page 19: ...e valve fully The air receiver will fill to cut out pressure and the motor will stop The unit is now ready for use NORMAL START UP 1 Set the pressure switch lever or control panel knob to OFF 2 Close...

Page 20: ...crewing the four screws holding the control panel The pressure switch cover can be removed by unscrewing the two screws holding the cover Pressure switch adjustment The compressor package will cut in...

Page 21: ...all pressure is vented from the system and that the machine cannot be started accidentally Ensure that maintenance personnel are adequately trained competent and have read the Maintenance Manuals Prio...

Page 22: ...d sheave are aligned and belt tension is satisfactory after installing new belts or tensioning existing belts FILTER REPLACEMENT 1 Unscrew and remove the wing nut securing the filter housing to its ba...

Page 23: ...d clean it Remove any debris that may be in the strainer body before replacing the filter screen 5 Replace plug and tighten with wrench 6 When putting the Electric Drain Valve back into service press...

Page 24: ...motor pulley crankshaft drive belt tension and alignment Repair or replace as required 2 Drain existing lubricant and refill with proper lubricant 3 Check line voltage and upgrade lines as required Co...

Page 25: ...er with 180 grit flex hone Knocking or rattling 1 Loose beltwheel or motor pulley excessive end play in motor shaft or loose drive belts 2 Compressor valves leaky broken carbonized or loose 3 Carbon b...

Page 26: ...or electric service panel too small 3 Poor contact on motor terminals or starter connections 4 Improper starter overload heaters 5 Bad motor 1 Check line voltage and upgrade lines as required Contact...

Reviews: