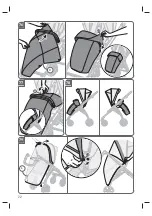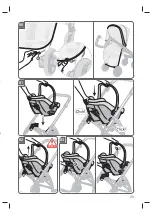
34
EN
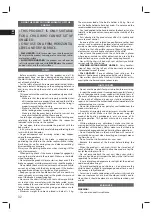
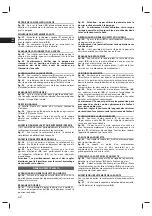
Handwash in cold water
Do not bleach
Do not tumble dry
Dry flat in shade
Do not iron
Do not dry clean
Do not spin-dry
• Dry the textile lining completely before using or storing it.
• To prevent formation of mildew, it is advisable to air the
carrycot periodically. In particular, separate the textile lining
from the structure and run a dry cloth over the bottom.
LIST OF COMPONENTS
fig. 1
ELECTA CHASSIS
A
Rear wheels
B
Front wheels assembly
ELECTA CARRYCOT
C
Hood lining
D
Carrycot apron
ELECTA STROLLER
E
Stroller seat
F
Handrail
G
Hood
ACCESSORIES
J
Feeding bottle holder
H
Storage basket
K
Muff (if available)
L
Rain cover (if available)
CAB 0+ / DARWIN INFANT i-SIZE CAR SEAT
(IF AVAILABLE)
STANDUP (IF AVAILABLE)
ELECTA CHASSIS
CHASSIS OPENING
fig. 2
Holding the lever (
T1
) down, lift the chassis firmly
until it opens completely.
fig. 3
Caution: ensure that all locking mechanisms
are properly engaged on both sides before use and that
none of the red indicators are visible.
ASSEMBLING/REMOVING THE REAR WHEELS
fig. 4
Insert the rear wheels (
A
) into the seats on the
chassis and push them until they click into place.
fig. 5
Caution: make sure that the wheels are properly
attached before use.
Should it be necessary, the rear wheels can easily be removed.
fig. 6
To remove the rear wheel (
A
) act on the lever (
A1
)
and at the same time extract it from its seat on the chassis.
REMOVING/ASSEMBLING THE FRONT WHEEL ASSEMBLY
Should it be necessary, both front wheel assemblies (
B
) can
easily be removed.
fig. 7
Pushing the small button (
B1
), pull the wheel
assembly out from its housing in the support.
fig. 8
To reinstall it, simply position it and push it until it
clicks into place.
fig. 9
Caution: make sure that the wheels are properly
attached before use.
CLOSING THE CHASSIS
fig. 10
Using both adjustment buttons (
T2
), bend the
handlebar to the lowest position.
fig. 11
Press the button (
T3
) and simultaneously rotate
the rear handle (
T4
) until the chassis closes completely.
Caution: always check that the chassis is closed correctly.
fig. 12
To transport the closed chassis, use the rear handle
(
T4
).
Never lift the chassis by the handlebar.
REAR WHEELS BRAKE
fig. 13
To operate the brake, press on the right lever (
T5
).
fig. 14
To release the brake, press on the left lever (
T6
).
Always engage the brake during stops.
fig. 15
Caution: never lift the brake action and release
levers, only press them.
BLOCKING/UNBLOCKING THE FRONT WHEELS
The chassis features swivel wheels.
fig. 16
To lock or unlock them make sure they are correctly
aligned, then operate the lever (
B2
) located on both front
wheel units.
ADJUSTING THE HANDLEBAR
The chassis is equipped with an adjustable handle.
fig. 17
Operate both buttons (
T2
) and simultaneously
raise or lower the handlebar to the desired position.
STORAGE BASKET
The chassis is equipped with a large storage basket (
H
),
which can be easily removed if necessary.
fig. 18
To remove the basket, undo the 4 snap fasteners
(
H1
) that secure it to the side tubes and detach the Velcro
flap (
H2
) from the spacer tube.
fig. 19
Remove the two rear hooks (
H3
) from their
corresponding seats.
fig. 20
Release both front Velcro flaps (
H4
) and pull them
off the chassis footboard, then remove the basket from the
small front hooks (
H5
).
To reinstall the basket, carry out the above operations in
reverse.
INSTRUCTIONS
T
T
Summary of Contents for ELECTA
Page 2: ......
Page 4: ...4 1 2 T1 B A H J K L E G D F C ...
Page 5: ...5 3 OK NO 4 A 5 6 A A1 7 B B1 CHECK ...
Page 6: ...6 11 9 8 10 T2 T3 T4 CHECK CHECK ...
Page 7: ...7 16 OK NO 15 12 13 14 OK GO NO NO STOP NO T4 T5 T6 B2 CHECK ...
Page 8: ...8 19 18 20 17 T2 H1 H2 H3 H5 H1 H4 H ...
Page 9: ...9 22 21 J1 J 24 23 OK NO C1 25 NO CHECK ...
Page 10: ...10 28 29 26 27 C C4 C3 C5 C2 C6 30 CHECK ...
Page 11: ...11 31 D 33 32 D1 34 35 C6 C7 ...
Page 12: ...12 40 39 OK NO C8 E C9 36 37 38 CHECK ...
Page 13: ...13 41 E2 42 43 NO 44 E1 CHECK ...
Page 14: ...14 48 OK NO NO 45 46 47 E3 ...
Page 15: ...15 49 E5 E6 E4 51 50 F F2 ...
Page 16: ...16 56 55 54 G1 G2 G3 G4 G 52 53 G F1 ...
Page 17: ...17 59 57 58 G4 62 60 61 CHECK ...
Page 18: ...18 66 E9 67 65 63 64 E7 E8 CHECK ...
Page 19: ...19 68 69 70 71 E10 E11 ...
Page 20: ...20 72 E12 E13 E12 73 E11 E14 E10 ...
Page 21: ...21 75 74 E13 E15 OK NO CHECK ...
Page 22: ...22 79 78 77 76 K K1 K2 L L1 ...
Page 23: ...23 80 L3 81 83 82 S1 CHECK ...
Page 170: ...170 ...


