37575-01I
I 7
recommended. Be certain the tip of the voice prosthesis, gel cap loading tool, pushrod, and your
hands are completely dry before beginning the following procedure. Failure to do so may cause the
gel cap to dissolve prematurely.
Before beginning the following procedure, remove the items from the kit that correspond in size to
your voice prosthesis, e.g., a 16 Fr. prosthesis uses the 16 Fr. gel caps and 16 Fr. pushrod.
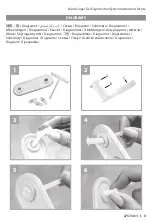
1. Insert the neck strap of the voice prosthesis (diagram 2c) into the appropriate size hole of the
dual gel cap loading tool on the side marked “top” (diagram 3). A 16 Fr. diameter prosthesis fits into
the 16 Fr.
hexagon
hole and a 20 Fr. diameter prosthesis fits into the 20 Fr.
round
hole.
2. Holding the neck strap, gently pull the prosthesis down and through the hole (diagram 4) until
the esophageal flange is positioned over the hole (diagram 5).
3. Grasping the body of the voice prosthesis at the base of the neck strap (diagram 2b), slowly and
gently pull the prosthesis (diagram 6) until the esophageal flange on the voice prosthesis begins
to fold forward inside the hole (diagram 7). Do not pull the prosthesis beyond this point. If the
prosthesis is over-pulled and releases from the gel cap loading tool, return to step 1.
4. From the gel cap container, remove the 16 Fr. or 20 Fr. gel cap that corresponds to the diameter
of your voice prosthesis. Discard the longer end of the capsule (diagram 8). Place the open end of
the gel cap in the hole of the loading tool with the folded flange of the prosthesis (diagram 9). The
gel cap should fit into the groove and cover the prosthesis tip. Verify that the gel cap is securely in
place.
5. Fully insert the appropriate-sized pushrod into the center of voice prosthesis at the base of the
neck strap. Place a finger on the tip of the gel cap to hold it in place while simultaneously pushing
the voice prosthesis from the bottom (diagram 10). Push gently until the folded esophageal flange
is fully positioned in the gel cap.
6. Remove your fingertip from the gel cap and push gently with the pushrod in the direction
indicated by the arrow in diagram 11.
7. Continue to push the prosthesis until it is completely out of the gel cap loading tool (diagram 12).
Hold the prosthesis at the base of the neck strap and remove the pushrod from the prosthesis.
The voice prosthesis is now fully loaded in the gel cap and ready for insertion in the usual manner.
Refer to the Instruction for Use Manual provided with your voice prosthesis for device insertion
instructions.
CLEANING AND CARE INSTRUCTIONS
Wash the dual gel cap loading tool and the pushrod thoroughly with a mild detergent and rinse
with water. Dry the devices with gauze or lint-free cloth. Never use facial or toilet tissue to dry
the dual gel cap loading tool, inserter, or voice prosthesis, as particles of lint or fabric could be
inhaled into the airway upon insertion of the prosthesis. Once the dual gel cap loading tool and the
pushrod have been cleaned and thoroughly dried, they may be stored in a clean, resealable plastic
bag.
SPECIAL STORAGE AND/OR HANDLING CONDITIONS
Only the gel caps packaged with the device have
special storage and/or handling conditions.
They must be
kept dry
and
out of direct sunlight.
DISPOSAL INSTRUCTIONS
This product is not biodegradable and must be considered contaminated upon use. Carefully
dispose of this device per local guidelines.
Blom‑Singer
®
Gel Cap Insertion System Instructions for Use


