Figure 2
Figure 2
Figure 3
Figure 3
Figure 5
Figure 5
Figure 6
Figure 6
Figure 7
Figure 7
Figure 8
Figure 8
Figure 10
Figure 10
Figure 9
Figure 9
Figure 4
Figure 4
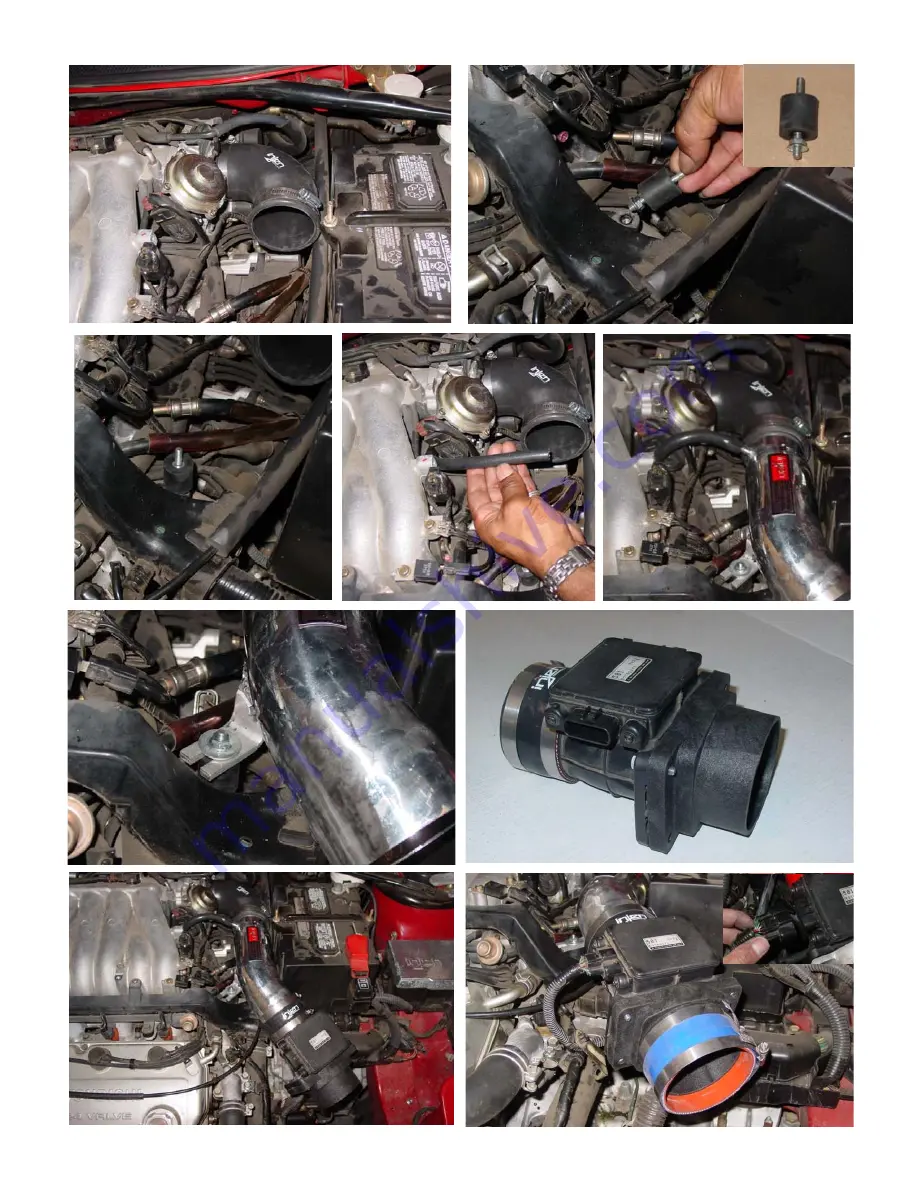
Press the 90 degree
Press the 90 degree
elbow over the throttle
elbow over the throttle
body. Use one clamp
body. Use one clamp
one each side of the
one each side of the
elbow.
elbow.
Remove the m6 bolt from the
Remove the m6 bolt from the
plastic harness cover.
plastic harness cover.
Screw the grey vibra-mount
Screw the grey vibra-mount
into the same pre-tapped hole.
into the same pre-tapped hole.
The m6 nut is screwed
The m6 nut is screwed
about 2/3 of the way.
about 2/3 of the way.
Shot of the vibra-
Shot of the vibra-
mount in place.
mount in place.
Remove the stock
Remove the stock
vacuum hose and
vacuum hose and
replace it with the
replace it with the
Injen 8mm nylon
Injen 8mm nylon
reinforced hose.
reinforced hose.
Press the reduced
Press the reduced
end on the intake
end on the intake
into the elbow.
into the elbow.
Press the other end
Press the other end
of the 8mm hose over
of the 8mm hose over
the 3/8” nipple on the
the 3/8” nipple on the
intake.
intake.
Set the bracket on the
Set the bracket on the
intake over the grey
intake over the grey
vibra-mount stud. Use
vibra-mount stud. Use
the m6 nut and fender
the m6 nut and fender
washer.
washer.
Press the 3 1/4” hose
Press the 3 1/4” hose
over the mass air
over the mass air
flow sensor and use
flow sensor and use
two large clamps.
two large clamps.
The specially designed
The specially designed
adapter with fins is
adapter with fins is
matched to the mass
matched to the mass
air flow sensor.
air flow sensor.
Use the m6 x m25
Use the m6 x m25
bolts in this kit to
bolts in this kit to
attach the adapter to
attach the adapter to
mass air sensor.
mass air sensor.
The assembled mass
The assembled mass
air flow sensor is
air flow sensor is
pressed on the end
pressed on the end
of the primary intake.
of the primary intake.
Press the 3 1/2” hose
Press the 3 1/2” hose
over the end of the
over the end of the
composite adapter,
composite adapter,
use two large clamps.
use two large clamps.
Press the harness clip
Press the harness clip
over the mass air
over the mass air
sensor.
sensor.
<<<<<
<<<<<
<<<<<
<<<<<
<<<<<
<<<<<
<<<<
<<<<
<<<<<
<<<<<
<<<<<
<<<<<
<<<<<
<<<<<
<<<<<
<<<<<
<<<<<
<<<<<
<<<<<
<<<<<
<<<<<
<<<<<
<<<<<
<<<<<


