[6.1.3] Filter Replacement
The filters do not substantially affect smoke performance even
when up to 90% of the filter is clogged. Quarterly visual inspec-
tion usually suffices to determine whether the filters should be
replaced because only a high percentage of contamination affects
performance. If further testing is required, compare differential
pressure readings with and without the filters installed. If the
difference exceeds 10% replace the filters. In no case should the
pressure differential fall below 0.03 inches of water.
[6.2] Standby, Alarm, And Sensitivity Tests
[6.2.1] Standby And Trouble
Standby —
Look for the presence of the flashing green LED
through the transparent housing cover. The LED
should flash approximately every 10 seconds.
Trouble —
If the detector LED does not flash, then the
detector lacks power (check wiring, panel, or
power supply), the detector board is missing
(replace), the cover has been missing or not se-
cured properly for more than 7 minutes (secure
cover properly), or the unit is defective (return
for repair).
Test —
The trouble condition can be caused intentionally
to verify correct operation of the system. Remove
the detector board to cause a trouble condition
locally and at the system control panel.
Cover Tamper — If the cover is removed or not properly secured
for a period longer than 7 minutes, a trouble sig-
nal is generated to indicate the cover is missing.
[6.2.2] Alarm Tests
[6.2.2.1] M02-04-00 Magnet Test
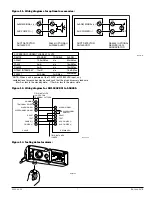
1. Place the painted surface of the magnet onto the TEST locator
on the bottom of the housing (
Figure 13
).
2. The red alarm LED on the detector should latch on, as should
any accessories (i.e. RA400Z, RTS451). Verify system control
panel alarm status and control panel execution of all intended
auxiliary functions (i.e. fan shutdown, damper control, etc.).
3. The detector must be reset by system control panel, front
cover reset button, or remote accessory.[6.2.2.2] RTS451/RTS-
451KEY Remote Test Station
The RTS451/RTS451KEY Remote Test Station facilitates test of the
alarm capability of the duct smoke detector as indicated in the
RTS451/RTS451KEY manual. The DH100ACDCI duct smoke detec-
tor can be reset by the RTS451/RTS451KEY. If a system control
panel is used, the panel itself may also require testing.
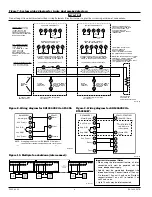
To install the RTS451/RTS451KEY, connect the device as shown in
Figure 9
; wire runs must be limited to 25 ohms or less per inter-
connecting wire.
Please note that the magnetic coil supplied with the RTS451
and RTS451KEY is not required when these accessories are
used with the DH100ACDCI detectors.
The functionality of the
magnetic coil has been designed into the circuitry of the new In-
novair™ duct smoke detectors.
[6.2.2.3] SSK451 Multi-Signaling Accessory
The System Sensor SSK451 Multi-Signaling accessory combines
a sounder feature with a key activated test and reset function.
Green, amber, and red LEDs provide a visual indication of power,
trouble, and alarm respectively. An optional strobe (PS24LO) with
a smoke lens can be added to conform to the codes of certain
jurisdictions.
To install the SSK451, connect the device as shown in
Figure 12
.
[6.2.3] Sensitivity Tests
[6.2.3.1] MOD400 or MOD400R Test
After verification of alarm capability, use the MOD400R test mod-
ule with a voltmeter to check detector sensitivity as indicated in
the test module’s manual. The housing cover must be removed to
perform this test.
If test module readings indicate that the detector head is outside of
the acceptable range that is printed on the label of the detector, the
detector chamber requires cleaning per Section [7] of this manual.
[7] Detector Cleaning Procedures
Notify the proper authorities that the smoke detector system is
undergoing maintenance, and that the system will temporarily be
out of service. Disable the zone or system undergoing mainte-
nance to prevent unwanted alarms and possible dispatch of the
fire department.
[7.1] Air Filters
1. Turn off power to the system.
2. Remove and inspect sampling tube filters.
3. If filters are heavily coated with dirt, replace them with new
filters. If they are not heavily coated, use a vacuum cleaner or
compressed air nozzle to remove dust, then reinstall the filters.
[7.2] Ion Detector Boards
1. Brush or vacuum inside area of cover. Chamber may then be
blown out using clean, compressed air.
2. Vacuum sensing chamber before using clean, compressed air
to loosen and blow out any remaining debris.
[8.0] Board Replacement
[8.1] Detector Board Replacement (part no. A5052)
1. Remove the two detector board mounting screws.
2. Pull gently on the board to remove it.
3. To replace the board, align the board mounting features, holes,
and the interconnect terminals. Push the board into place.
4. Secure board with the two mounting screws.
[8.2] Power Board replacement (part no. A5064)
1. Disconnect wiring from the terminal block.
2. Remove the two power board mounting screws.
3. Pull gently on the board to remove it.
4. To replace the board, align the board mounting features, holes,
and the interconnect terminals. Push the board into place.
5. Secure board with the two mounting screws.
6. Re-connect wiring to terminal block.
D100-68-00
5
I56-1684-007R


