background image

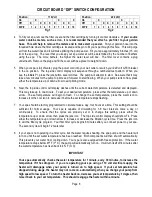
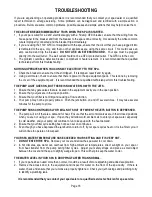
CIRCUIT BOARD “DIP” SWITCH CONFIGURATION 


Position 

110 Volt 


Position 

220 Volt 


On 


X   

On 


Off 


X  X  X  X 


X  X 


Off 


X  X  X  X 


X  X  X 


DIP # 

1  2  3  4  5  6  7  8  9  10   

DIP # 

1  2  3  4  5  6  7  8  9  10 

                                             Fig 1                                                                                    Fig 2 

 
4  To fill your spa, remove the filter cover and the filter cartridge by turning it counter clockwise.  

If your source 

water  contains  metals,  such  as  iron,  it  is  recommended  that  you  attach  a  pre  filter  to  your  garden 
hose.  This will help to remove the metals and to make start up easier.  

Put your garden hose into the 

threaded hole where the filter cartridge is located and begin to fill your spa through this hole.  This will purge 
air from the water lines and it will make priming the pump easier.  Fill your spa approximately 6 inches (15 cm) 
from the spa top.  The level that you keep your spa water at will be determined by the number  of bathers 

using  the  spa.    The  more  bathers,  the  higher  the  water  level  will  rise.    The  filter  cover  contains  a  plug 
underneath.  Remove the plug and fill the cover with pea gravel to weight it down. 

 
5  When your spa is full of water, plug the power cord into your wall outlet or switch your 220 volt GFCI breaker 

to the on position.  The top side control display will sequence through a numbered test pattern.  When you 
see the initials Pr, press the jets button several times.  The pump will attempt to start.  Be aware that it may 

take a few minutes for the pump to prime and for water to start flowing.  When your pump starts to flow, press 
either the temperature up or down arrow to exit priming mode. 

 
6  Next, the top side control will display dashes until the current water temperature is detected and displayed.  

This may take up to one minute.  To set your desired temperature, press either the temperature up or down 
arrow.    The  set  temperature  will  begin  to  flash.    To  change  the  set  temperature,  press  the  warm  icon  to 
increase it or the cool icon to decrease it before the set temperature stops flashing. 

 
7  Your spa should be factory programmed to circulate twice a day, four hours at a time.  This setting should be 

sufficient  for  normal  usage.    Your  spa  is  capable  of  circulating  for  1-8  hour  intervals,  twice  a  day,  or 
continuously.    To  ensure  that  the  cycles  are  properly  set  or  to  change  this  setting,  press  either  the 
temperature up or down arrow, then press the jets icon.   The top side control display should show F4.  Press 
either the temperature up or down arrow to increase or decrease the filtration cycle time.  Press the jets icon 

to exit the filter cycle program.  Your first filter cycle begins 6 minutes after you connect power to your spa.  
The second cycle will begin 12 hours later. 

 
8


If your spa is not operating in a filter cycle, but the water requires heating, the spa pump and the heater will 
turn on until the set water temperature has been reached.  Both components will then shut off automatically.  
This prevents your water from cooling down.  Your spa is also equipped with freeze protection.  If the water 
temperature drops below 45

F (7

0

 C), the pump will automatically turn on.  It will turn itself off 4 minutes after 

the water temperature has risen back to 45

F (7

0

 C). 


IMPORTANT 


Your spa automatically checks the water temperature for 1 minute, every 30 minutes, to increase the 
temperature if it has dropped.  If you  are  operating  your spa using a 110  volt electrical supply, the 

heater  will  disengage  when  your  pump  is  turned  on  to  high  speed.    If  your  set  temperature  has 
dropped during usage, the heater may not come on, automatically, when you change your pump from 
high speed to low speed.  To turn the heater back on, decrease your set temperature by 1 degree, then 
raise it back to your set temperature.  This should reengage the heater within a minute. 


Page 8 

Summary of Contents for Urbania Standard 110

Page 1: ...OWNER S MANUAL STANDARD 110 PREMIUM 110 TURBO 220 Manufactured by InnovaSpa 1 819 850 0408 www innovaspa ca www innovaspa com ...

Page 2: ...S 6 INSTALLATION QUICK START UP GUIDE 7 8 OZONE GENERATOR INSTALLATION 9 PERSISTENT MEMORY RESET 9 OPERATING THE SPA CONTROLS 10 ROUTINE MAINTENANCE 11 WINTERIZING YOUR SPA 12 UNDERSTANDING SPA CHEMICALS 13 14 15 TROUBLESHOOTING 16 DIAGNOSTIC MESSAGES 17 COMPONENT IDENTIFICATION 18 WARRANTY 19 Page 2 ...

Page 3: ... access by children to pools or hot tubs Be sure to check with your local agencies for specific requirements WARNING SOAKING IN HOT WATER DURING PREGNANCY MAY CAUSE DAMAGE TO THE FETUS CONSULT YOUR PHYSICIAN BEFORE USE PREVENT DROWNING SPA HEAT SPEEDS UP THE EFFECTS OF ALCOHOL DRUGS OR MEDICATION AND CAN LEAD TO LOSS OF CONSCIOUSNESS IMMEDIATELY LEAVE SPA IF UNCOMFORTABLE OR SLEEPY PREVENT CHILD D...

Page 4: ... 70 1993 The disconnect must be readily accessible and visible to the spa occupant but installed at least 5 feet 1 5 m from the spa water To Reduce The Risk of Injury 1 The water in a spa should never exceed 104O F 40O C Water temperatures between 100O F 38O C and 104O F 40O C are considered safe for a healthy adult Lower water temperatures are recommended for young children and when spa use excee...

Page 5: ...UVE DE RELAXATION NI QUAND ON S Y TROUVE WARNING The use of alcohol or drugs can greatly increase the risk of fatal hyperthermia in spas and hot tubs AVERTISSEMENT LA CONSOMMATION D ALCOOL OU DE DROGUE AUGMENTE CONSIDERABLEMENT LES RISQUES D HYPERTHERMIE MORTELLE DANS UNE CUVE DE RELAXATION WARNING Pregnant or possibly pregnant women should consult a physician before using a spa or hot tub AVERTIS...

Page 6: ...s Chairs 2 2 2 Bench Seat Positions 3 3 3 Cool Down Seat 1 1 1 Jets Black Poly 13 Stainless Steel 13 21 Turbo 1 Drain Valve 1 1 1 Waterfall NA Cascade LED Cascade LED Lighting Standard Main LED Package LED Package Ozone Ready Ready Standard Structure Polyethylene One Piece Molded One Piece Molded One Piece Molded Insulation PU Foam Bagged PU Foam Bagged PU Foam Bagged Equipment Pack Balboa VS300L4...

Page 7: ...I s in the same circuit will cause nuisance tripping Replace a GFCI protected wall outlet with a regular outlet Do not plug the cord into your electrical outlet until you have completed Step 4 and your spa is full of water If you plan to operate your spa using a 220 volt electrical supply you will be required to install a 220 volt 50 amp GFCI breaker and to connect your spa to your GFCI breaker an...

Page 8: ...he set temperature will begin to flash To change the set temperature press the warm icon to increase it or the cool icon to decrease it before the set temperature stops flashing 7 Your spa should be factory programmed to circulate twice a day four hours at a time This setting should be sufficient for normal usage Your spa is capable of circulating for 1 8 hour intervals twice a day or continuously...

Page 9: ...ged Connect the longer piece of tubing to the barb connector on the ozone generator 7 Remove the front cover of the equipment pack by loosening the two screws at the top of the pack 8 Connect the electrical cord of the ozone generator to the female amp connector labeled J29 and located on the top right hand side of the circuit board 9 Secure the electrical cord into the cord restraints located on ...

Page 10: ...ntil they are completely off when the turbo jet is in its full open position By turning the valve clockwise the turbo jet intensity will decrease and the intensity of the therapy jets will increase again AIR CONTROL VALVES There are two air control valves located on the top of the spa beside the filter lid Each valve controls air flow to the therapy jets at each end of the spa By opening and closi...

Page 11: ...ur cartridges should last about two years MAIN DRAIN SUCTION FITTING Your spa contains a main drain to supply water to your pump It is equipped with a VGB compliant cover that is located in the foot well of your spa This cover traps hair and other large debris to prevent these contaminants from being sucked into the spa pump It is recommended that you remove the debris from the cover on a weekly b...

Page 12: ...our equipment is located 7 Loosen and remove the unions connected to the pump and to each end of the heater manifold and the bleed valve located on the front of the pump It is recommended that you hold the vacuum hose underneath the unions and the bleed valve as you are loosening them This will capture leaking water and prevent it from escaping into your spa cavity 8 Using your vacuum suck as much...

Page 13: ...ventive maintenance and water clarification When using any chemicals always refer to the manufacturer s recommendations for usage WATER BALANCE CHEMICALS Water balance chemicals are extremely important because they prevent your spa water from becoming acidic corrosive or alkaline scale forming This in turn prevents costly damage to your spa and its equipment There are four parameters that lend the...

Page 14: ...at can be filtered Clarifiers are positively charged ions When added to spa water they neutralize the negative charge of the micro particles and they allow them to clump together into larger particles that can be filtered out of the water If your spa water is properly balanced and your spa filter is functioning properly but you still have a cloudiness problem you should add a clarifier to your wat...

Page 15: ...orine or bromine Contact with these chemicals will leave gummy deposits in your spa Also Biguanide is not effective with heavy bather loads OZONE Ozone is a chemical that is produced onsite using an ozone generator It is injected directly into the spa water It is not an effective stand alone sanitizer because it has a very short life and it will not leave a measurable residual in spa water because...

Page 16: ...are located in the equipment cavity are in the open position 2 Ensure that your jets are in their open position 3 Ensure that your filter is not dirty and causing a flow restriction 4 Your pump may not be properly primed Push the jets button on and off several times It may take several minutes for the pump to prime THE PUMP RUNS CONTINUOUSLY OR WILL NOT SHUT OFF WHEN THE JETS BUTTON IS DEPRESSED 1...

Page 17: ...ear when the heater cools Sn Sensors are out of balance If alternating with spa temperature it may just be a temporary condition If flashing by itself spa is shut down If the problem persists contact your dealer or service organization HL A significant difference between temperature sensors has been detected This could indicate a flow problem Check water level in spa Refill if necessary If the wat...

Page 18: ...MB HV B 1016211 Ozone Generator Balboa UV 52468 01 Standard Light Sloan 701739 SAO NA LED Lights Sloan 701564 2 DLO REV D 701564 4 DLO XL REV E NA GFCI Cord Leviton 700 16593 15E NA Jets and Valves Waterway Plastics NA See Component for Part Number Waterfall InnovaPlas 600 600 NA Filter Pleatco Handle 1 MPT 4 3 4 x 9 3 4 PGS25 Unicel Handle 1 MPT 4 5 8 x 9 3 4 4CH 24 Filbur Handle 1 MPT 4 5 8 x 9 ...

Page 19: ... minor surface imperfections or pattern appearance 1 Year Parts Spa parts including the control head top side control pumps excluding pump seals ozone generator light housings jets and jet plumbing are warranted to be free of leaks and or defects for a period of one 1 year 1 Year Limited Labor Labor charges related to the repair or replacement of defective components as listed in the Parts section...

Reviews: