background image


Wiring 


2.1 

Main Gauge Wiring 


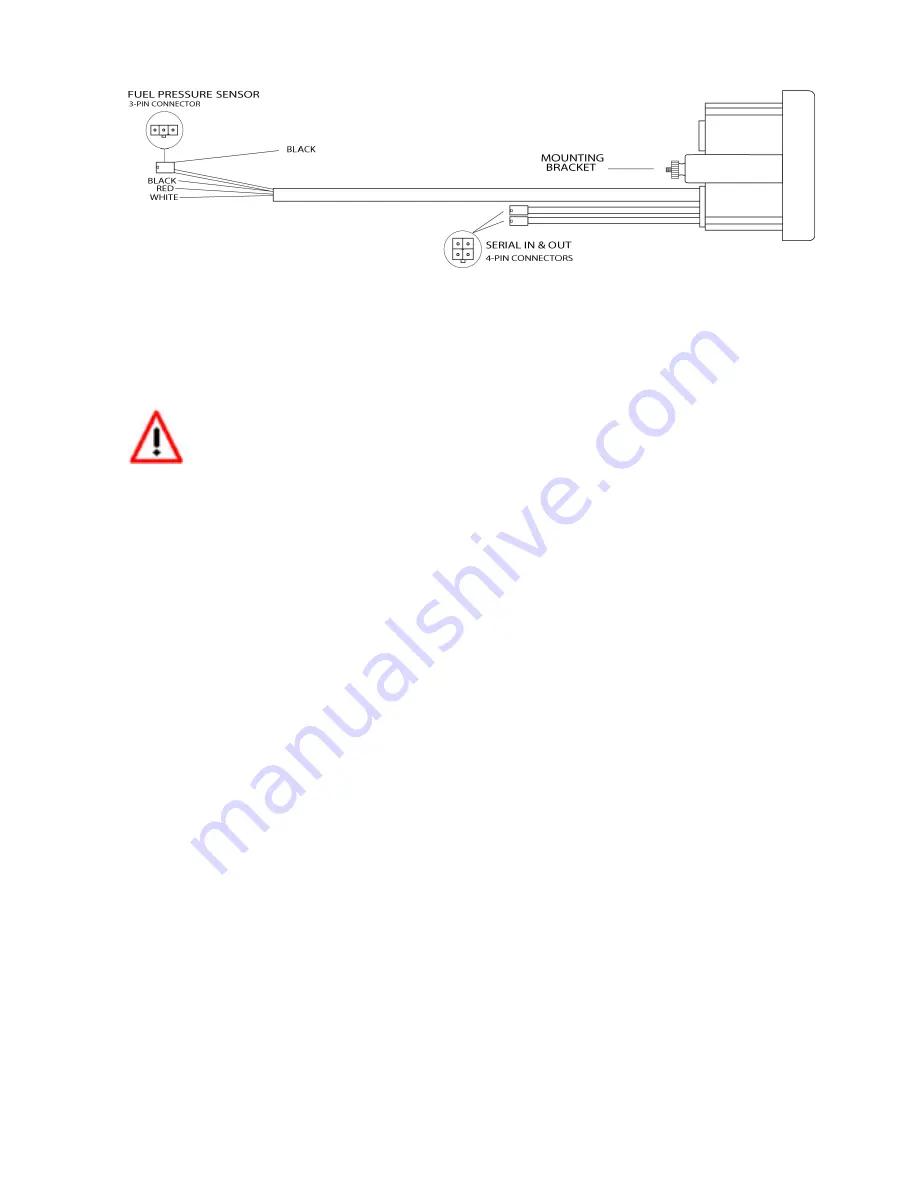
1.  Connect the RED wire to a switched 12V source. A switched 12V source 

comes ON as soon as the ignition on the car is keyed on. Make sure the 
connection is fused with a minimum fuse size of 2A. 

Circuits that share power with the vehicle’s stereo, ignition 

system, ECU or fuel pump should not be used.   


2.  Connect the main BLACK wire to a ground source. Note that there is an 

additional black wire coming out of the 3 pin connector, this is not the 
main gauge ground and will be covered later in the Fuel Pressure sensor 
wiring. Avoid noisy ground sources, such as grounds used for the radio 
and or ignition.  
 

3.  Connect the WHITE wire to a headlight power wire (a wire that supplies 

current when the headlights are on). This enables the display to dim for 
better nighttime viewing. DO NOT CONNECT THIS WIRE TO THE 
HEADLIGHT DIMMING WIRE. Connection to this rheostat type of switch 
will cause the gauge to malfunction. If you chose not to utilize the 
dimming feature, connect the WHITE wire to ground. 

2.2 

Fuel Pressure Sensor Wiring 


1.  Route the pressure sensor cable to the gauge and connect it to the 3 

pin connector.


2.  Coming out of the female three pin connector from the gauge you 

will find a black wire with a stripped end. Connect this black wire to 
the same ground source as the gauge.  

3.  Connect the other end of the pressure sensor cable to the fuel  

pressure transducer.  

Summary of Contents for MTX-A

Page 1: ...1 2 Fuel Pressure Sensor 2 2 Wiring 3 2 1 Main Gauge Wiring 3 2 2 Fuel Pressure Sensor Wiring 3 3 Download the Logworks 3 software package 4 3 1 Installing software 4 3 2 LM Programmer Software 4 3 2 1 Pressure Tab 5 3 2 2 Updating the Firmware 5 3 3 LogWorks Software 6 3 3 1 MTS Serial Communication 6 3 3 2 Logging data 7 Appendix A Limited Warranty 8 ...

Page 2: ...a pressurized source When replacing the bezel and or gauge face verify that the o ring is properly seated Make sure the mounting location does not impair visibility or interfere with driving 1 1 1 Changing the MTX A s Gauge Bezel 1 Lay the MTX A face down and remove the three 2 phillips screws from the outside rim of the back plate 2 Carefully lift out the bezel from the gauge cup 3 Configure the ...

Page 3: ...s used for the radio and or ignition 3 Connect the WHITE wire to a headlight power wire a wire that supplies current when the headlights are on This enables the display to dim for better nighttime viewing DO NOT CONNECT THIS WIRE TO THE HEADLIGHT DIMMING WIRE Connection to this rheostat type of switch will cause the gauge to malfunction If you chose not to utilize the dimming feature connect the W...

Page 4: ...orks3 3 2 LM Programmer Software LM Programmer is used to configure the pressure alarm and upgrade the firmware 1 Connect the OUT port of the MTX A to the provided serial programming cable Connect the other end of the serial programming cable to your computer If your computer does not have a serial port you can purchase a USB to Serial adapter from Innovate Motorsports P N 3733 or use any USB to s...

Page 5: ...irmware for the MTX A Fuel Pressure gauge has the extension dld New firmware releases are available for download on the Innovate Motorsports web site www tuneyourengine com under Support 1 Power OFF the MTX A gauge 2 Connect the supplied serial cable to the port labeled OUT 3 There should be nothing connected to the port labeled IN 4 Power ON the MTX A gauge 5 Connect the serial cable to your comp...

Page 6: ...ional gauges and sensors 3 3 1 MTS Serial Communication The MTX A gauge has a port labeled IN and a port labeled OUT These connections allow multiple MTS Modular Tuning System devices to be connected together in order to form a single log chain There are two types of cables used to interface the MTX A gauge The 3812 cable is a 4 pin micro fit to 2 5mm male stereo plug used The 3846 cable is a 4pin...

Page 7: ...ble to your computer If you are using a serial to USB adapter connect the serial cable to the adapter then connect the adapter to the computer 5 Launch LogWorks The LogWorks application can be launched from Start Programs LogWorks3 Logworks3 from the Windows task bar 6 Once LogWorks launches go to File Connect You will be prompted to connect to serial COM port Click Connect 7 To start recording go...

Page 8: ...th proof of purchase and the return material authorization form to the Innovate repair location as instructed by Customer Service Innovate within a reasonable amount of time from its receipt of your product so shipped will ship to you at its option the repaired product or a new or reconditioned product of comparable or greater specified functionality All repaired or replacement products shall be w...

Reviews: