background image

ELITE

 Installation guide 


Chapter 3:  Reference 

101 

Property management 

To edit tenant property management settings, click the 

Do

 button of the Elite main 

screen and then select 

Configure System

. In the next screen, click the name of the 

tenant you want to edit in the system tree (for example, 

Tenant 1

). Next, double-

click the 

Property Management

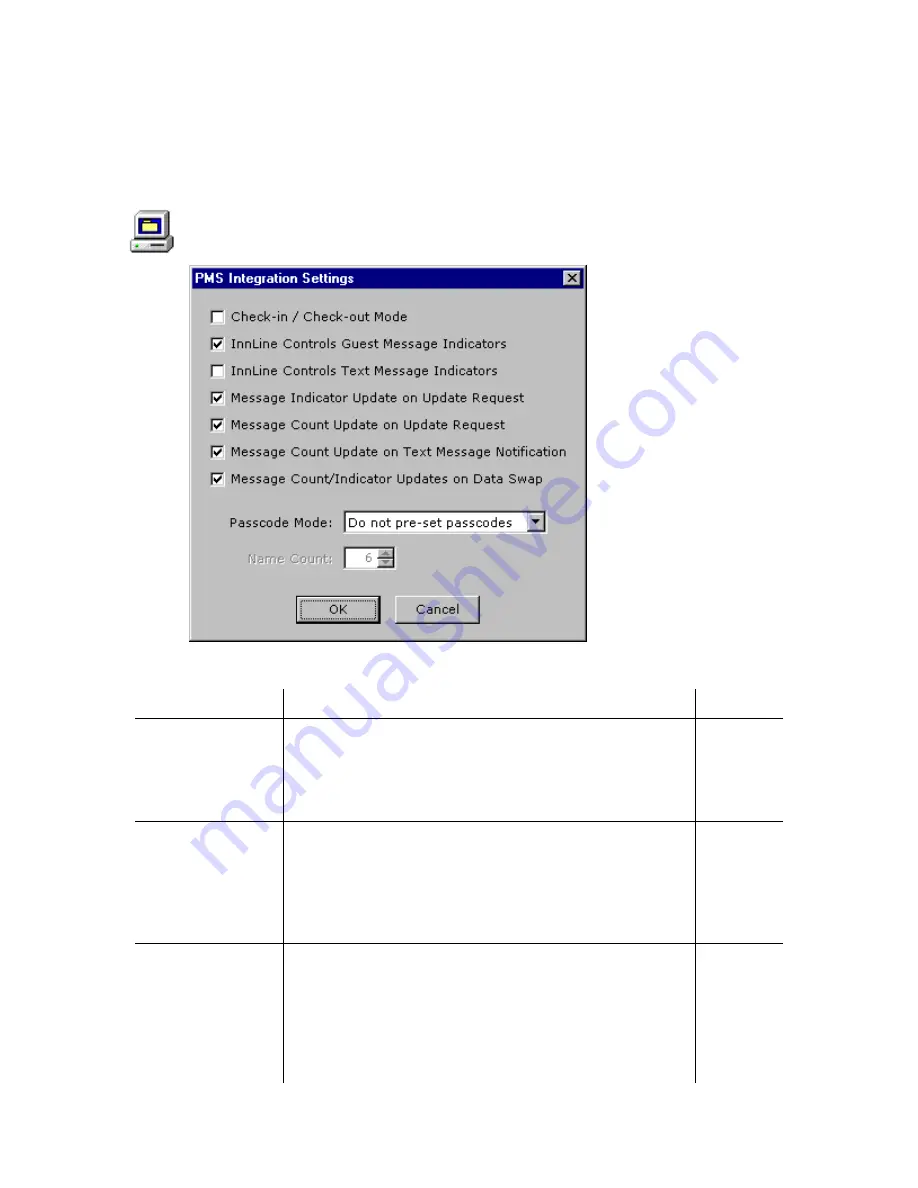
 icon, as shown at left. The following window 

appears. 


You can edit the following parameters in the PMS Integration Settings window. 

Parameter


Description


Default


Check-in/ 

Check-out Mode 

Check this box if the Elite system is interfaced to a Property 
Management System (PMS). Guest mailboxes will be in a 
“checked-out mode” when created. If the box is not 
checked, the system is in a non-PMS or “manual” mode. 
Guest mailboxes remain open or “checked in” all the time. 

Not 
checked 

InnLine Controls 

Guest Message 

Indicators 

Typically, InnLine controls guest message lamps. Some 
PMS companies want to control guest message lamps 
themselves. If this parameter is not checked, InnLine will 
not generate message waiting events to turn guest message 
lamps on or off. The PMS then controls the lamp, based on 
the message count update it receives from InnLine. 

Checked 

InnLine Controls 

Text Message 

Indicators 

Text messages reside in a property management system. 
Some PMS integrations will communicate the existence of 
text messages to Elite. If you check this box, Elite will turn 
on the message lamp if it receives a text message. If the box 
is not checked, the PBX controls the message lamp. If the 
PMS does not have a data link to the PBX, Elite will most 
likely control it. 

Not 
checked 

Summary of Contents for ELITE

Page 1: ...Voicemail Installation guide 1841 Bourbon Road Cross Plains Wisconsin 1 800 424 6757 www innovationtw com ...

Page 2: ... then press 1 at the menu prompt You can also visit our Web site www innovationtw com This manual is based on software release 3 0 is for informational use only and is subject to change without notice No part of this publication may be reproduced stored in a retrieval system or transmitted in any form or by any means electronic mechanical photocopying recording or otherwise without the express wri...

Page 3: ...dding staff mailboxes 25 Adding front desk mailboxes 27 Adding administration mailboxes 28 Checking your maximum mailbox number size 30 Defining the guest services class 31 Prompt administration 34 Using Elite s user interface to record prompts 34 Creating a Record Prompt mailbox for prompts 36 Translations 39 Adding translations individually 39 Adding multiple translations 40 Deleting translation...

Page 4: ...u remember to 76 Chapter 3 Reference 77 System housekeeping 78 System backup 79 System languages 80 System atomic clock 81 System service log 82 System prompts 82 Alerts 82 SNMP alerts 83 System alerts 83 COM port assignments 83 Voice ports 83 Voice port types 86 Device interfaces 89 Associated Tenant 91 Parameters 91 Echo Messages 91 Administrators 91 Tenants 92 Tenant information 92 General tena...

Page 5: ...hapter 4 Add on features 155 PrivateLine 156 Step 1 Configure PrivateLine settings 156 Step 2 Add a DID phone number for a guest 158 Step 3 Test the DID phone number routing 159 Step 4 Add the remaining DID phone numbers that guests will use 159 Step 5 Add DID phone numbers that staff members will use 160 Guest Other Phone Number function buttons 160 Step 6 Adjust the Guest Service Class 161 Step ...

Page 6: ...ELITE Installation guide Introduction vi ...

Page 7: ...hardware you configure the software for the installation site Elite is easy to modify for your own needs Chapter 2 explains what you can do Add mailboxes either one at a time or in groups Add and configure Automated Attendants Customize certain system prompts Configure automated guest services AGS menus Note Changes to an Elite system should only be attempted by qualified personnel Innovation beli...

Page 8: ...ELITE Installation guide Introduction viii ...

Page 9: ... Setting MWI dial strings if necessary Device interfaces If you re a certified dealer or telephone technician you can use the instructions in this chapter to install the hardware of the Elite voice messaging system You ll also set some hardware related parameters in the system software The installation procedures consist of the topics summarized at left Note Installation of the Elite system should...

Page 10: ... line cord Some PBX integrations require special wiring and terminations Check with the PBX installation guide that came with your system for further information Opening and verifying system components Before installing the system verify that all of the components are present With all systems you should find Elite computer UPS uninterruptible power system AC Power cords Software key HASP PS 2 Keyb...

Page 11: ...strap Failure to do so may damage Elite Connecting the AC power cords to the computer and plugging them in will provide a path to ground Verify that all cables and boards are seated properly In particular check All power connections from the power supply to the motherboard or passive back plane hard drive floppy drive and CD RW drive That all circuit boards are properly seated Reseat any boards th...

Page 12: ...rations of what the back of the system may look like based on the port size and or voice cards installed depending on the integration type Example 1 shows 2 four port D 41 voice cards Example 1 shows 2 four port D 41 voice cards Example 2 shows 1 eight port D 82U voice card Typically used in Mitel DNIC and Nortel integration s ...

Page 13: ... operation Flip both power supply toggle switches located on the back of the system to the on position Open the door to the system and flip the power toggle switch to the on position Verify that the following components are working The software begins to load on the monitor The CPU fan on the motherboard is turning The power supply fan is turning The fan s in the front section of the computer are ...

Page 14: ...Place the cover back on the Elite voice mail system Replace the thumbscrews to secure the cover Final connections Before configuring the system connect the software key HASP and the telephone line cords At this point refer to the PBX installation guide that came with this system to verify that your PBX is properly configured and programmed for this installation 1 Connect the software key HASP to t...

Page 15: ...beled L1 L8 L9 L12 or L16 and so on 4 Power up the system Flip the power toggle switch to the on position The Elite application will start1 The system is ready to accept calls when you see the screen in the following illustration 5 Call each voice mail extension to ensure that Elite answers each line Since no mailboxes have been programmed the system will answer with an automated attendant greetin...

Page 16: ...n a menu option to display the appropriate screen If a screen contains folders or icons double click them to open them If you click the Configure System option from the Do menu a list of options called the system tree appears on the left side of the window The bar at the top of the window displays your location in the system tree as shown in the previous illustration Watch the status bar at the bo...

Page 17: ...and installation date in the fields at the bottom of the window When you finish click the OK button to close the window and return to the System options screen as shown in the preceding illustration 3 Double click the Site Information icon and fill in details about the system Use the window that appears to enter basic information about the system s location such as the address phone and fax number...

Page 18: ... screen 5 Select the Tenant 1 option in the system tree and then double click the Tenant Information icon to fill in basic details about the tenant Use the window that appears to enter basic information about the tenant such as the address phone and fax number and contact information Fill in each field and then click the OK button Adding a system administrator Adding a system administrator is very...

Page 19: ... same password in the Password and Verify Password fields Click OK when you finish Note Administrator passwords are not case sensitive 3 Click the Do button again and select the Shutdown System option This step is needed to make the password protection active Otherwise it will become active after Elite s next system restart interval Choose Stop InnLine Voice Mail when ports are idle or Halt InnLin...

Page 20: ... voice ports The voice port integration type is pre programmed by Innovation before your system is shipped It s a good idea to verify that the correct port type was assigned to each port 1 Click the Do button of the Elite main screen and then select Configure System In the next screen click Voice Ports in the system tree 2 Double click the Port Wizard icon and then click Yes in the next window to ...

Page 21: ...n on the front of this manual 3 When you finish click OK to close the Wizard and save the settings to all ports Setting the Call ID format in band port types only If your PBX integrates to Elite via DTMF in band signaling you need to set the Call ID format Failure to do so can cause unnecessary pauses on direct calls to the voice mail or call integration from some stations to fail altogether 1 Cli...

Page 22: ...he largest extension programmed in your PBX 5 Examine the Covered Calls information in the Call ID tab The Type A Covered Call ID Format field shows 0 4d Again let s break down this format string 0 Prefix digit 4 Maximum length of extension Variable d Called party The string means that the system is expecting a 0 followed by a 4 digit extension of maximum length on covered calls This setting is fi...

Page 23: ...window 2 In the MWI tab enter the appropriate dial strings in both the Indicator On and Indicator Off sections In the Dial string Prefix fields enter the digits that need to be dialed before the extension In the Dial string Suffix fields enter the digits that need to be dialed after the extension rarely needed A comma represents a two second pause It s a good idea to include one comma before the d...

Page 24: ... of the Multi COM port cable and may be used for miscellaneous serial interfaces COM4 is part of the Multi COM port cable and is dedicated to any PBX serial interfaces COM5 is part of the Multi COM port cable and is dedicated to any PMS serial interfaces COM6 is part of the Multi COM port cable and may be used for miscellaneous serial interfaces COM7 is part of the Multi COM port cable and may be ...

Page 25: ...gh voltage typically a flickering green light for either TXD or RXD when data is being transmitted If there is no voltage no light for either TXD or RXD first check that the signal ground GND is connected through both connectors properly If either TXD or RXD is low but the other has no voltage you may need to reverse the wiring for TXD and RXD on a connector because there is a conflict If problems...

Page 26: ...ilboxes and other useful features You can set up mailboxes for guests staff the front desk and administrators After setting up mailboxes you can Add guest service classes which are groups of options that help guests use the voice mail system Administer prompts which are voice recordings used in the program Add translations which associate a PBX extension number with a mailbox of a different number...

Page 27: ...essage playback speed and skipping backward to a previous new or saved message Staff users can also configure their mailboxes for Call or Pager notification See Staff mailboxes in Chapter 3 for a complete list of staff mailbox settings Front Desk mailbox When this mailbox is accessed directly a front desk user is presented with a menu of administrative options Front desk users can set wake up call...

Page 28: ...rs to be routed to different mailboxes or mailbox IDs based on the time of day or a specified date You could route a caller to a different mailbox for every day of the week by linking multiple time branch mailboxes This mailbox can only be administered via the software s user interface Menu mailbox This specialized mailbox gives callers single digit choices to other mailboxes or mailbox IDs Caller...

Page 29: ...isconnected from the system without warning DIRECTORY When this mailbox ID is used the caller has access to the user directory The caller then follows prompt instructions to find an operant on the system LOGIN When this mailbox ID is used the caller will be asked to enter a mailbox number followed by a passcode AA and AA1 through AA9 When these mailbox IDs are used such as in a Reference mailbox o...

Page 30: ...lboxes Follow this procedure to add new guest mailboxes Before entering mailboxes it is a good idea to have a copy of the hotel s room numbering plan Adding mailboxes one at a time 1 Click the Do button of the Elite main screen and then select Configure System In the next screen click Guest in the system tree 2 Double click the New Mailbox icon as shown above 3 In the window that appears enter the...

Page 31: ...in the Extension 1 field For most users the extension is all the information you need to enter For information on what the other fields control and how to set them see Guest mailboxes in Chapter 3 4 Press Enter or click OK to finish creating the mailbox The guest mailbox you created is now displayed as an icon in the window 7101 in the illustration below ...

Page 32: ... Move the hand pointer to an empty area near the mailbox icon and right click again This time choose Paste from the menu 3 In the window that appears enter the mailbox s extension number and press Enter The new mailbox is added Most settings of the original mailbox will carry over to the mailbox being copied with a few exceptions To copy an existing mailbox and create multiple mailboxes simultaneo...

Page 33: ...If you need to delete all guest mailboxes and start over use the Delete Guest Mailboxes function See the Mailboxes section in Chapter 3 Adding staff mailboxes The following steps explain how to add new staff mailboxes The procedure is basically the same as entering guest mailboxes Before entering mailboxes it s a good idea to have a copy of the hotel s administrative extension list 1 Click the Do ...

Page 34: ... them see Staff mailboxes in Chapter 3 4 Press Enter or click OK to finish creating the mailbox The staff mailbox you created is now displayed as an icon in the window 1000 in the illustration below You can continue to add staff mailboxes one at a time If you need to add many staff mailboxes with similar settings use the Copy or Range Duplicate options explained in the previous section ...

Page 35: ...igure System In the next screen click Front Desk in the system tree 2 Double click the New Mailbox icon as shown in the previous illustration 3 In the next window that appears enter the front desk extension number then press Enter or click OK 4 In the next window that appears click the Front Desk tab Use this tab to control whether the front desk mailbox can reset a staff mailbox and reset a staff...

Page 36: ...see Front desk mailboxes in Chapter 3 Adding administration mailboxes You should add at least one administration mailbox to the system This mailbox will allow you to add change or delete guest staff and front desk mailboxes For example an administration mailbox may prove useful if you have to add a staff mailbox but you don t have immediate access to the system 1 Click the Do button of the Elite m...

Page 37: ...red mailbox number then press Enter or click OK The Administration Mailbox window appears 4 If the mailbox has no associated extension remove the number from the Extension field Enter a User Name and Group if necessary 5 Press Enter or click OK to finish creating the mailbox The administration mailbox you created is displayed as an icon in the window 8500 in the following illustration ...

Page 38: ...han necessary the system will be unable to detect mailboxes assigned higher numbers To check the maximum mailbox number size 1 Click the Do button of the Elite main screen and then select Configure System In the next screen click Tenant 1 in the system tree 2 Double click the General icon 3 In the window that appears adjust the value in the Maximum Mailbox Number Size field if needed The default v...

Page 39: ... Chapter 4 If you want all guests rooms to work the same there s no need to create more service classes You can use the Default service class for all guest mailboxes unless you have a service class with special requirements If you want some mailboxes to have a different AGS menu or outside callers to be routed to a different operator if zero is pressed during the guest s unavailable greeting you c...

Page 40: ...s will be used Either re enter the prompt letters entered in the Default service class which you can view by clicking the Default icon shown above or enter new letters and record your own prompts To do this see the next section Prompt administration 4 Press Enter or click OK to finish creating the guest service class 5 Click Guest in the system tree and then double click on a guest mailbox to chan...

Page 41: ...s you just created If you did not create a service class leave the setting at Default 7 Press Enter or click OK to save the change Note If you use the Range Duplicate command with this mailbox the duplicated mailboxes will be assigned to the same service class For details on duplicating mailboxes see Adding multiple mailboxes earlier in this chapter ...

Page 42: ...s You can use a telephone located near the system to record prompts Prompts that you can record have a field action button to the right of the prompt name as illustrated at left In the following example you will learn how to re record the GWAKEUP prompt 1 Click the Do button in the Elite main screen and then select Configure System In the next screen click Service Classes in the system tree 2 Doub...

Page 43: ...nter the extension or telephone4 number you want the system to call By default the last voice port is used to dial out but you can enter a new Voice port number or change it by clicking the up and down arrows 6 Answer the phone and say Hello voice activated 4 If entering a telephone number you must add 9 before the number ...

Page 44: ...n a 3 5 inch diskette you can click the Load button to transfer the file from diskette to the system Prompts must be recorded or converted using Dialogic OKI ADPCM format at 32 KPS kilobits per second If you want to stay in this screen but disconnect the system from the phone click the Hang up button 9 Click the Done button to close the window Creating a Record Prompt mailbox for prompts Since eve...

Page 45: ...r features 37 2 Double click the New Mailbox icon as shown in the following illustration 3 Select the Record Prompt option in the list and then press Enter or click OK 4 Enter the mailbox ID in the next window and click OK The following window appears ...

Page 46: ... a generic recording called RECNEW which plays an instructional prompt before taking the user to a record tone The Next Mailbox field allows you to send the mailbox user elsewhere after the prompt recording is complete AA for example If you leave the field blank the system hangs up after the user presses 1 to accept the recording Click on the field action button for the Prompt to Re record field a...

Page 47: ...ul when each guest room has two extensions one for voice and one for data for example but the guest can try to call voice mail from either extension You can add translations one at a time or in groups as explained in the following sections Adding translations individually 1 Click the Do button of the Elite main screen and then select Configure System In the next screen click Port Types in the syst...

Page 48: ...Enter or click OK to finish adding the translation Adding multiple translations 1 Open the Port Type window and click the Translations tab as explained in the previous section 2 Right click on the white space of the Translations tab and select the New Translation Range command as shown in the previous illustration 3 Enter the beginning and ending extensions of the range you want to translate ...

Page 49: ...of the Port Type window right click on the translation you want to remove and select the Delete command from the resulting menu 2 At the resulting prompt press Enter or click Yes to delete the translation 3 To remove a range of translations click on the first translation you want to remove Hold down the Shift key and then define the range by clicking the last translation you want to remove Press t...

Page 50: ...ey during message review The following section explains how to set up an automated guest service AGS menu For an explanation of each guest service see Guest services menus in Chapter 3 1 Click the Do button of the Elite main screen and then select Configure System In the next screen click Guest Services Menus in the system tree 2 Double click the Menu 1 icon The following window appears ...

Page 51: ...mouse Double click an Empty listing in the Guest Services menu and choose the guest service from the list in the next window The example in the following illustration shows a basic Guest Services setup It s advisable to program Return to Voice Mail as the final option in the menu which allows the guest to go back to the message review portion of the mailbox The following illustration shows a sligh...

Page 52: ... service once assigned to the Guest Services menu will make the following window appear If the phone number to which you re connecting is a restaurant for example you should record Open and Closed prompts The Open prompt could be recorded to simply say Please hold while we connect your call The Closed prompt could state the times that the establishment is open ...

Page 53: ...box next to AGS Menu and choose the menu you just created Next click the check box to activate it Click OK when you finish Automated attendants Elite s automated attendant can be used to answer calls6 for a property full time or on an operator overflow basis Callers can enter the extension of their choice or press an advertised digit for a department e g reservations sales or a particular service ...

Page 54: ...pt administration section earlier in this chapter Automated attendant example In the following example you will build a three option auto attendant menu which will also allow callers to transfer to guest rooms First you need to write a script of what you want to play to outside callers Thank you for calling the Grand Plaza Hotel To reach a guest enter 7 plus the room number To reach a hotel staff ...

Page 55: ... in the Greeting Prompt field of the Automated Attendant window 2 In the next window click the Dial button Next enter the Dial extension number you want the system to call then answer the phone and say Hello 3 Type the first part of your script in the Script field 4 Click the Record button wait for the tone and then record your message Press any touch tone key to end your recording 5 Click the Pla...

Page 56: ...ntify mailboxes in the Key Mailbox fields with alphabetical characters as opposed to numeric ones Using alphabetical characters to identify mailboxes gives the installer or system administrator a better idea of each Key Mailbox s function at first glance To create the Directions mailbox 1 Click OK to close the Automated Attendant window then click Other in the system tree and double click the New ...

Page 57: ... option in the Select New Mailbox Type window and then click OK 3 In the next window enter the word DIRECTIONS as the mailbox ID and then click OK The following window appears Now you need to write a script for a prompt that explains the direction choices 4 Enter a file name e g AA1SUB1D in the Menu Prompt field and then click the button next to the field 5 In the Script field of the next window e...

Page 58: ...ext reference the mailboxes in the three selections just advertised Again use alphabetical characters to identify the mailboxes Enter AIRPORT in the Key 1 Mailbox field and DOWNTOWN in the Key 2 Mailbox field Enter DIRECTIONS in the Key Mailbox field This is how you can repeat the Menu prompt to the caller ...

Page 59: ...ect New Mailbox Type window and then click OK 3 In the next window enter AIRPORT as the mailbox ID and click OK 4 Enter a file name in the Prompt field and click the field action button to type the script and record the prompt Click Done when you finish The script is shown in the following illustration Directions for recording are the same as explained earlier in this procedure 5 In the Next Mailb...

Page 60: ...ing window appears 4 In the Extension field enter the number to which you want callers to transfer and click OK 5 Follow the immediately preceding steps 1 through 4 to create an Extension mailbox for SALES This mailbox is referenced in the Key 3 Mailbox field of the Attendant 1 screen InnConnect InnConnect is a call forwarding or routing feature for Elite Guests can configure their mailboxes to gi...

Page 61: ...ff and guests Parameters Description Default Connecting Hold Prompt This prompt is played to a caller when attempting to connect with a guest or staff member pre recorded music SCFHOLD GCFHOLD Forwarding Announcement Announcement that is played to a staff member or guest receiving a forwarded call This is a call forwarding from the InnLine message system or This is a call forwarding from the hotel...

Page 62: ...st s service class will determine if AGS is enabled and which Menu 1 through 9 is in use 2 Find the guest service labeled Configure Call Forwarding and drag it to an available Empty button press 3 Next double click Configure Call Forwarding The following introduction prompts are presented to the guest the first time this service is accessed Parameters Description Default Introduction 1 Prompt This...

Page 63: ...through 9 is in use Check the box labeled Call Forwarding The call forwarding prompts GCFINTRO and GCBUY will be offered to the guest as in automated guest services Step 4 Enable InnConnect for selected staff members If staff mailboxes will be allowed to use this feature it must be enabled by the system administrator It is enabled on an individual mailbox basis or by using one of the staff templat...

Page 64: ...e When a caller chooses to reach a guest or staff members cellular phone another voice port is required to go off hook and dial the number The system can do simultaneous call forwards but for this to happen more than one outdial port must be configured Please keep these facts in mind For each call forward two voice ports are used The first port has the caller while the second port configured for o...

Page 65: ...to flow through this interface before reaching the call accounting system This interface uses two COM ports even if you are running InnCharge co resident with Elite How the SMDR Filter interface works When an InnConnect call is completed the PBX s SMDR record shows that the voice mail extension called the telephone number The SMDR filter modifies this record replacing the voice mail extension numb...

Page 66: ...t new SMDR formats can be added as needed Reports Elite s reports can be generated on demand from a front desk mailbox or via the software s user interface In addition reports can also be generated automatically at the same time each day They are typically sent to a fax machine although the system can be configured to send them to a printer or e mail them The following sections explain how to prin...

Page 67: ...re System In the next screen click Tenant 1 in the system tree 2 Double click the Reports icon and click the Delivery Methods tab The following window appears 3 Select a Delivery Method Reports may be faxed emailed or printed to a local or network printer If all delivery methods are selected the system will perform all three fax email and print If the fax machine you want to fax reports to is conn...

Page 68: ...to select the time 4 Click the Add button The report is added to the list of scheduled reports in the Report Settings window If you want to delete a scheduled report select it in the Report Settings window and then click the Clear button Report examples You can print the following reports with the Elite voice messaging system Active Guest report Wake up Call report Phone Number Status Phone Number...

Page 69: ...t report lists all active guest mailboxes A C T I V E G U E S T R E P O R T Tenant 1 05 26 2006 8 26a Lists all active guest mailboxes Active guest mailboxes are those that are checked in have guest information assigned have new or saved messages or have a pending wake up call associated with them Mailbox Guest Name 7101 GRAY KENT 7102 HUFFMAN JOHN 7103 CONRAD TED 7105 CLOSE MARGARET 7106 FRANK BO...

Page 70: ...ANSWER 3 05 21 06 00 104 05 21 09 00 21 NO ANSWER 1 05 21 09 00 104 05 21 09 05 22 NO ANSWER 2 05 21 09 00 104 05 21 09 10 21 NO ANSWER 3 05 21 09 00 P E N D I N G W A K E U P C A L L S When Mailbox Attempt Reoccurs Daily 05 22 06 00 101 1 Yes 05 22 09 00 104 1 Yes Summary Calls Set 0 Calls Cleared 0 Calls Snoozed 0 Calls Reoccuring Daily 2 Calls Attempted 6 Calls Pending 2 The following report pr...

Page 71: ...information about mailbox status guest name new and saved messages and whether any wake up calls are currently set Mailbox Status Guest Name New Saved Wake up Calls 7101 Checked In GRAY KENT 0 0 05 19 06 00 7102 Checked In HUFFMAN JOHN 1 0 7103 Checked In CONRAD TED 0 0 7104 Checked Out 0 0 7105 Checked In CLOSE MARGARET 1 3 05 18 09 00 7106 Checked In FRANK BOB 4 3 05 19 05 30 05 19 07 30 7107 Ch...

Page 72: ...ered to 225 from 202 05 18 09 25 Message 10202 deleted 05 18 09 32 Access of STAFF mailbox successful 05 18 09 46 Access of STAFF mailbox successful 05 18 11 24 Access of STAFF mailbox successful no passcode entry 05 18 11 42 Access of STAFF mailbox successful no passcode entry 05 18 11 54 Access of STAFF mailbox successful 05 18 12 39 Message 10400 recorded for 202 by UNKNOWN 05 18 12 39 Message ...

Page 73: ...g of guest room status codes by maids and inspectors as to the condition of the guest rooms H I S T O R Y Mailbox When Code Description 7100 05 18 15 30 15 1 STATUS SET 7100 05 18 15 32 41 0 FAILED INVALID STATUS CODE 7100 05 18 15 33 05 2 STATUS SET 7100 05 18 15 33 20 9 FAILED INVALID STATUS CODE 7101 05 18 16 01 01 2 STATUS SET C U R R E N T S T A T U S Mailbox Status When Set 7100 2 05 18 15 3...

Page 74: ... saved messages whether or not name N and greeting G recordings have been set time and date of last log in and whether or not the mailbox has been initialized for a new user Mailbox Staff Name Directory Code New Saved N G Last Log in 202 0 0 N N 04 08 16 45 400 0 0 N N NEVER 401 0 0 N N NEVER 402 8745 0 0 Y N 04 08 11 04 403 0 0 Y Y 04 08 10 30 404 0 0 Y Y 04 08 10 21 405 0 0 Y N 04 08 10 29 406 C...

Page 75: ...T D Duration Wake up 0 0 0 0 sec call Notification 0 39 111 60 sec call MWI Total Failed 0 0 0 0 0 0 0 0 sec call Wake up Set 0 0 0 0 sec call Wake up Cancel 0 0 0 0 sec call DID Route 1 1 11 7 sec call DID Cancel Route 0 0 0 0 sec call Loop back 0 0 0 0 sec call Call Forward Test 0 0 0 0 sec call Call Forward Call 5 9 114 50 sec call Total 6 49 236 I N B O U N D C A L L S Average Total Today Tota...

Page 76: ...uide Chapter 2 Mailboxes other features 68 7 D A Y H O U R L Y C A L L V O L U M E C H A R T 0 21 43 64 86 WED 12AM 05 12 3AM 6AM 9AM 12PM 3PM 6PM 9PM THU 12AM 05 13 3AM 6AM 9AM 12PM 3PM 6PM 9PM FRI 12AM 05 14 3AM 6AM 9AM ...

Page 77: ...ELITE Installation guide Chapter 2 Mailboxes other features 69 12PM 3PM 6PM 9PM SAT 12AM 05 15 3AM 6AM 9AM 12PM 3PM 6PM 9PM SUN 12AM 05 16 3AM 6AM 9AM 12PM 3PM 6PM 9PM ...

Page 78: ...ELITE Installation guide Chapter 2 Mailboxes other features 70 MON 12AM 05 17 3AM 6AM 9AM 12PM 3PM 6PM 9PM TUE 12AM 05 18 3AM 6AM 9AM 12PM 3PM 6PM 9PM ...

Page 79: ...cessful 05 19 09 36 57 Voice message 10015 recorded for 400 by 403 digit max size 05 19 09 37 02 Voice message 10015 delivered to 400 from 403 05 19 09 37 14 Access of STAFF mailbox 400 failed passcode 111 05 19 09 37 20 Access of STAFF mailbox 400 failed passcode 6969 05 19 09 37 25 Access of STAFF mailbox 400 failed passcode 9876 05 19 09 38 29 Access of GUEST mailbox 102 successful no passcode ...

Page 80: ...O ANSWER 1910 1016 1 11 05 19 05 00 28 COVER NO ANSWER 1910 1016 1 11 05 19 05 05 28 COVER NO ANSWER 1911 1016 1 11 05 19 05 07 00 COVER NO ANSWER 1621 1919 1 11 05 19 05 31 46 DIRECT 1312 1 11 05 19 05 49 02 COVER NO ANSWER 1307 1919 1 11 05 19 05 50 31 DIRECT 332 1 11 05 19 05 56 55 COVER NO ANSWER 5072885732 1502 1 11 05 19 06 17 39 COVER NO ANSWER 1509 1919 1 11 05 19 06 26 32 COVER NO ANSWER ...

Page 81: ...373 1 11 05 19 08 19 04 OTHER 1 11 05 19 08 21 03 COVER NO ANSWER 6123336263 368 1 11 05 19 08 24 20 DIRECT 337 1 11 05 19 08 24 43 DIRECT 338 2 11 05 19 08 25 16 COVER NO ANSWER 300 368 3 11 05 19 08 25 28 COVER NO ANSWER 1912 2721 3 11 05 19 08 25 43 COVER NO ANSWER 6123027746 398 3 11 05 19 08 25 48 COVER NO ANSWER 6123212822 394 4 11 05 19 08 26 43 DIRECT 394 3 11 05 19 08 28 48 COVER NO ANSWE...

Page 82: ...9 48 NORPMS YMSGCOUNT 7209 0 0 05 19 01 09 51 NORPMS pCHECKIN RESYNC 7210 BARANKO STEPHEN MR 05 19 01 09 52 NORPMS YMSGCOUNT 7210 0 0 05 19 01 09 55 NORPMS pCHECKIN RESYNC 7211 EVANS NICOLE 05 19 01 09 56 NORPMS YMSGCOUNT 7211 0 0 05 19 01 10 00 NORPMS pCHECKIN RESYNC 7212 ALLEN REBECCA 05 19 01 10 01 NORPMS YMSGCOUNT 7212 0 0 05 19 01 10 04 NORPMS pCHECKIN RESYNC 7218 BARRETT BEN 05 19 01 10 05 N...

Page 83: ... E S S R E P O R T Innovation Tenant 1 05 15 2008 4 26p Lists all staff mailboxes that have an e mail address configured for forwarding voice messages to email and whether the form is enabled to allow the feature and if the individual address is active Mailbox Form enabled Email address Address enabled 146 Y jkaroth brilliant com Y 146 hommeones yahoo com N 202 Y pbrown brilliant com Y 202 pbrown ...

Page 84: ...mailboxes Add an Administration mailbox Adjust the Maximum Mailbox Number Size if necessary Add Translations if guest rooms have two extensions each Create a guest service menu AGS if necessary Set up automated attendants if necessary Check or add the fax number to which reports will print Test the modem s dial out capability using the Atomic Clock feature To perform this test see System atomic cl...

Page 85: ...ins every system option in case you need to set additional parameters to customize your application To edit system options click the Do button of the Elite main screen and then select Configure System In the next screen click the option you want to revise or review in the system tree Each option in the system tree contains folders and icons Double click the icon to open the item it represents and ...

Page 86: ...etting controls when Elite performs maintenance HH MM SS AM or PM 3 00 00 AM System Restart Interval Determine when the system restarts after running through its maintenance routines If you choose a specific day the system restarts each week on that day Specific day of week Every day 1st of Month or Never 1st of Month Deleted Staff Message Life The maximum number of days to keep deleted staff mess...

Page 87: ... of the Elite main screen and then select Configure System In the next screen double click the System Backup icon The following window appears You can edit the following parameters in the System Back ups window Parameter Description Daily Back ups By default the system is backed up daily to the CD RW drive which contains formatted RW media To disable a daily backup click the check box next to a da...

Page 88: ...is option allows you to activate other languages HASP protected in the voicemail system To edit the system language options click the Do button of the Elite main screen and then select Configure System In the next screen double click the System Languages icon In the next window the Available Languages list displays the languages you can add to the system To add a language click it in the Available...

Page 89: ...dow appears You can edit the following parameters in the Atomic Clock window When you finish click the Dial Now button to call the Naval Observatory Atomic Clock Parameter Description Range Default Enabled This setting allows Elite to call the Naval Observatory Atomic Clock check the time and adjust the time if necessary If this box is not checked the feature is disabled N A Checked When to Call T...

Page 90: ...ipt or prompt has a number associated with it These prompts are discrete part of the mac file and cannot be re recorded or altered by the dealer or end user You can re record only non discrete prompts See Prompt administration in Chapter 2 for information on which prompts you can re record Alerts Use this feature to allow the Elite system to call home if problems occur Currently problem notificati...

Page 91: ...ck the System Alerts icon In the next window right click on the white space to print save or delete the log COM port assignments This feature lets you check which interface is assigned to each com port To use the feature click the Do button of the Elite main screen select Configure System and then double click the COM Port assignment icon You cannot change COM port assignments here you can only se...

Page 92: ...terface the port will use Supported PBX integration modes Generic In band DTMF Call Direction This setting controls whether the port can make outgoing calls accept only incoming or both In bound only Out bound only and In bound Out bound In bound only10 Out bound Actions This setting shows which out bound actions are to be done by a voice port If only one port is configured as out bound all action...

Page 93: ...PBX Valid mailboxes or mailbox IDs AA Guest Direct Call This setting is used to take a guest directly to a specific AGS function programmed in the Speed Dial Menu under Guest Service menus It is used only if the PBX does not provide calling party information on a forwarded call to voice mail Logs in to guest mailbox or does speed dial AGS menu key 1 8 Logs in to guest mailbox ...

Page 94: ... Code and Alcatel Out of band data link This category includes port types such as Fujitsu 9600 NEC 2000 2400 Avaya C LAN and Cisco Call Manager Set display information converted to SMDI This category includes all port types using PBXLink hardware Set display emulation This category includes D x2U port types The parsing information found under the Call ID tab for these port types is hard coded and ...

Page 95: ...pe identifier 1 to 5 1 Direct Call ID Format This setting specifies the call identification string format for calls made directly to voice mail Choose a setting from the list or create a custom setting N A Type A Covered Call ID Format This setting specifies the call identification string format the PBX sends to voice mail on forwarded covered calls Choose a setting from the list or create a custo...

Page 96: ...ng Distance Prefix Some voice mail operations require Elite to dial outside the hotel This setting specifies the dial string prefix for long distance calls numbers with 7 or more digits valid dial strings L 9 MWI tab Parameter Description Range Default Dial string Prefix These fields set dial string prefixes for a message waiting indicator s on off settings valid dial strings Dial string Suffix Th...

Page 97: ...erfaces If necessary you can add interface types to the system See Device interface serial ports in Chapter 1 for more details Follow the steps below to add serial interfaces or edit existing interfaces To begin click the Do button of the Elite main screen and then select Configure System In the next screen click Device Interfaces in the system tree To add a new serial interface double click the N...

Page 98: ...Specify the serial COM port to be used by the interface driver Always use the port assigned to the interface type unless you have reason to change it Available COM ports Rate Specify the baud rate used by the serial COM port For this setting and the remaining settings in the Serial Ports tab always start with the default setting assigned to the interface driver 300 1200 2400 9600 Parity Specify th...

Page 99: ... parameters are associated with the interface and how to use them Valid parameters Echo Messages Check this box to echo messages from this device to all other devices for a given tenant By default this box is not checked N A Device Number Translation Use to strip or add the leading digit of the guest room number in the message being sent or received by Elite A range of rooms may also be specified ...

Page 100: ... the following illustration A screen similar to the following illustration appears Each icon in the above illustration represents an aspect of the tenant that you can revise if necessary For example you can edit Tenant Information information on the Staff Tutorial and information on the tenant s Property Management The following sections explain each aspect of tenant management you can edit Tenant...

Page 101: ...Tenant 1 Next double click the General icon as shown at left The following window appears You can edit the following parameters in the window Parameter Description Range Default Maximum Mailbox Number Size The largest mailbox value in the system If the value is larger than necessary user interaction slows down which is undesirable 0 9 4 Minimum Staff Passcode Size The smallest passcode allowed for...

Page 102: ... Iterations value 0ms through 99999ms 3000ms Mailbox Entry Time out This field shows how long the system will wait for the first and between each mailbox entry digit press before performing the next function This value does not affect mailbox entry digit presses in automated attendant menus 0ms through 99999ms 2500ms Day Operator The mailbox to be used as the Day Operator for this tenant If no Day...

Page 103: ... staff extension The default value PLSHLD4 means Please hold for N A PLSHLD 4 Other Transfer Phrase This setting defines how to announce other mailbox transfers If Prompt Only is chosen then only the recording in the Other Transfer Prompt field will be played If Prompt Box ID is chosen then the mailbox number will be announced to the caller after the Other Transfer prompt is played If the staff ma...

Page 104: ...r ID Some integrations provide the calling party s station number on forwarded calls to voice mail This feature uses that station number as the sender ID to identify which calling station left a message in the called parties mailboxes If the calling party information is unavailable the sender ID is identified as an outside caller N A Checked Guest Greeting Log in This option allows guests to acces...

Page 105: ...ording a message for a staff member N A Checked Post Send Guest Message Menu This option announces additional instructions to forwarded callers after they leave a message for a guest and press any touch tone key If the box is not checked the message sent prompt is played followed by Thank you goodbye N A Checked Post Send Staff Message Menu This option announces additional instructions to forwarde...

Page 106: ...s on how to hang up will be offered after the staff member s unavailable greeting is played If the box is not checked this prompt is disabled N A Not checked Leave Guest Message Speak Leave Message If the Require Key Leave Guest Message box is not checked recording instructions will be played after the guest s unavailable greeting is heard by the forwarded caller If the box is not checked no recor...

Page 107: ...er accessing express messaging in the previous field the system will instruct you to stay on the line to leave your message or to transfer the caller now if this box is checked N A Checked Express Message Speak Mailbox Greeting After accessing express messaging in the previous field the mailbox s unavailable greeting will be played to you if this box is checked N A Checked Always Ask Guest for Dir...

Page 108: ...cording their name and recording a personalized greeting To enable additional staff tutorial options click the Do button of the Elite main screen and then select Configure System In the next screen click the name of the tenant you want to edit in the system tree for example Tenant 1 Next double click the Staff Tutorial icon as shown at left The following window appears You can edit the following p...

Page 109: ...e system is in a non PMS or manual mode Guest mailboxes remain open or checked in all the time Not checked InnLine Controls Guest Message Indicators Typically InnLine controls guest message lamps Some PMS companies want to control guest message lamps themselves If this parameter is not checked InnLine will not generate message waiting events to turn guest message lamps on or off The PMS then contr...

Page 110: ... provided the guest s name with the check in message the system can preset the passcode using the first three to six letters of the guest s last name The preset value from PMS check in is only available if the PMS company has written to Innovation s protocol specification Do not preset passcodes Name Count The number of letters to use in creating passcodes from the PMS provided guest name The rang...

Page 111: ...s 10 to 10 minutes 5 minutes Maximum Attempts This setting controls how often Elite will issue a wake up call before it sends a notification that the wake up attempt failed Type the number of attempts or click the and buttons 1 to 20 attempts 3 attempts Retry Interval This setting controls the wait time between wake up attempts Type the number of minutes or click the and buttons 1 to 20 minutes 5 ...

Page 112: ...ns not forwarded to voice mail are used Valid PBX stations 0 operator Maximum Attempts This controls how often 2020 will call the station that is set up to receive notifications of failed wake up attempts 1 to 20 attempts 5 Retry Interval This setting controls the wait time between notification attempts 1 to 20 minutes 1 minute Language This setting controls the language to use to announce the wak...

Page 113: ... Range Default Directory Type This setting controls whether the directory will be shared by both guests and staff members or if the directory is exclusive to guests or staff members Choosing Disabled turns off the directory feature Disabled Guest Only Staff Only Staff Guest Staff Guest Last Name Digits This setting controls how many letters a caller needs to enter when searching for someone in the...

Page 114: ...enant 1 Next double click the Reports icon as shown at left The following window appears Scheduled Reports Tab Parameter Description Range Default Scheduled Reports This setting allows you have InnLine automatically print reports at a specified time daily All available reports No schedule d reports Add Click this button to set up reports to print automatically In the next window select the report ...

Page 115: ...eport Valid email addresses N A Printer These setting control what device reports are printed to Valid print devices N A Guest messaging To edit guest message settings click the Do button of the Elite main screen and select Configure System In the next screen click the name of the tenant you want to edit in the system tree for example Tenant 1 Next double click the Guest Messaging icon as shown at...

Page 116: ... day that the comfort message is delivered HH MM SS AM or PM 11 00 00 AM Deliver Check out Message This setting controls how many days before check out that the message is delivered 0 day of or 1 day 1 day before check out Check out Message Time This setting controls the time of day that the check out message is delivered Note that this function is based on the PMS11 providing InnLine with check o...

Page 117: ...leave a message instead or limit automated transfers according to a schedule To create a schedule click the Edit Schedule button Next click the Add button In the next window for any day of the week or any particular date you can set the schedule to always allow transfers never allow them Always No or to allow transfers during a period you specify If you use the latter option transfers will be disa...

Page 118: ...he Elite system to dial telephone numbers such as pager and call notification you can specify area codes to which calls are restricted and specify area codes that are considered local calls To add these area codes click the Do button of the InnLine 2020 main screen and then select Configure System In the next screen click the name of the tenant you want to edit in the system tree for example Tenan...

Page 119: ...e System In the next screen click the name of the tenant you want to edit in the system tree for example Tenant 1 Next double click the Staff Mailbox Reset icon as shown at left The following window appears When a staff mailbox is reset its options will be changed based on the settings in this window For each setting select what should be done during a full reset operation Disable Enable or Don t ...

Page 120: ...ble click the Announce icon as shown at left The following window appears You can edit the following parameters in the Announcement Settings window Parameter Description Attendant Announcement Click the icon to the right of the field and enter the announcement to be played to all callers before automated attendant prompts If you do not require an announcement leave the field blank Staff Log in Ann...

Page 121: ...Click the icon to the right of the field and enter the announcement to be played to the staff member at the time of mailbox log in Get Click this button to display which Announcement is currently programmed for a Staff Mailbox Set After you program the individual staff log in click the Set button Less After you program the individual staff log in click the Less button to hide the individual option...

Page 122: ...rs and warns that the maid status reporting feature is only supported for compatible PMS interfaces Contact Innovation for more information on which PMS interfaces are supported Click OK to close the warning window To update the PMS the housekeeper calls voice mail from the guest telephone When voice mail answers enter the appropriate codes A tone will be returned signifying success and the voice ...

Page 123: ...ean room to one property management vendor and a dirty room to another Ending Code This code is always Automated attendants If you want you can set up automated attendants This feature is described in detail in Chapter 2 To edit automated attendant settings click the Do button of the Elite main screen and then select Configure System In the next screen click Automated Attendants in the system tree...

Page 124: ...he latter option the night menu will be used during the hours not specified for the day menu Click the Add button when you finish Note that Dated Period settings will override conflicting Day of Week periods you enter Greetings Schedule tab On holidays you can record a special greeting that plays instead of the usual greeting message Click the Add button in the tab select the date enter a name for...

Page 125: ...000ms to 30000ms 2500ms Max Invalid Entries This setting controls the maximum number of invalid entries After this threshold is reached the Entry Failure prompt is played and the caller is sent to the Entry Failure mailbox 1 to 20 3 Greeting Prompt The message that plays before the attendant menu recording By default it is AAGRTD or AAGRTN Thank you for calling Valid recordings AAGRTD or AAGRTN Me...

Page 126: ... Failure Mailbox Callers are sent to this mailbox after hearing the Entry Failure prompt explained above Valid mailboxes or mailbox IDs OPERATOR Guest services menus If you want to set up guest services menus see Chapter 2 To edit settings for guest services menus click the Do button of the Elite main screen and then select Configure System In the next screen click Guest Services Menus in the syst...

Page 127: ...the system Set Clear Wakeup Calls This feature allows a guest to set or clear wakeup calls for their own room The guest is prompted to enter the time in hours and minutes Set Greeting This feature allows a guest record a personal greeting Set Passcode This feature allows guests to choose a passcode which allows them to listen to their messages while outside the hotel Record Name This feature allow...

Page 128: ...d Configure Call Forwarding This feature allows a guest to enter a phone number where they want their calls sent if they cannot answer calls in their room Menu Use this feature to create a sub menu within guest services Goto Mailbox This feature routes the guest to a mailbox followed by a specified action Transfer To Leave Message or Go To Connect To Phone Number This feature allows a guest to con...

Page 129: ...stallations using PrivateLine See PrivateLine in Chapter 4 for PrivateLine feature descriptions Not checked Call Forwarding If you check this box the guest will be offered a chance to set up call forwarding for their mailbox the first time they access voice mail See InnConnect Step 3 on page 55 for feature descriptions Not checked Set Passcode If you check this box the guest will be offered a chan...

Page 130: ...eLine in Chapter 4 for PrivateLine feature descriptions GPNINTRO GPNBUY Parameter Description Default Call Forwarding Prompts GCFINTRO is the default prompt played to a guest when accessing this service Call Forwarding provides parties reaching your in room voice mail the opportunity to forward their call to your cellular phone GCFBUY is played next and is useful for charge notices Please note tha...

Page 131: ...time of message delivery You cannot edit this distribution list The Available Mailboxes list displays the staff or guest mailboxes you can add to the distribution list To add these mailboxes to the Mailboxes in Distribution List select them and then click the Add button The mailboxes are added to the staff and guest mailboxes in the current distribution list To remove mailboxes from the Mailboxes ...

Page 132: ...methods to notify individuals that a message exists Special message notification ends when one of the following conditions occur 1 The notification is confirmed 2 The mailbox containing the message is saved or deleted 3 The call list has been processed in full and no one has confirmed notification or picked up the message To create a special message notification list click the Do button of the Eli...

Page 133: ...new message Used to control what type of new message will trigger notification Selecting an urgent new message will cause the system to notify on urgent new messages only Keeping the setting at a new message covers all new including urgent messages A new message Mailbox field Enter the staff or front desk mailbox that you want special message notification set for N A To add a notification to the l...

Page 134: ... one Or to confirm this notification press any other key If you press one the system will ask for the mailbox passcode Un checking disables the ability for message review during the call Notified callers are then required to call back into the system to access the mailbox Checked Process call list X times How many times the list will processed 1 time Finally print notification Checking this box wi...

Page 135: ...ally page him Then he wants the entire call list to repeat a second time and then print a report if the message was never picked up The following window shows how this may be programmed Any of the descriptions on the call list may be disabled by removing the check to it s left Clicking on the description then dragging it on top of another will change the call order NOTE If the Special Message Noti...

Page 136: ...call notification attempt 2 of 3 to 2134567 NO ANSWER 10 59 16 Notification for 400 call notification attempt 3 of 3 to 2134567 NO ANSWER 10 59 37 Notification for 400 pager notification attempt 1 of 2 to 18883459876 11 04 59 Notification for 400 repeating list 11 04 59 Notification for 400 pager notification attempt 2 of 2 to 18883459876 11 05 13 Notification for 400 call notification attempt 1 o...

Page 137: ...rt type before using this utility Refresh All MWIs When activated the system issues a light on or light off command for each staff and guest mailbox in the system Use this feature with care If you have a 300 room hotel with 40 staff mailboxes and you issue this command you ll create 340 message waiting events Refresh Guest Data Use this utility to send a resynchronization message to the PMS device...

Page 138: ...gure System In the next screen click Guest under Mailboxes in the system tree To create a guest mailbox double click the New Mailbox icon In the next window enter an ID for the new mailbox and then click OK To edit or view an existing mailbox double click the mailbox icon The following window appears The window is divided into three tabs General Greeting and Call Transfer You can edit fields in ea...

Page 139: ... to Elite Service ID The guest quality of service identifier used only if PMS sends this information to Elite Print Fax to This feature is for Elite installations with the InnCommand Fax Server See InnCommand in Chapter 4 for all related Elite features concerning InnCommand Offer Tutorial If you check this box a mailbox tutorial will be offered to the guest but only if it is enabled in the guest s...

Page 140: ...TE Installation guide Chapter 3 Reference 132 default greeting Greeting Recording The recorded greeting of the guest associated with this mailbox A number from 30000 to 39999 represents a recorded greeting ...

Page 141: ...d by the guest if using the InnConnect feature Service classes for guest mailboxes This feature allows you to create edit and view Service Classes for guest mailboxes For step by step instructions on using this option see Adding guest services classes in Chapter 2 To use the Service Classes feature click the Do button of the Elite main screen and then select Configure System In the next screen cli...

Page 142: ...ds a new message for you it will light the lamp on your room phone to notify you that you have a new message waiting Check to use the prompt at right uncheck to not play a prompt Not checked Tutorial Conclusion The closing message played to guests when the tutorial is completed The default selection is GTUTEND You have finished configuring your message service Check to use the prompt at right unch...

Page 143: ...ticular date you can set the schedule to always use the day operator or the night operator or to use the day operator during a period you specify Click Add when you finish Note that Dated periods you specify override conflicting Day of Week periods you enter N A N A AGS Menu If you check this box the Automated Guest Services menu is available to guests Use the drop down box to select which menu th...

Page 144: ... enjoyable Thank you for staying with us Check to send this message with each new check in Uncheck to disable Not checked Comfort Message The message received by the guest later in the stay See the Guest Messaging section earlier in this chapter to control when the comfort message is delivered It only applies if Elite is in Check in Check out Mode The default message is GMSGPCI This is the front d...

Page 145: ... tree To edit or view a guest holding mailbox double click the appropriate mailbox icon The window that appears is identical to that for guest mailboxes For more details see the Guest mailboxes section earlier in this chapter Staff mailboxes This option allows you to create and edit staff mailbox settings To reach this option click the Do button of the Elite main screen and select Configure System...

Page 146: ...on The telephone extension associated with this mailbox Passcode The passcode used to log in to this mailbox The default passcode is 9876 Staff Name The mailbox user s last name This field is for informational purposes only Department The department to which this mailbox belongs This field is for informational purposes only Name Recording The name recording associated with this mailbox A number ra...

Page 147: ... choices are Oldest 1st Oldest 1st Grouped Newest 1st and Newest 1st Grouped By default the setting is Newest 1st Print Fax to This feature is for Elite installations with the InnCommand Fax Server See InnCommand in Chapter 4 for all related Elite features concerning InnCommand Messages New Saved and Deleted These fields show the current number of new messages saved messages and archived messages ...

Page 148: ... this box the system will disable the confirmation message a staff mailbox receives when certified mail has been reviewed Only messages that have not been reviewed before the Certified Expires value is reached will send the non delivery notification message to the sender s mailbox Missed Forward Notification If you check this box the system will send this mailbox a message in the event a forwarded...

Page 149: ... not checked Disable Greeting Menu If you check this box the mailbox cannot define or use previously defined greeting keys By default the field is not checked Disable Guest Group Sending If you check this box the mailbox cannot browse the guest group directory or send a message to a PMS defined guest group Greeting tab Parameter Description Active Greeting This option displays and controls which u...

Page 150: ...ct feature for this mailbox See InnConnect in Chapter 4 for InnConnect feature descriptions Key X This area allows you to define up to seven go to or transfer points based on an individual key press depending on whether you select Goes to mailbox or Transfers call to in the appropriate field When callers are presented with the staff mailbox s unavailable greeting they can redirect themselves to an...

Page 151: ... In the next window for any day of the week or any particular date you can set the schedule to always be on always be off or to be on during a period you specify Click Add when you finish Note that Dated periods you specify override conflicting Day of Week periods you enter N A N A Pager Message Pause The number of seconds to pause before sending a pager message for this schedule 1 to 30 seconds 1...

Page 152: ...is chapter Email tab Elite has the ability to forward a new voice message to single or multiple email addresses This area allows you to enable the feature and add email addresses that will receive the forwarded message Typically the email will include the wave file attachment But you may also specify that the file not be attached This may be the case where you just want to send the email as a noti...

Page 153: ...nd the complete email address To enter more email addresses just right click on one of the empty cells and repeat the process Un checking the box in the description cell will disable the system from forwarding the voice message to that email address If you have multiple entries and wish to disable the entire list simply un check the Enabled box at the top of the form Below is an example of multipl...

Page 154: ...ational name Click Next to continue The next screen will want to know what your mail servers name for both incoming and outgoing mail This usually starts off with mail yourcompanyname com The next screen will want to know the account name and password Enter Elitevm as the account name and leave the password field blank and the Remember password box checked Click Next to continue The Internet Conne...

Page 155: ...the Elite main screen and then select Configure System In the next screen click Front Desk under Mailboxes in the system tree To create a front desk mailbox double click the New Mailbox icon In the next window enter an ID for the new mailbox and then click OK To edit or view an existing front desk mailbox double click the mailbox icon A window appears and offers options for Front Desk mailboxes Th...

Page 156: ...heck this box the system will ask you to record the guest s name during a manual check in Not checked Set Guest Directory Code also prompted If you check this box the system will ask you to set the guest s directory code during a manual check in Not checked Staff Passcode Reset Select Enabled or Disabled If enabled this front desk mailbox can reset a staff mailbox s passcode back to the system def...

Page 157: ... New Mailbox icon In the next window enter an ID for the new mailbox and then click OK To edit or view an existing administration mailbox double click the mailbox icon as shown at left The following window appears You can make the following settings in the window For more information on administration mailboxes see Adding administration mailboxes in Chapter 2 Parameter Description Extension The te...

Page 158: ...d by a tone After the caller records the message it is usually delivered to a staff mailbox Record Prompt This mailbox allows the property to change the recording of a customizable system prompt such as the wake up message For details on using this option see Creating a Record Prompt mailbox for prompts in Chapter 2 Reference Use this mailbox to route a caller to another mailbox or mailbox ID Sele...

Page 159: ...lbox option click the Do button of the Elite main screen and then select Configure System In the next screen click Other under Mailboxes in the system tree To create a question answer mailbox double click the New Mailbox icon In the next window double click Q A and enter an ID for the new mailbox Then click OK To edit or view an existing question answer mailbox double click the mailbox icon as sho...

Page 160: ...cked If this prompt is blank then the single word phrase Canceled will be played to the caller Next Mailbox Field that defines where the call flow should continue after Conclusion prompting is played back to the caller No value in this field will simply hang up on the caller Delivery Mailbox Destination mailbox or distribution list that the concatenated responses are delivered to Play Record Beep ...

Page 161: ...o David Peterson GM Hotel Allegro 312 555 1212 The system is currently down To accept the responses you gave press 1 To listen to your responses press 2 To start over again press 3 Or to cancel entirely press star Finishes at this point 1 Success Thank you An Innovation Customer Support representative will contact you shortly two second pause or Cancel Canceled This incident has not been submitted...

Page 162: ...ove on to the next question if a key is pressed during the Response Collection step or after system time out If a caller hang up or immediate system shutdown is detected during the Question Response Collection step a partial Result Voice Message is generated and delivered using whatever questions were answered so far A caller may exit cancel at anytime by pressing the star key ...

Page 163: ...h the exception of InnCommand When the add on features are enabled fields that were shaded become accessible Additional icons guest services options and new report options are displayed InnCommand Fax Server runs on a separate PC and is connected to Elite via a network connection 13 InnCommand is no longer part of Innovations product offering The technical information is still part of this guide p...

Page 164: ...helpful for convention groups If the HASP is licensed for this option a PrivateLine icon will appear when you click Tenants in the system tree and then click Tenant1 Tenant1 may have been renamed as the property s hotel name Double click the icon to begin your PrivateLine configuration then take the following steps to ensure a smooth installation Note Before configuring PrivateLine review the Priv...

Page 165: ...escription Range Default Mode External Device The PBX to which Elite will communicate DID assignments The term Universal reflects any PBX with which InnLine cannot communicate DID routings directly Supported PBXs or Universal None Phone Number Master In most cases InnLine will control the assignment of DID numbers If a Property management company has written to Innovation s DID specification then ...

Page 166: ...tension 3 fields If the installation is new you can add the numbers with a range function Step 2 Add a DID phone number for a guest After configuring the PrivateLine settings add one DID number to either the Guest Phone Numbers or Other Phone Numbers section of the Tenants tree In this example you will add one DID number to the Guest Phone Numbers section 1 Click Guest Phone Numbers in the Tenants...

Page 167: ...ayed Click OK Place a test call to the number to verify correct routing Step 4 Add the remaining DID phone numbers that guests will use 1 After successful testing click Unroute to return the DID phone number to Out of service 2 Add the remaining DID phone numbers that guests will use by clicking Add and using the Range of Phone Numbers function When you add a block of phone numbers the ID numeric ...

Page 168: ...the Tenants tree Use the Add button to add a single number or range of DID phone numbers Use the Delete button to remove DID phone numbers from Elite s database Use the Route Unroute button to manually route a DID phone number to an extension or to return the DID phone number to the Out of service station Use the Reserve Unreserve button to manually reserve guest phone numbers When the guest check...

Page 169: ... a DID phone number to be assigned to the second extension click the box next to Allow mailbox phone number 2 assignments to mailbox extension 2 5 If you want a card containing the guest s DID phone number s to automatically print to the Dymo LabelWriter printer at check in click the box next to Auto print X phone number cards at check in The options in the Phone Numbers tab of the Service Class w...

Page 170: ...the first character of the guest s name as a flag indicating whether DIDs are to be allocated or not Put a 1 before the guest s name during check in to assign one DID a 2 to assign two or a star to assign all possible phone numbers Not Checked Auto print X phone number cards at check in Controls the number of DID phone number cards printed at check in Up to five cards may be printed Warning Settin...

Page 171: ...ELITE Installation guide Chapter 4 Add on features 163 The printed DID card will look like the card shown below ...

Page 172: ...is COM port to the front desk you must extend the following six pins straight through Pin 2 TX Pin3 RX Pin 4 RTS Pin 5 CTS Pin 6 DSR Pin 7 GND Recommended cables are a category 5 type or extended distance data cable that does not exceed 150 feet in length 2 Double click the Phone Card Printing icon then click the Print Test Label button to test the printer Step 9 optional Adjust the guest tutorial...

Page 173: ... in within the guest s service class Step 10 optional Adding PrivateLine options to the Guest Services Menu AGS With the PrivateLine feature enabled two new features will appear in the Guest Services list Hear Assigned Phone Numbers Use this feature in a Guest Services Menu to allow guests to hear their assigned DID phone number s at any time Configure Phone Numbers Use this feature in a Guest Ser...

Page 174: ...ich it is currently routed Phone Number Billing Report This report shows the amount of time in tenths of hours that a DID number has been assigned to a guest s station Refer to Chapter 2 Reports of this guide for instructions on how to automatically generate these reports Front Desk administrative functions Refer to the Front Desk reference guide for instructions on how to print additional Phone C...

Page 175: ... step by step installation instructions The following steps will assist you in programming InnCommand related items for Elite 1 Decide which method you will use to connect InnCommand and Elite For more information see pages 7 through 10 of the InnCommand Installation and Administrative Guide 2 Add the InnCommand Fax Server interface to Elite Click Device Interfaces and then double click New Interf...

Page 176: ... accept this charge press 1 Or to cancel press any other key Not checked Fax Printed Message This prompt is played when a fax print request is submitted The default selection is GFAXPRNT The fax will be printed as soon as possible Checked Positive Fax Printed Notification Check this box to enable notification of successfully printed faxes Not checked Print Faxes to Default This field determines wh...

Page 177: ... notification The default selection is GFAXSBUY Please note that your room will be charged for use of this feature To accept this charge press 1 Or to cancel press any other key Not checked Fax Sent Message This prompt is played when a fax send request is submitted The default selection is GFAXSENT The fax will be sent as soon as possible Checked Positive Fax Sent Notification Check this box to en...

Page 178: ...ber of a fax machine or an InnCommand printer alias Blank Fax Printing Checking this box gives the staff mailbox the ability to print faxes on which they have received notification Checked Fax Print OK Notification Check this box to enable notification of successfully printed faxes Not checked Fax Sending This option allows staff users to redirect the fax they received send a copy to another telep...

Page 179: ...d GuestWorks requires PBXLink ISA card installed in Elite or PBXLink external box connected to a COM port Hitachi HCX requires passive connection to FOA IOC port Nortel Meridian 1 requires a connection to a TTY port configured as a Background Terminal Alcatel OmniPCX 4400 requires a connection to AHL port Mitel SX 200 requires use of the Mitel to Compatable PMS and Mitel Hotel Motel Wakeup Port de...

Page 180: ...eft blank Due to conflicts in a numbering plan a pause may be required after the Set Wake up Code Prefix has been sent Enter a comma in this field for a 2 second pause add more commas if needed None Clear Wake up Code Prefix The Hitachi HCX feature code used to cancel wake up calls for an extension Valid feature code 5 Clear Wake up Code Suffix This field is normally left blank Due to conflicts in...

Page 181: ...ugh one of the two interfaces mentioned above The feature can be configured to Deliver a message to a mailbox s notifying its user that a 911 call was placed Send a pager message displaying the numbers 911 plus the extension number that placed the emergency call Call various parties of a call list Print or fax a 911 notification message To make 911 notification settings click the Do button of the ...

Page 182: ...x to enable pager notification If a 911 call is monitored the system will call the pager number entered You can control the number of Paging Attempts and the Paging Interval You can also adjust the Pause setting which is the number of seconds to wait after dialing the paging service before dialing the Message String for the pager If you use this feature the system will continue to page you until a...

Page 183: ...If the number of attempts is one 1 then the interval field becomes shaded Valid mailboxes Not checked If no confirmation repeat call list X times The number of times to repeat the call list until a member has confirmed the 911 call notification 0 999 0 will not repeat the list Notification message prompts A B The message that is played to member s of the call list The message is played in two part...

Page 184: ...ELITE Installation guide Chapter 4 Add on features 176 ...

Page 185: ...86 Covered Calls information Call ID tab 14 86 D Daily backup 78 DAPI Message report 74 Data bits 89 Day menu 114 Day Operator 93 132 Dealer information 10 Deleting guest mailboxes 127 Deleting mailboxes 25 Deleting translations 41 Device interface serial ports 16 Device interfaces 16 88 Dial Now button Atomic Clock window 80 Dialing directory 104 Dialing security 108 DIMMs 3 Direct Calls informat...

Page 186: ...uest mailboxes 127 select language 144 service classes for guests 31 130 setting an MWI 127 staff 19 25 134 time branch 20 144 Main Menu prompt 45 117 Maximum mailbox number size 30 92 Menu mailbox 20 144 Menu schedule 114 Message waiting indicator MWI 15 127 Multi COM port cable 4 16 MWI dial strings 15 N Naval Observatory Atomic Clock 80 New Translation Range command 40 Night menu 114 Night Oper...

Page 187: ...rts 82 Staff mailbox 19 25 134 Staff Mailbox report 66 Staff mailbox reset 109 Staff tutorial 99 Stop bits 89 System atomic clock options 80 backup 78 housekeeping 77 prompts 81 restore option 79 service log 81 System Activity report 71 126 System alerts 82 System information 8 System languages 79 T Tenant information 10 91 Tenants 91 announcement prompts 110 dialing directory 104 dialing security...

Page 188: ...ELITE Installation guide Index 180 ...

Reviews: