background image

Auto lens meter operation manual 


21 

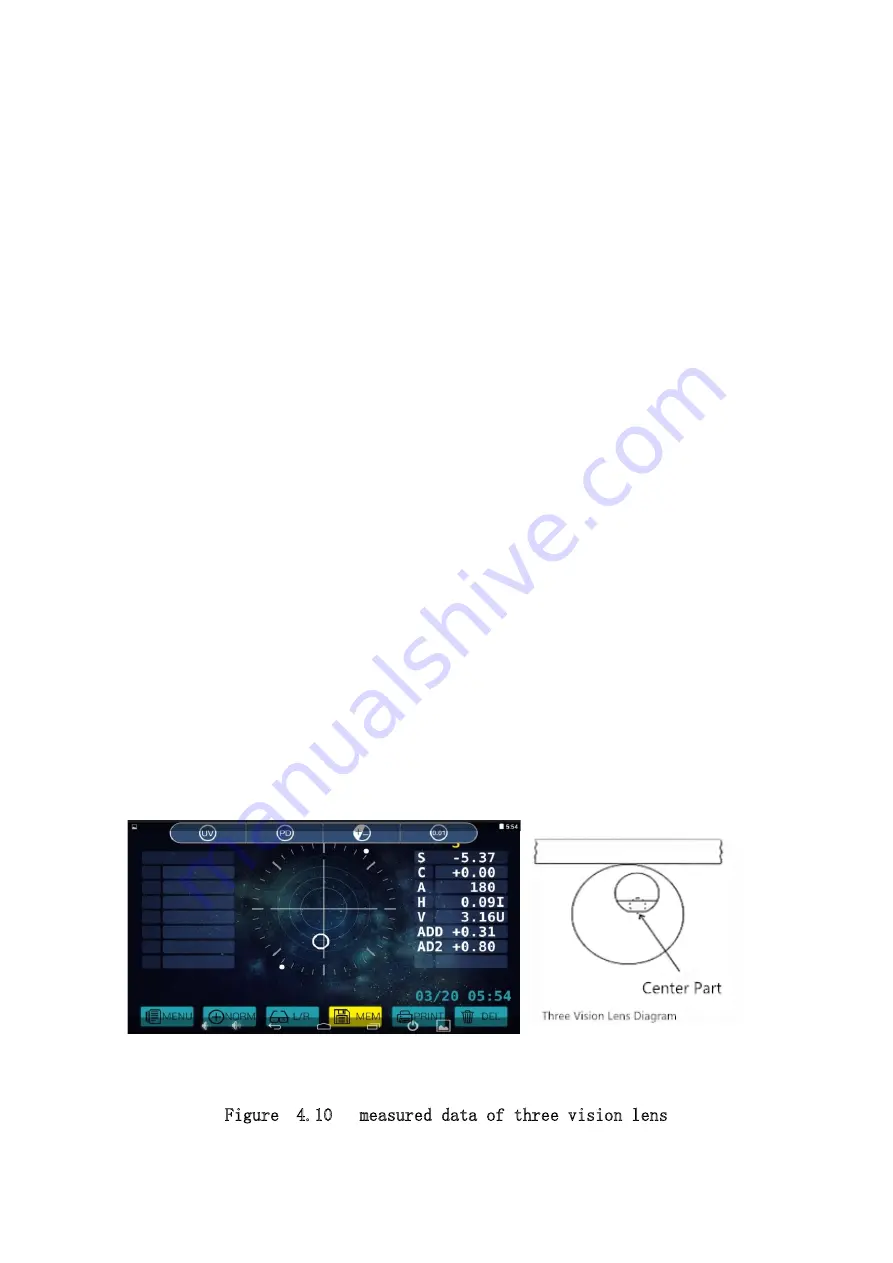
(4)ADD of three visions lens 

The way to measure far vision part of three vision lens and double vision 

lens are the same. ADD should be measured twice. 

a. To move the lens toward yourself till the center of near vision part 

on the lens base. Then to press Mode, there will be AD1 showed on the screen. 

When the notice showed under the drone as “close to the center”(there 

is no need to focus the center perfectly), to press the Memory , then the 

measured data of the center of near vision part will be confirmed. Then 

continue the measurement. 

b. To move the near vision part to the lens base, then press Mode, there 

will be AD2 showed on the screen. When the notice showed under the drone 

as “close to the center”(there is no need to focus the center perfectly), 

to press the Memory , then the measured data of near vision part will be 

confirmed. 


Figure 


4.10   measured data of three vision lens 

Summary of Contents for VIEWLIGHT DLR-700

Page 1: ......

Page 2: ...arks on machine 6 3 Introduction to machine 7 3 1 Main body 7 3 2 Operation panel 9 4 Operation 13 4 1 Assembling 13 4 2 Test 13 4 3 Operation 14 4 3 1 Lens settings 14 4 3 2 Lens measurement 15 5 Maintenance 26 5 1 daily care 26 5 2 replacement of materials 27 5 3 machine clean 27 5 4 notice in moving 28 5 5 service information 28 6 Simple fault phenomenon and solution 29 6 1 solution to general ...

Page 3: ...lens quickly The 7 inch high resolution TFT touch screen can show everything smooth and fine There is brief menu Just pressing the keys on the screen the graphs will show their functions accurately LM 700 is the auto lens meter which is specialized for lens measurement The Implementation of the enterprise standard Q31 0113000121C001 2016 which is in the line with the national metrological verifica...

Page 4: ...otice Don t open or touch the inner part of machine if not necessary or it may cause electric shock or make problem to machine To use the stipulated voltage if too high or too low it will influence the operation or even cause damage to machine or result in electric shock Don t put the wires under machine or it will break the wires and cause cutting out fire disaster or electric shock If the metal ...

Page 5: ...the operation of machine Then it just need to put machine under the stable temperature for 3 10 hours then it can be operated normally Don t pull the wires or cable which will damage the machine or hurt people Don t take machine by seizing the LCD screen when moving machine You should hold the base by hands Or it will hurt people or damage machine Don t put machine in humid place Any water into ma...

Page 6: ...ence the operation or make error Don t operate machine at the place against electric fans or air conditioner otherwise the dust will be flowed into machine which will influence the preciseness of measured data Don t operate the machine at the place with dust or humid and hot which will influence operation Don t put too many plugs on one power socket which will make it too hot and cause fire disast...

Page 7: ... pull the plug out from power socket in case to prevent from fire disaster If there is any problem with machine and need to take down the machine for check please contact with our agent or our branch office You need to take all the responsible to any damage to machine from your personal action to it Don t scrape the protecting lens which under the lens base otherwise it will very influence the pre...

Page 8: ...Auto lens meter operation manual 6 2 9 Marks on machine Please read the manual carefully It means that the power supply be off It means that the power supply be on ...

Page 9: ...xing the lens to up the frame and down it with gentle When take down lens to up the frame till there is a sound like ka then the frame will be locked Sliding nose frame which used for measuring PD To put the nose pad Switch lens fixing frame Sliding nose pad frame Lens base Lens table Point button Lens table knob printer Memory switch ...

Page 10: ...he back of machine Lens base which used for putting lens and as the basic point of measurement Dust cover which used for protecting machine from dust Before operating machine please take down the dust cover Switch short time press to turn on machine and longer press to turn off machine Port Out power injection USB connection Fuse cover ...

Page 11: ...ens table to fix the direction of lens frame To put the bottom of lens frame on the lens table when make the measurement Don t move the lens table directly but just moving it by lens table knob Printer to print the measured data Note no operation for some time machine will turn to screen saver mode The time of this mode can be set in Menu Back to measure mode just gentle touching on the screen 3 2...

Page 12: ...sed on center mark point and it will be showed on screen L R When the left side or right side L R has been set and the mark showed up the degree of the side will be showed under the mark S means to measure one side lens PD To show PD LPD left PD RPD right PD and the PD of glasses Marks functions are showed as marks Menu to enter into and modify the system parameter Memory to save the measured data...

Page 13: ... glasses the screen will appear like following click then into the UV measurement interface measurement the glasses Figure 3 5 UV measurement interface Menu shows After entering into Menu to press the corresponding button to change the menu options then back by pressing exist L R to choose left side or right side Clearance to clear the saved data ...

Page 14: ... 12D 0 25D Cylinder Mix Lens Normal lens hard lens Prism No display X Y P B Screen saver Closed 3minutes 5minutes 10minutes Auto memory Closed near to center focus on center language ENGLISH Chinese Switch of PD On off Backlight adjust Light dark clock Wallpaper gridding halo starry sky Time setting Yes no ...

Page 15: ...ower output injection of adapter to the power injection at the back of machine 4 to put the grounding terminal well 4 2 Test 1 to turn on the power switch just gentle touching on switch 2 the test data should be 0D without any lens To turn on the power so check if everything is OK Note if all the data showed on measurement menu are not 0 then it means that the protecting glass is dirty which is in...

Page 16: ...eft side L R keys will be workable In PD measuring the sliding nose pad frame will direct the left or right side and it will measure out the PD of left or right while the L R keys are not workable If no need for choosing left or right side there will be S showed on the right up corner of measurement interface 2 Lens settings To put the lens on the lens base and the convexity upward Figure 4 1 to p...

Page 17: ...the very place at center the shape of the drone will be a thicker cross 十 There are two ways to confirm the measured data A to press the memory key and the data will be saved When data be saved the direction type of astigmatism can be changed To press clear key then it will restart the measurement B automatical memory settings the data will be saved automatically according to the settings then the...

Page 18: ...ing 2 measurement to lens with frame Normal measurement 1 to press L R key to move the drone 十 to the center When the distance between the two less than 0 5 the shape of the drone will be as a cross 十 When the drone is just at the very point of center the shape will be a thicker cross 十 To press memory key or automatical ...

Page 19: ...ne by the move of sliding nose pad frame 3 to rotate the lens table knob to move the lens table till touch the bottom of lens frame and move sliding nose pad frame to the center of lens frame To move the lens to make the drone 十 close to the center when the distance between the two less than 0 5 the shape of the drone will be as a cross 十 When the drone is just at the very point of center the shap...

Page 20: ...check the other lens to move the sliding nose pad frame along with the lens frame Action as 1 3 measurement of high index lens This machine is manufactured with standard green light source There is no need to set the Abbe number when measure the high index lens The measured data showed on the screen will be the correct one ...

Page 21: ...ress print then the machine will print out the data One side Two side figure4 7 print of measured data 5 Measurement of double triple vision lens There are two keys used in this measurement a Memory b Mode 1 To put the far vision part far vision range of lens on the lens base ...

Page 22: ...med 3 ADD of double vision lens To move the lens toward yourself till the near vision part near vision range of the lens on the lens base To press Mode there will be AD1 on the screen When the notice showed under the drone as close to the center there is no need to focus the center perfectly to press the Memory then the measured data of near vision part will be confirmed And the measurement finish...

Page 23: ...ed under the drone as close to the center there is no need to focus the center perfectly to press the Memory then the measured data of the center of near vision part will be confirmed Then continue the measurement b To move the near vision part to the lens base then press Mode there will be AD2 showed on the screen When the notice showed under the drone as close to the center there is no need to f...

Page 24: ...ial eyes ports supplied by manufacturer and make the lens convexity upward In the near vision range to keep the horizontal reference line in horizontal and lock the lens To measure the far vision range first and to move the lens up and down and from left to right to make the drone just on the center of the cross line When the drone as the thicker cross 十 and to press the Memory key the data of far...

Page 25: ...asurement of lens with frame There is no marks for range on lens when measure with the progressive screen So be careful during the operation 1 to put the lens with frame well 2 to measure the parameter of the far vision range The center of far vision range is close to the center of the frame The measuring way is same as that of item 6 above ...

Page 26: ...To measure the prism lens on glasses 1 to point out the pupil center to let customer to wear glasses and look into the distance and point out the pupil center on every lens Note the diameter of the point should be smaller than 1mm If too bigger it will influence the measurement 2 to choose the left or right wide of lens to press L R key to choose the left right lens or right side lens 3 to choose ...

Page 27: ...the lens with frame then to move the lens table close to the bottom of frame 2 to make the astigmatism axis to show the data to rotate the lens till there shows the data which will be showed through axis If the thicker 十 turns to be 十 then it should be center focusing again 3 to make the data of prism lens to make the data of prism same as that of the matchable lens When choose the rectangular coo...

Page 28: ...nance 5 1 daily care 1 Don t put machine under sunshine 2 Don t put heavy part on machine which will damage to machine 3 To keep clean both machine and air around 4 To keep machine clean Don t use the organic solution like volatile liquid diluent or benzol to machine 5 No operation for long time to cut off power supply and pull out the plug 6 To put on the dust cover when not use the machine ...

Page 29: ...ng glass by balloon to blow away the dust If it is still dirty to wipe it with clean dry cloth To clean the protecting glass regularly and move up the lens base when clean it Note don t scratch the glass it will influence the preciseness 3 Don t use alcohol gas ether or acetone to wipe machine 4 to clean the light transfer glass regularly The lens base should be taken down while turning off machin...

Page 30: ...chine 4 handle with care and to put on a smooth table 5 5 service information 1 maintenance Anything problem with machine can not be settle according to the manual please contact with the after sales services office Please offer us with following information about machine Machine DLR 700 Serials number the number on the sticker Problem please try to be detailed picture and video are the better cho...

Page 31: ...sposal company or the agent 6 Simple fault phenomenon and solution 6 1 solution to general problem Figure 6 1 General problem solution No fault problem Solution 1 No reaction from screen when turn on machine There power wires are not connected well or turn off machine not correctly To check the wires if in good condition and cut off the power then turn on it after a while 2 The screen doesn t show...

Page 32: ...irty To avoid the strong light or clean the glass 4 Not reaction when press the print No measured data saved The data should be saved then can be printed 5 The marks on lens not clear There is problem with the pen To change the pen 6 Measured data preciseless Need to calibrate the data again Enter into the interface for calibration ...

Page 33: ...10 00m 1 Prism basal Angle measurement range 0 to 360 Prism Horizontal 10cm m Vertical 15cm m The accuracy of measurement Dioptric 0 01 0 12 0 25 m 1 Prism 0 01 0 12 0 25 cm m Mode of measurement Cylinder Prism X Y P B Speed of measurement 0 2 second Diameter od measurable lens 18 to 110mm Other parameters Display 1024 600 TFT and touch screen Printer Thermal printer Size 203 W x 240 L x 480 H mm ...

Page 34: ... Power supply AC 220V 50Hz Power 25VA 8 Attached list packing parts 1 main body 1 unit 2 Print paper 1 roll 3 Dust cover 1 piece 4 Power wires 1 piece 5 Inkpad oil 1 box 6 Operation manual 1 piece 7 Certificate of quality 1 piece 8 Maintenance card 1 piece ...

Reviews: