NV11 Manual Set – Section 2
7
Copyright © Innovative Technology Ltd 2012
GA963-2
Caution!
Be careful cleaning sensors.
When cleaning the recessed front sensor, use a
small soft brush or cotton bud – do not use
anything sharp or abrasive.
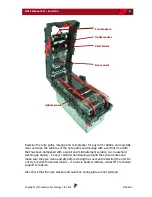
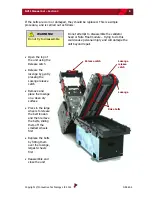
Cleaning the belts is a simple operation. Ensure the validator is enabled (i.e. bezel
lights are illuminated), then remove the bezel:
The bezel is
removed by pushing
the red locking arms
on both sides of the
validator upwards,
and sliding the bezel
away from the
locking arms
Lift the bezel off
once the bezel has
been slid fully
across and is clear
of the locating pins
a. Push locking arms upwards
b. Slide bezel away from
locking arms
Locating pins
Lift upwards to remove
Summary of Contents for NV11
Page 1: ...NV11 MANUAL SET...
Page 2: ...NV11 MANUAL SET INTRODUCTION...
Page 10: ...NV11 MANUAL SET QUICK START AND CONFIGURATION GUIDE SECTION 1...
Page 27: ...NV11 MANUAL SET FIELD SERVICE MANUAL SECTION 2...
Page 49: ...NV11 MANUAL SET ITL SOFTWARE SUPPORT GUIDE SECTION 3...
Page 57: ...NV11 Manual Set Section 3 9 Copyright Innovative Technology Ltd 2012 GA963 2...
Page 74: ...NV11 Manual Set Section 3 26 Copyright Innovative Technology Ltd 2012 GA963 2...
Page 78: ...NV11 Manual Set Section 3 30 Copyright Innovative Technology Ltd 2012 GA963 2...
Page 92: ...NV11 MANUAL SET MECHANICAL AND ELECTRICAL MANUAL SECTION 4...
Page 121: ...NV11 Manual Set Section 4 30 Copyright Innovative Technology Ltd 2012 GA963 2...
Page 131: ...NV11 Manual Set Section 4 40 Copyright Innovative Technology Ltd 2012 GA963 2 Cashbox Options...
Page 134: ...NV11 MANUAL SET SOFTWARE IMPLEMENTATION GUIDE SECTION 5...
Page 157: ...NV11 MANUAL SET TECHNICAL APPENDICES SECTION 6...

