1
2
3
4
5
6
DIGITAL CONTROLLER
BLOWER CALIBRATION
Request a Complete Manual • info@innovive.com
Contact Support • (866) 432-2437 | support@innovive.com
Tutorials • www.innovive.com/resources/video-training.html
F10
F9
F8
Network Info
Sound Volume
Screen Brightness
Blower Calibration
Blower Calibration
This will calibrate airflow
sensors on all blowers. Press
'Start' to begin
Current values:
Updated values:
Calibrate blower airflow
Up
Done
Down
Start
6/6
Network Info
Sound Volume
Screen Brightness
Blower Calibration
Blower Calibration
Ensure rack is disconnected
from HVAC. Press Calibrate
to begin
Current values: 350 351 352 353
Updated values: • • • •
Calibrate blower airflow
Up
Done
Down
Calibrate
6/6
Network Info
Sound Volume
Screen Brightness
Blower Calibration
Blower Calibration
Please confirm rack is
disconnected from HVAC
Current values: 350 351 352 353
Updated values: • • • •
Calibrate blower airflow
Up
Done
Down
Confirm
6/6
F12
F11
Network Info
Sound Volume
Screen Brightness
Blower Calibration
Blower Calibration
Calibrating side A...
Supply
Current values: 350 351 352 353
Updated values: • • • •
Calibrate blower airflow
Up
Done
Down
6/6
Network Info
Sound Volume
Screen Brightness
Blower Calibration
Blower Calibration
Calibration complete,
restoring setpoints.
Success!
Current values: 350 351 352 353
Updated values: 380 358 361 387
Calibrate blower airflow
Up
Done
Down
6/6
BEFORE OPERATING THE INNORACK, LEAVE THE RACK
RUNNING IN ITS OPERATING ENVIRONMENT FOR 24 HOURS.
ALL RACKS MUST BE CALIBRATED PRIOR TO OPERATING.
DO NOT PRESS ANY BUTTONS WHILE BLOWER
IS CALIBRATING.
DO NOT DISCONNECT BLOWERS WHILE RACK
IS POWERED ON!
IT IS RECOMMENDED TO REPEAT THE BLOWER
CALIBRATION PROCEDURE EVERY 6 MONTHS.
STEP 1. GETTING TO THE BLOWER CALIBRATION SCREEN
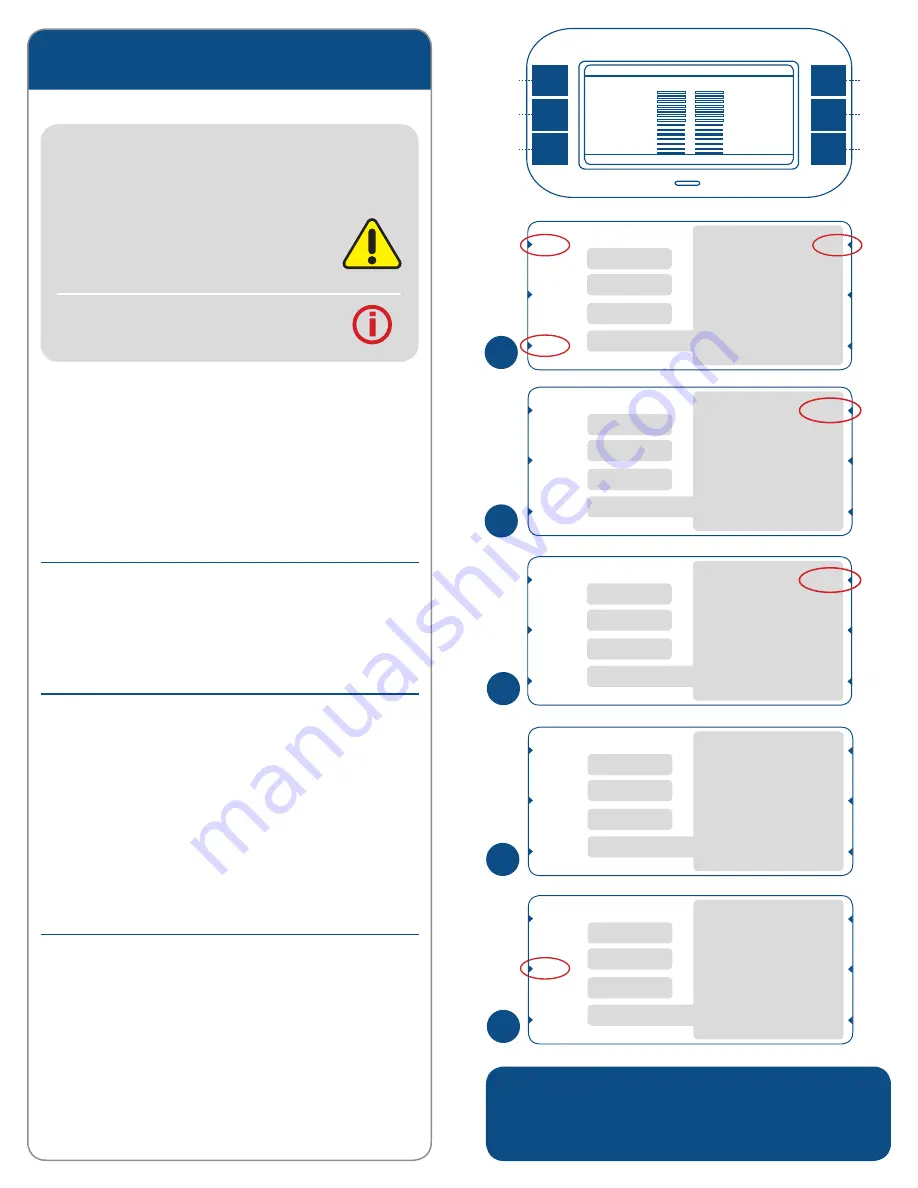
• Press and hold bottom buttons 5 and 6 on the digital controller until
the menu screen appears.
• Scroll UP (button 1) or DOWN (button 5) until you reach the Blower
Calibration screen (see
F8
).
• Press START to begin (see
F8
)
.
The controller will confirm the number of rack sides and current
blower calibration values (see
F9
)
.
STEP 2. DISCONNECT HVAC BEFORE CALIBRATING
• Make sure the rack is disconnected from the HVAC system.
• Press CALIBRATE to begin (see
F9
)
.
• Press CONFIRM to ensure the rack is disconnected from all HVAC
systems (see
F10
).
STEP 3. CALIBRATING THE BLOWER
After confirming the rack is disconnected from the HVAC, calibration of
each blower will begin (see
F11
)
.
During the calibration process, the following will take place:
1. Airflow set points will be saved.
2. Blower fans will be turned off, and the controller will wait 30 seconds for
the fans to stop spinning.
3. Each blower will be calibrated in sequence.
As each blower is calibrated, the updated calibration values will be
displayed at the bottom right of the calibration screen (see
F12
).
STEP 4. BLOWER CALIBRATION IS COMPLETE
SUCCESS:
Upon successful recalibration of all blowers, airflow set points
will be restored. Blower calibration screen will remain displayed. To exit
blower calibration screen, press DONE (see
F12
)
.
PROBLEMS:
If any problems are encountered during the blower
calibration process, airflow set points will be restored. Problem message
will appear on the screen. Contact Innovive support for assistance.
If failure occurs, restart the blower calibration process, press RESTART.
To cancel the blower calibration process, press DONE.


