background image

Before Using The Air Fryer 

For The First Ti me 

1. Remove all packaging material
Remove any stickers or labels from the appliance. 

2. Thoroughly clean the pan and basket with hot water, some dishwashing liquid and a non-abrasive

sponge. 
3. Wipe the inside and outside of the appliance with a moist cloth. 

Note: During the first few times of using your new Air Fryer there might be a "hot plastic" smell. This 1s 

perfectly normal in new Air Fryers as the material is heated for first time. It will go away after the first 

few uses. 

PREPARING FOR USE 

1. Place the appliance on a stable, horizontal and even surface

Do not place the appliance on non-heart-resistant surface. 

2. Put the basket into the pan, Place the ingredients in the basket-do not overload
3.Plug the Air Fryer into an electrical wall outlet
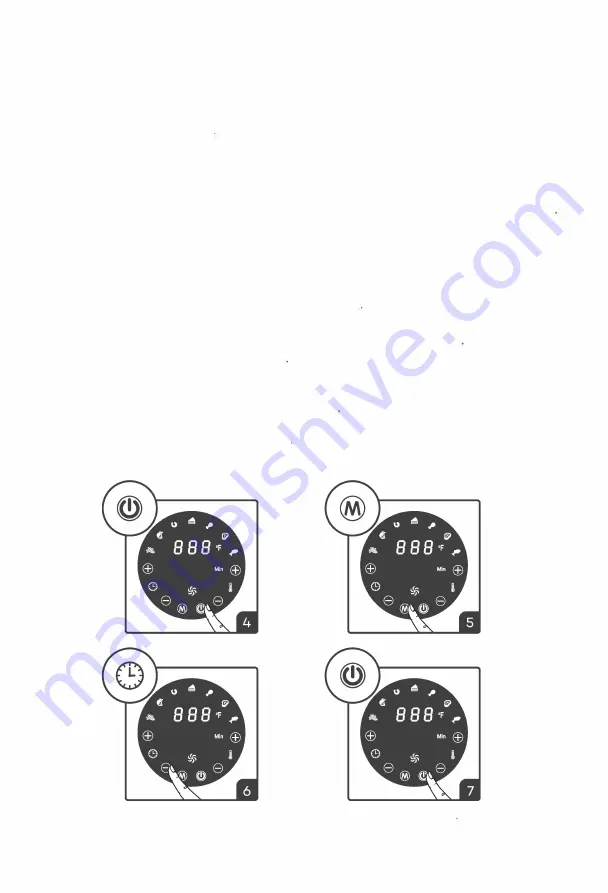
4. To turn on the appliance tap the power icon. The air fryer will first go into default mode
5. To select a preset, tap the menu icon, until desired food icon appears. The selected food will start to

flash. The temperature and time will appear on the screen

6. To set the temperature and time manually or to adjust the preset temperature or time, tap the arrow

icons to select your desired temperature or time
7. To begin the air frying process tap the power icon.

Note: If you want to power off the air fryer in middle of air frying press the power icon 

for 3 seconds. 

Summary of Contents for 55PA1US

Page 1: ...AIR FRYER INSTRUCTION MANUAL READ THIS MANUAL THOROUGHLY BEFORE USING AND SAVE IT FOR FUTURE REFERENCE llnnsky SSPAlUS ...

Page 2: ...ever connect this appliance to an external timer switch or separate remote control system in order to avoid a hazardous situation To disconnect turn off the appliance then remove plug from the wall outlet 8 Do not place the appliance on or near combustible materials such as a tablecloth or curtain The accessible surfaces may become hot during use Do not place on or near a hot gas or electric burne...

Page 3: ...t the lnnsky Customer Support Team GENERAL DESCRIPTION Control Panel Safety Switch Frying Basket Frying Basket Handle 0 Frying Tray O Release Button Cover G Basket Release Button o o Control Panel CAKE Shellfish Muscle Flesh Poultry Steak French Fnes tr BBB F Fish Time Controls Min Time Controls Temperature Controls Temperature Controls Menu icon Power icon Working Indicator ...

Page 4: ...Clean the inside af the appliance with hot water and nan abrasive spange 5 Clean the heating element with a cleaning brush ta remove any foad residues WARRANTY INFORMATION The manufacturer provides warranty in accordance with the legislation of the customer s own country of residence with a minimum of 18 months starting from the date on which the appliance is sold to the end user The warranty only...

Page 5: ...zontal and even surface Do not place the appliance on non heart resistant surface 2 Put the basket into the pan Place the ingredients in the basket do not overload 3 Plug the Air Fryer into an electrical wall outlet 4 To turn on the appliance tap the power icon The air fryer will first go into default mode 5 To select a preset tap the menu icon until desired food icon appears The selected food wil...

Page 6: ...reparing another batch No preheating is necessary Tip After hot air frying the pan and the ingredients are hot avoid touching Depending on the type of the ingredients in the air fryer steam may escape from the pan SETTINGS This table below will help you to select the basic settings for the ingredients Note Keep in mind that these settings are indications As ingredients differ in origin size shape ...

Page 7: ......

Page 8: ... n r a d is t s p e o i r n n i e n t s t h s h e o e f a fr m th ie o e s u fr nt ie o s f de oil an es SOLUTION Put the main plug in an grounded wall socket Tap the timer icon to set the required preparation time to turn on the appliance Slide the pan into the appliance properly Put smaller batchesof ingredients in the basket Smaller batchesare fried more evenly Tap the temperature icon to eat t...

Reviews: