background image

4.2: Mechan cal and Electr cal Assembly

 4.2.1: Return to Factory Sett ng

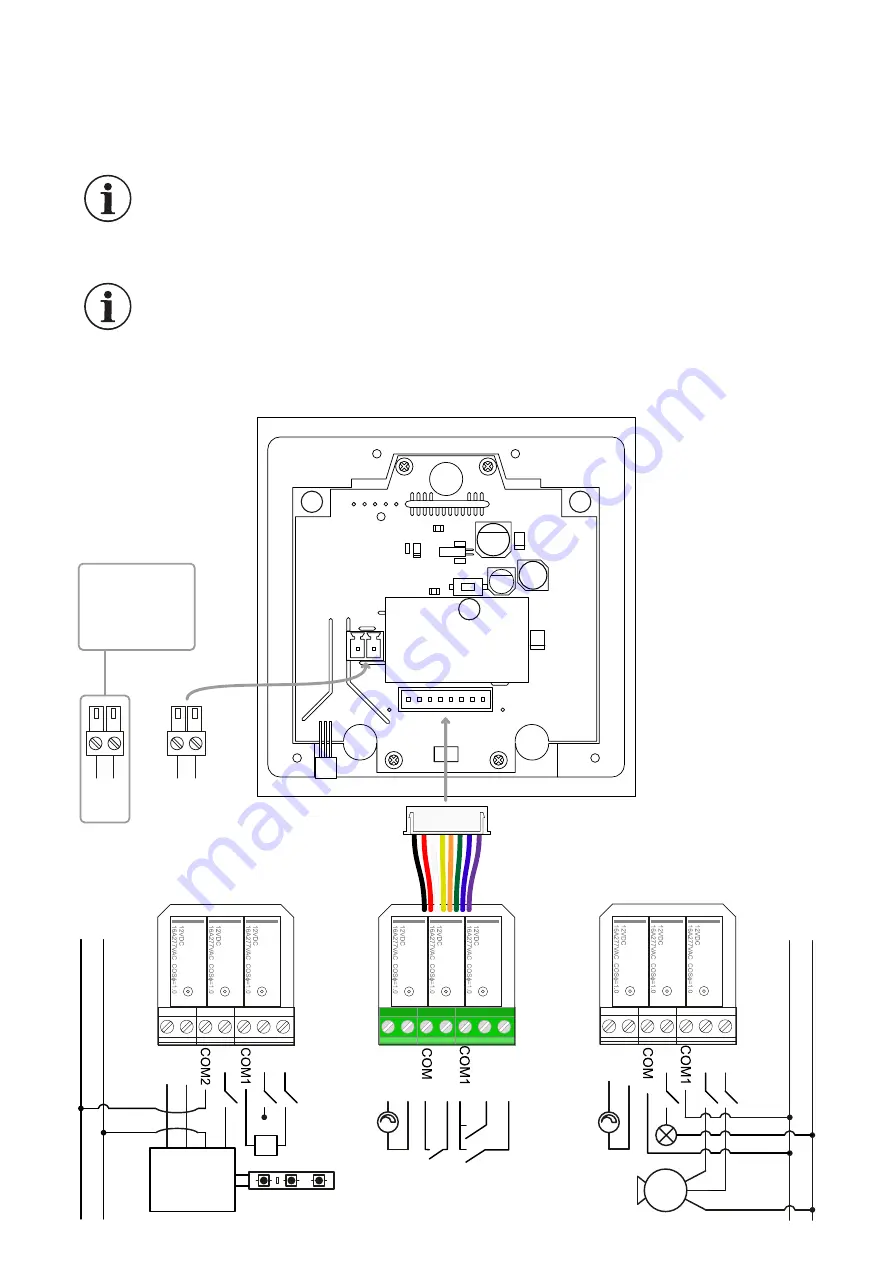
 4.2.2: Electr cal Assembly

L  N

L

 : 

Phase

N

 : 

Neutral

Q

 : 

D g tal Output

P n

COM

 : 

Common 

contact po nt

+,-

 : Pos t ve, Negat ve 

poles

M

 : 

Curta n, Bl nder


Motor

K

 : 

Comb  bo ler 

thermostat connect on

A

 : 

Mount ng apparatus 

bear ng

The dev ce w ll return the factory sett ngs when the Reset button  s pressed and

held for 10 seconds. The button  s represented w th “B” letter  n the draw ng.

+  -

12V

DC  supply 
p r o d u c t 
connect on 
s t r u c t u r e

6

Q1

Q2

Q3

2

0-10V

Q1

Q2

Q3

2

M

L   N

The  relay  group  that  can  be  mounted  and  d smounted  to  the  back  of  the  dev ce 

enables you to turn on/turn off the dev ce or d m the fixtures by controll ng the LED dr vers 

w th 10VDC output from the Smart Touch Panel M n . The relays are res stant up to 277VAC

16A  nrush 100A and enables long-term use w thout relay adhes on.

L   N

K

Q1

Q2

Q3

DIM+

DIM-

DIM+

DIM-

DIM+

DIM-

D

I

M

-

D

I

M

+

LED Dr ver

240VAC

LED Str p

Vo+
Vo-

A

A

B

Summary of Contents for STPM1710

Page 1: ...Smart Touch Panel M n STPM1710 V1 0 inohom USER MANUAL EN Smart Life Solutions ...

Page 2: ...3 1 Technical Details 3 2 Technical Drawing 4 Installation 4 1 Before Installation 4 2 Mechanical and Electrical Assembly 4 2 1 Return to Factory Settings 4 2 2 Electrical Assembly 4 2 3 Mechanical Assembly 5 Communication Properties 6 Descr pt ons 6 1 Button Funct ons 6 2 Screen Menu Descr pt ons 7 Commissioning 8 Regulations ...

Page 3: ...ect ons w ll be changed Do not operate the dev ce w th wet or mo st hands to avo d electr c shock r sk Do not make any changes on th s dev ce that are not spec fied n the user manual Do not leave the dev ce d rectly exposed to sunl ght or other heat sources Do not place the dev ce near open fire or ntense heat sources such as electr c Other dev ces The manufacturer GST ELEKTRONİK LTD ŞTİ cannot be h...

Page 4: ...C Temperature Sensor 55 C 125 C 3 Relay 277VAC 16A nrush 100A Analogue Output 0 10VDC Des gn 4mm Tempered Glass Surface Capac t ve Touchscreen RF 433 Mhz nohom OS 2 5mm screwed electr c term nal IP 20 0 50 C Max 50 C 65 Amb ent Hum d ty Max 2000m 90mm x 90mm x 14mm Surface Wall Mount ng EN55032 2015 EN55024 2011 EN62368 1 Sensors Hysteres s 0 5 C 0 96 OLED Screen Buttons Commun cat on Operat ng Sy...

Page 5: ...sk Do not power on the dev ce before all the connect ons are completed Check the dev ce user manual to create a secure connect on Do not make any connect ons other than the connect ons spec fied n the scheme Do not connect w th dev ces that do not comply w th secur ty standards Mount the dev ce away from metal surfaces or objects to avo d any negat ve mpact on the w reless commun cat on performance...

Page 6: ...d for 10 seconds The button s represented w th B letter n the draw ng 12V DC supply p r o d u c t connect on structure 6 Q1 Q2 Q3 2 0 10V Q1 Q2 Q3 2 M L N The relay group that can be mounted and d smounted to the back of the devce enables you to turn on turn off the devce or d m the fixtures by controll ng the LED drvers w th 10VDC output from the Smart Touch Panel M n The relays are res stant up to...

Page 7: ... ng screw the ground Use the mount ng apparatus n the box for mount ng Please use the correspond ng holes of mount ng apparatus to mount sw tch case Make sure that the apparatus s perpend cularly mounted to the ground The holes on the mount ng metal sheet allows 20 dev at on for fine tun ng inohom 20 F ne Tun ng Angle 4 2 3 Mechan cal Assembly 7 C Mount ng Ear D Mount ng Screw C C C D D ...

Page 8: ...ouch Panel M n can w relessly commun cate w th other nohom products and can learn and sw tch You can tr gger ts own when used w th relay or relays on RL 1710 CCM176X or Nova panel relays t w relessly commun cates w thout relay to SWITCH Other dev ces ntegrated v a IP Camera Intercom EIO 8 manage your comb bo ler for temperature set value and keep your room at the des red temperature nohom IP Gatew...

Page 9: ...t ons 6 2 Screen Menu Descr pt ons author zed dealer Th s operat on s completed by tra ned techn cal personnel n comm ss on ng program Go Back Button Go Forward Button Decrease and Turn Off Buttons Increase and Turn On Buttons Increase and Turn On Buttons Decrease and Turn Off Buttons 9 HEATING ACTIVE COOLING ACTIVE AIR CONDITIONING PASSIVE ILLUMINATION ON ILLUMINATION OFF ILLUMINTION INTENSITY PLUG...

Page 10: ...used to dent fy the related dev ce The LEDs on the dev ce w ll bl nk w th 1 second nterval when pressed FIND button and press STOP button when the dev ce s found Then sett ng parameters are sent to the related dev ce w th MATCH button and the dev ce becomes operat onal IO TEST buttons on the control panel nterface can be used for test ng the correct cable connect on of the dev ce The state of the ...

Page 11: ...e the trademarks of the r respect ve owners The domest c product on logo on all the products show that themanufactur ng and software are 100 completed n Turkey The company has ISO 9001 Qual ty Management 14001 Env ronment Management 45001 Occupat onal Health and Safety Standards The dev ces tagged w th WEEE symbol shall not be d scarded w th other domest c waste The product should be del vered to ...

Reviews: