


19
12.
High Speed Handpiece
–
Maintenance and Care
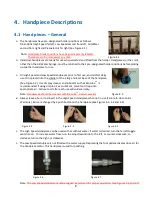
In order to always provide the handpiece with clean air, water accumulated in the compressor must be drained out
ONCE A DAY. DAILY LUBRICATION IS ABSOLUTELY ESSENTIAL.
12.1
Operation and Maintenance
Operate the handpiece at a pressure of 35 PSI. The handpiece is engineered to attain speeds of 400,000
RPM at 35 PSI. Use the brush to remove foreign particles. Particles can be dislodged by blowing air
backward from the contra-angle head.
NOTE: DO NOT
attempt to blow particles from the rear end of the
handpiece, as larger particles will be blocked in the water tube.
12.2
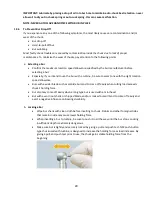
AUTO-CHUCK (PUSH BUTTON) SYSTEM - INSTALLING AND REMOVING ROTARY CUTTING INSTRUMENT
Grasp handpiece firmly so that your thumb can touch the cap, then push on centre of cap. Insert cutting
instrument into chuck until it stops, then release thumb. NOTE: After installation, it is recommended as a
safety measure to push button again one time (holding bur) and release. This will effect proper alignment
of the jaws. For removing, grasp handpiece firmly so that your thumb can touch the cap, and push on
centre of cap. Then, pull bur straight out.
12.3
OBSERVE THE FOLLOWING SAFETY RULES
Do not attempt to extend burs from the chuck. Always tug on the cutting instrument after chuck is loaded
to confirm the cutting instrument is held securely. Before use, verify rotating concentricity by operating the
handpiece outside the mouth in a safe place. Do not use instruments which do not run concentric or
produce excessive noise.
CAUTION:
Never depress the auto-chuck end cap button or rest the end cap against any part of the oral
anatomy during the handpiece operation. Depressing the end cap while bur is rotating can activate the
chuck opening spring mechanism and result in end cap heat-up and/or loss of bur retention.
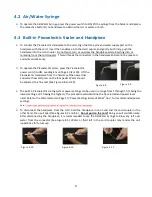
12.4
Replacement of Cartridge (Turbine)
a.
Place bur in cartridge.
b.
Unscrew head cap with head button wrench, turning counter-clockwise.
c.
Push bur on flat surface until cartridge is removed.
d.
Clean inside of handpiece head to remove moisture and foreign particles.
a.
Insert new cartridge into handpiece head. When replacing with canister style cartridge, the guide
projection on the canister must be lined up with concave groove inside handpiece head to insure
proper fit.
e.
Replace head cap into handpiece by screwing clockwise with cap wrench.
NOTE: When replacing the head cap, be careful to align threads correctly. these threads are very fine and
can be easily stripped.
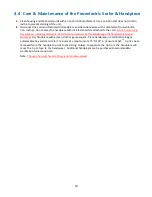
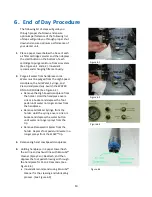
12.5
Autoclave Procedure for High Speed Handpiece
Remove bur from handpiece and clean handpiece with soap and water by scrubbing with a toothbrush or a
2” x 2” piece of gauze, then towel dry the handpiece. Lubricate the handpiece. Insert bur back into the
handpiece and connect to unit. Run the handpiece for approximately 15 - 20 seconds or until lubricant is
out of handpiece. Remove bur from handpiece and disconnect handpiece from unit. The handpiece is now
ready for sterilization. Follow manufacturer’s instructions for the autoclave unit being used. After
autoclaving is complete, allow handpiece to return to room temperature, and then lubricate handpiece
again prior to use.


