background image


2


SAFETY


PRECAUTIONS


To


use


this


player


safely,


please


read


and


follow


the


instructions


in


this


manual


carefully


before


use.


THE


AC


MUST


REMAIN


EASILY


ACCESSIBLE


IN


ORDER


TO


BE


ABLE


TO


DISCONNECT


THE


DEVICE


IN


CASE


OF


EMERGENCY.


Never


use


the


player


while


driving


or


when


operating


any


vehicle,


as


this


could


cause


an


accident.


It


is


also


against


the


law


in


many


areas.


Take


care


when


using


the


player


outdoors,


especially


when


crossing


the


street.


Do


not


listen


to


music


at


very


high


volumes


using


the


earphones


as


this


can


permanently


damage


your


hearing.


Keep


the


player


clean


and


never


store


it


next


to


a


heat


source


or


in


dirty,


humid


or


wet


places.


Keep


it


out


of


direct


sunlight.


Do


not


put


the


player


in


high


temperature


places


(over


40

º

C),


especially


not


in


a


car


with


the


windows


closed


in


summer.


Keep


the


player


away


from


strong


magnetic


fields.


Please


don’t


turn


on


the


device


in


where


the


wireless


equipment


is


forbidden


or


when


the


usage


of


the


device


will


cause


interference


and


danger.


Press


the


player’s


buttons


gently.


Pressing


them


or


the


screen


too


hard


can


damage


the


player.


Do


not


use


the


player


in


an


electronics

prohibited


area,


such


as


in


an


airplane.


Do


not


use


the


player


in


an


extremely


dry


environment,


as


this


can


lead


to


static


discharge,


which


can


damage


the


player.


Do


not


subject


the


product


to


harsh


impacts.


Do


not


drop


the


appliance.


This


may


result


in


damage


to


the


product.


Do


not


attempt


to


dismantle


or


repair


this


unit


yourself,


Repairs


should


only


be


performed


by


qualified


personnel


only.


We


will


not


be


responsible


for


any


memory


loss


caused


by


product


damage,


repairs


or


other


reasons.


Disconnect


the


appliance


from


the


power


source


when


cleaning.


In


order


to


prevent


program


failure,


never


disconnect


the


player


suddenly


from


a


PC


during


downloading,


uploading


or


formatting


to


prevent


program


failure.


Summary of Contents for MID110-3G

Page 1: ...CONNECTIVITY Ref MID110 3G User s Manual Thank you for you chose our 3G TOUCHPAD In order to maintain good performance for this unit please read this user manual carefully before using and make sure...

Page 2: ...away from strong magnetic fields Please don t turn on the device in where the wireless equipment is forbidden or when the usage of the device will cause interference and danger Press the player s butt...

Page 3: ...away from direct sunlight and heat source Protect the power cord When connect the power cord do not step onto it or place any object on it which may cause extrusion Protect the connector of the power...

Page 4: ...ll the SIM cards 2 3 Startup and Shutdown 2 4 Open and Close of the Screen 2 5 Usage of Touch Screen 2 6 Home Page 2 7 USB Connection 3 BASIC SETTING 3 1 SIM Management 3 2 Wireless and Internet 3 3 B...

Page 5: ...ra 4 5 FM Radio 5 COMMUNICATION FUNCTION 5 1 Phone 5 2 Text Message 5 3 Contact List 6 INTERNET 6 1 Browser 6 2 Email 7 OTHER APPLICATION PROCEDURES 7 1 Clock 7 2 Calculator 7 3 File Manager 7 4 Recor...

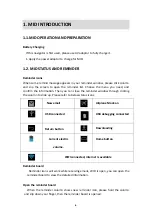
Page 6: ...the information Then you can close the reminder window through clicking the column to slide up Please refer to below status icons New email Airplane Mode on USB connected USB debugging connected Retu...

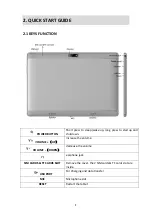
Page 7: ...p long press to startup and shutdown VOLUME UP increase the volume VOLUME DOWN decrease the volume earphone jack SIM CARDS TF CARDS SLOT Remove the cover the 2 SIM cards TF cards slot are inside USB P...

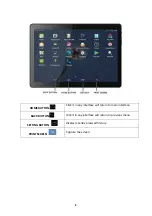
Page 8: ...UTTON Click it in any interface will return to main interface BACK BUTTON click it in any interface will return to previous menu SETTING BUTTON display recently browsed history PRINT SCREEN Capture th...

Page 9: ...can enter into startup picture The system enters into screen lock status please unlock it Shutdown 1 Long press POWER it will popup shutdown window 2 Shutdown window contains mute mode airplane mode r...

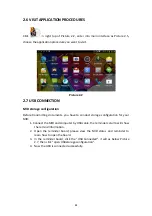
Page 10: ...open it it will show the picture as below picture left slide to unlock and enter into camera right slide the unlock icon to unlock the screen 2 5 HOME PAGE Main interface as below picture 2 1 long pre...

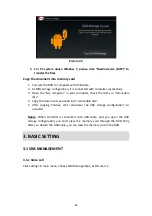
Page 11: ...ansmitting documents you have to conduct storage configuration for your MID 1 Connect the MID and computer by USB cable the reminder column will show the remind information 2 Open the reminder board p...

Page 12: ...ck the items in removable disc 4 Copy the documents you need into removable disc 5 After copying finishes click shutdown the USB storage configuration to uninstall Notice When the MID is connected wit...

Page 13: ...ck voice call choose defaulted SIM card as Picture 3 2 Picture 3 2 3 1 2 Video Call Click settings in main menu choose SIM Management and click video call choose defaulted SIM card when makes video ca...

Page 14: ...3 4 Picture 3 4 3 1 4 Data Connection Click setting application in main menu choose SIM management click data connection choose the defaulted SIM card 3 2 WIRELESS AND INTERNET 1 Connect Wi Fi 1 In th...

Page 15: ...will pop up the password window enter password click connect 2 Add Network 1 Click icon in right top as Picture 3 5 Picture 3 5 2 Input network SSID the wireless network name click save 3 Click user n...

Page 16: ...4 Click the available Bluetooth device it will popup request window enter into related password and match the device to connect Bluetooth setting 1 Rename tablet Click icon in right top of Picture 3 6...

Page 17: ...e mode is turned on WIFI and GSM can t get any signal then airplane mode is turned off WIFI and GSM module will recover to previous state 3 4 2 VPN Open VPN click add VPN network as Picture 3 9 Input...

Page 18: ...otspots 1 Click setting application in main menu 2 Click more when Wi Fi is well connected open network share and portable hotspot Picture 3 11 3 Click keep WI FI hotspots on choose open time 4 Return...

Page 19: ...ord should be more than 8 numbers 3 4 4 Mobile Networks 1 3G service Click 3G service as Picture 3 13 choose available defaulted SIM card GSM is 2G network WCDMA is 3G network Picture 3 13 2 Access Po...

Page 20: ...the webpage it visit belongs to wap webpage and CMNET support www browse mobile phone network it can also log in webpage in computer And the charges are also different 3 Network Operator Click networ...

Page 21: ...andard to enter into Picture 3 17 Picture 3 17 1 Vibrate In picture 3 17 click vibrate MID will vibrate when someone calls you 2 Volume In picture 3 17 click volume you can set ringtone notice and ala...

Page 22: ...call Ringtone In picture 3 17 click voice call ringtone to choose voice call ringtone as Picture 3 19 Picture 3 19 4 Video call ringtone In Picture 3 17 click video call ringtone to choose video call...

Page 23: ...You can Adjust the screen brightness set wallpaper set font size etc as below photo 3 8 STORAGE Open setting function click memory click preferred install location you can choose install new applicat...

Page 24: ...e Open GPS Assistance it can increase the speed of GPS positioning but you need to insert SIM card and use data transmission 4 EPO setting Click EPO setting enter into Picture 3 21 then check if EPO p...

Page 25: ...ut when USB adjustment is turned on USB storage needs to manual adjust 3 13 2 Keep awaken state If you open keep awaken state it will never auto sleep when your MID is charging 3 13 3 Pointer Location...

Page 26: ...menu or desktop click music icon to enter into music player click the music you want to play Picture 4 1 Drag the progress bar to adjust play progress Operation of music player button as Picture 4 2...

Page 27: ...view 3 Click the picture you want to view the system will play it in full screen mode automatically 4 The pictures can be zoom in and zoom out put two fingers on the screen the separate the fingers g...

Page 28: ...the main interface or desktop to enter into FM radio interface Radio button operation instruction as Picture 4 4 Switch front back camera Click it to take pictures Sub menu Full screen play mode came...

Page 29: ...the channel and the channel will be saved in channels list Note You need to insert earphone as antenna when using FM radio If no antenna your MID can t search any frequency band Enter into channel li...

Page 30: ...30 5 COMMUNICATION FUNCTION 5 1 PHONE 1 Click Phone application procedure 2 Operate as Picture 6 1 Picture 5 1 Display phone numbers Call history Hide key Menu...

Page 31: ...e 2 Click Edit new message Picture 5 2 5 3 Contact List Click Contact list in the main interface enter into the contact list as Picture 5 3 Picture 5 3 Directly input phone number or name Add receiver...

Page 32: ...e Yahoo Gmail Hotmail and 163 a Email Setting 1 After you click the sending email icon you can see the email setting guide which can help you to set 2 Input your email address and password 3 Click Nex...

Page 33: ...menu key the menu popup 8 Click Attach file photo music video contacts 9 Click send to send the email out 7 OTHER APPLICATION PROCEDURES 7 1 CLOCK Click Clock procedure enter into clock alam setting...

Page 34: ...record interface click record key to start record Click Play key to play the recorded sound The system will auto remind you to use or abandon this record please choose it manually Play the record choo...

Page 35: ...plication procedures installed in the system 3 Click the APK you want to uninstall click uninstall 4 Click confirm to finish uninstallation Note The procedure manager installed by system has many conv...

Page 36: ...luetooth G sensor GSM GPRS SMS MMS Emails FM radio Calendar play store GMAIL etc Speaker Built in speaker Earphone Jack 3 5mm Camera Built in 2 cameras camera on front 0 3MP on backside 5 0MP AUDIO fo...

Page 37: ...enerally on the market 2 In order to minimize hearing damage it is recommended to limit the listening time to 5 hours per week at a moderate level 3 Listening to music at a loud level can affect the h...

Page 38: ...38...

Reviews: