background image

INOXPAN S.L. 

EN 

– INSTALLATION


The  appliance  was  designed  to  exhaust  odors  and  vapors  in  the  best  way.  The 
appliance  is  to  be  installed  on  the  outside  wall  of  the  house  and  connected  to  the 
cooker-hood which is in the kitchen. 

 
The motor must be installed in such a manner that its vibrations are not transmitted to 
the conduits or structures of the building. Make sure the motor is firmly and stably secure 
and that it is level. 


WARNING! 

This motor must not be installed upside down. The fan should be installed 

in such a manner that maintenance and repair operations can be carried out simply and 
safely.  Noise  disturbance  can  be  avoided  by  installing  a  silencer  (Not  included,  but 
available). 


DUCTING: 


Should  be  installed  with  a  Ø150mm  conduit,  a  different  diameter  will  affect  the 

performance of the motor, reducing its suction capacity, increasing noise produced 

as well as causing other problems. 


The recommended length  of the conduit between the hood and the motor is 6 m 

maximum,  a  greater  distance  will  reduce  the  motor's  suction  capacity,  while  a 

shorter distance will increase the noise of the hood, if the latter case in inevitable, 

we recommend the use of soundproofing elements. 


It is recommended that the conduit from the hood to the motor has no sharp angles, 

as  they  will reduce the suction capacity of the motor If they are inevitable, try to 

ensure they are not too close to the inlet or outlet of the motor (at least 0.5m away). 

Do not use elbow joints with an angle of less than 90º, or place one after another, 

the minimum recommended distance between them is 1m, and try to make them as 

open as possible. 


The maximum total length of the conduit from the hood to the exterior should be 6 
linear  meters,  not  counting  elbow joints  (one  elbow joint  is equivalent  to  1  linear 
meter), any longer and the suction capacity of the motor will be reduced. 


The material for the pipe has to be approved by an authorized company.


It  is  important  to  avoid  changes  in  the  diameter  (we  recommend  a  diameter  of 

150mm).


Sirius will not be responsible for problems of capacity and/ or noise level due to the 

missed respect of the warnings included in the manual of instructions.


WARNING! 

Please read this 

user’s manual carefully before installing the motor. 

Before installing, check that the diameters of the fume outlet correspond to those indicated in the 
specifications table. 
Do not manipulate the internal connections in the motor box. Do not plug the motor directly into 
the  mains  socket,  it  should  always  be  connected  through  the  hood,  following  the  connection 
instructions. 
 

EN 

– INSTALLATION


10 

Summary of Contents for Pando MOTOR MURAL V1100

Page 1: ... PT Manual de instalação FR Manuel d installation EN Installation Manual MOTOR MURAL V1100 Certificado de Empresa de Gestión de la Calidad UNE EN ISO 9001 2015 The International Certification Network Quality Management System ISO 9001 2015 Pando ...

Page 2: ...INOXPAN S L 2 ...

Page 3: ...ón de la vivienda correspondan con las características del aparato como muestra la etiqueta de los datos técnicos Un buen mantenimiento garantiza un buen funcionamiento y un buen rendimiento en el tiempo Todos los motores son empaquetados en la fábrica para soportar la manipulación normal de un transporte Al manipular el material use elementos de elevación adecuados con el objetivo de evitar daños...

Page 4: ...de insonorización En el recorrido de conducto entre campana y motor se recomienda que no haya codos éstos disminuirán la capacidad del motor De haberlos intentar que no estén muy pegados a la boca de admisión o expulsión del motor como mínimo que estén a 0 5m de distancia No usar codos más cerrados de 90º ni colocarlos uno seguido de otro distancia recomendada entre codos es 1m lineal e intentar q...

Page 5: ...terísticas do aparelho conforme indicado na etiqueta de dados técnicos Boa manutenção garante boa operação e bom desempenho ao longo do tempo NFORMAÇÕES DE SEGURANÇA Todos os motores são embalados na fábrica por forma a suportarem o manuseamento normal de um transporte Ao manusear o material utilize elementos de elevação adequados a fim de evitar danos no motor e ferimentos no pessoal ATENÇÃO Não ...

Page 6: ...elementos de insonorização Não se recomenda a utilização de curvas em toda a extensão da conduta entre oexaustor e o motor uma vez que estas diminuirão a capacidade do motor Caso necessite de utilizá las deve tentar que estas não fiquem muito próximas do orifício de admissão ou expulsão do motor colocando as a uma distância de pelo menos 0 5 m Não utilize curvas com um ângulo inferior a 90º nem as...

Page 7: ...ctéristiques de l appareil comme indiqué sur l étiquette technique Un bon entretien garantit un bon fonctionnement et de bonnes performances dans le temps Tous les moteurs sont emballés en usine dans des conditions qui leur permettent de supporter la manipulation normale d un transport Lors de la manipulation du matériel utiliser des appareils de levage adaptés afin d éviter d endommager le moteur...

Page 8: ...es d insonorisation Il est recommandé d éviter les coudes sur le parcours du conduit entre la hotte et le moteur car ceux ci diminueraient la performance du moteur En cas de présence de coudes faire en sorte qu ils ne soient pas collés à la bouche d admission ou d expulsion du moteur et de respecter une distance d au moins 0 5m Ne pas utiliser de coudes ayant un angle de fermeture supérieur à 90º ...

Page 9: ...e mains supply make sure that the voltage indicated in the rating plate corresponds to the mains voltage in the home An appropriate maintenance ensures a good working and a good performance in the long run All motors are packaged for normal handling during transport When handling use adequate elevation equipment to avoid damaging the motor and injuring personnel WARNING Do not lift the fans by the...

Page 10: ...recommended that the conduit from the hood to the motor has no sharp angles as they will reduce the suction capacity of the motor If they are inevitable try to ensure they are not too close to the inlet or outlet of the motor at least 0 5m away Do not use elbow joints with an angle of less than 90º or place one after another the minimum recommended distance between them is 1m and try to make them ...

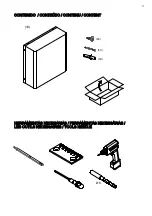
Page 11: ... 1X 5X 8X CONTENIDO CONTEÚDO CONTENU CONTENT LES OUTILS NÉCESSAIRES TOOLS NEEDLE HERRAMIENTAS NECESARIAS FERRAMENTAS NECESSÁRIAS Ø 8 5X 11 ...

Page 12: ...COTAS DIMENSÕES REPÈRES DIMENSIONS 450 450 148 215 238 85 175 12 ...

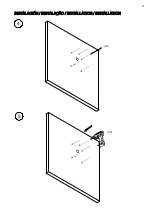
Page 13: ...está dañada PT Retire o motor exterior da caixa Verifique se o modelo é o pretendido e se não existe nenhuma parte danificada FR Déballer le boitier du moteur extérieur Vérifier que le modèle correspond à celui commandé et qu aucune partien est endommagée EN Unpack the motor Check that the model corresponds to what you have ordered and that it isundamaged 2 8X 13 ...

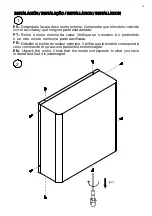
Page 14: ...INSTALACIÓN INSTALAÇÃO INSTALLATION INSTALLATION 3 14 ...

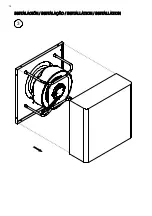
Page 15: ...INSTALACIÓN INSTALAÇÃO INSTALLATION INSTALLATION 4 5X 5X 5 15 ...

Page 16: ...INSTALACIÓN INSTALAÇÃO INSTALLATION INSTALLATION 6 x5 12 16 ...

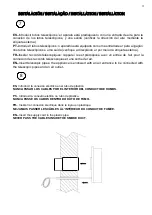
Page 17: ...ei le est prédisposé avec un entrée de l air pour la connexion des raccords téléscopiques et une sortie de l air EN Insert telescopic pipes the appliance is endowed with an air entrance to be connected with the telescopic pipes and an air outlet 8 ES Introducir la conexión eléctrica en el tubo de plástico NUNCA PASAR LOS CABLES POR EL INTERIOR DEL CONDUCTODE HUMOS PT Introduzir a conexão elétrica ...

Page 18: ...to cerca de la pared PT Para evitar a infiltração de água use silicone no perímetro do produto perto da parede FR De façon à éviter des infiltrations d eau veuillez bien isoler avec du silicone le bord du produit près du mur EN In order to avoid water infiltrations please apply silicone on the product perimeter close to the wall 10 18 ...

Page 19: ...INSTALACIÓN INSTALAÇÃO INSTALLATION INSTALLATION 11 8X 12 19 ...

Page 20: ...veis A fixação entre os tubos deve ser feita com grampos de metal adequados tubos e grampos são executados pelo instalador FR Connexion des tuyaux Après la fixation de l appareil à la paroi extérieure les deux raccords téléscopiques qui se trouvent dans la paroi doivent être connectés avec la hotte par les tuyaux flexibles Les tuyaux doivent être fixés par des petites bandes métalliques appropriée...

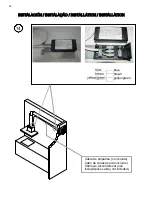
Page 21: ... 5 metros e em superiores de 3x2 5mm Certifique se de conectar os cabos corretamente NUNCA PASSE OS CABOS DENTRO DO DUTO FR CONNEXION ÉLECTRIQUE DU MOTEUR À LA HOTTE Le moteur et la hotte sont équipés de 3 câbles avec une boîte de connexion avec un bornier Vous devrez joindre les les boites de connexion do motor e doexaustor avec un câble non inclus Utiliser un câble non inclus de section 3x1mm 3 ...

Page 22: ...INSTALACIÓN INSTALAÇÃO INSTALLATION INSTALLATION 14 blue brown yellou green Cable de empalme no incluido Cabo de conexão não incluído Câble de raccordement non inclus Splice cable not included 22 ...

Page 23: ... exaustor E200 205 275 320 O motor é equipado com 6m de cabo elétrico de 8 fios de cores diferentes que deve ser conectado ao capô com o bloco de terminais ou tira que está dentro da caixa de plástico preta localizada no capô Os cabos são conectados na ordem indicada nas instruções da foto colada na caixa de conexão respeitando a ordem das cores Conectá los mal fixados ou inverter as cores podem c...

Page 24: ...For the hood models E200 205 275 320 The motor is equipped with an 6m electrical cable consisting of 8 wires of different colors The wires must be connected to the terminal box located inside the black plastic box within the hood The wires must be connected in the order indicated by the picture on the connection box respecting the order of colors A wrong connection or inversion of colors could cau...

Page 25: ...INSTALLATION 14 ES ESQUEMA CONEXIONES Para modelos campana E200 205 275 320 PT ESQUEMA DE LIGAÇÕES Para modelos do exaustor E200 205 275 320 FR SCHÉMA CONNEXIONS Pour les modèles de hotte E200 205 275 320 EN WIRING DIAGRAM for the hood models E200 205 275 320 E200 205 275 320 25 ...

Page 26: ...INSTALACIÓN INSTALAÇÃO INSTALLATION INSTALLATION 15 ES Conectar la campana a red 120V PT Ligue o exaustor à rede de 120V FR Connectez la hotte au réseau 120V EN Connect the hood to the 120V network 26 ...

Page 27: ...o se desplacen o que éstas se deformen En caso de mal funcionamiento del motor contactar con el servicio técnico oficial de la marca Servicio de asistencia técnica 902 41 55 10 Fax 93 757 96 53 E mail divisiontecnica pando es MUY IMPORTANTE Debe de proveerse un acceso al motor para una posible intervención de mantenimiento o reparación del Servicio de Asistencia Técnica La ubicación del motor y el...

Page 28: ...s pás não se deslocam ou que as pás não ficam deformadas Em caso de mau funcionamento do motor contacte o serviço técnico oficial da marca Serviço de assistência técnica 902 41 55 10 Fax 93 757 96 53 E mail divisiontecnica pando es MUITO IMPORTANTE Deve existir um acesso ao motor para uma possível intervenção de manutenção ou reparação por parte do Serviço de Assistência Técnica A localização do m...

Page 29: ...les ne se déplacent pas ou que celles ci ne se déforment En cas de dysfonctionnement du moteur contacter le service technique officiel de la marque Service d assistance technique 902 41 55 10 Fax 93 757 96 53 E mail divisiontecnica pando es TRÈS IMPORTANT S assurer de pourvoir un accès au moteur pour rendre possible l intervention de maintenance ou de réparation du Service d Assistance Technique L...

Page 30: ... and that the blades are not deformed In case of motor malfunction contact the Pando official technical service Technical assistance service 902 41 55 10 Fax 93 757 96 53 E mail divisiontecnica pando es VERY IMPORTANT The motor must remain accessible for maintenance or possible repairs to be carried out by the Technical Assistance Service Access to the motor for maintenance or repair must be safe ...

Page 31: ...INOXPAN S L NOTAS NOTAS REMARQUES NOTES 31 ...

Page 32: ...TONA Barcelona Spain Tel 34 93 757 94 11 Fax 34 93 757 96 53 www pando es com pando pando es Export export pando es Tel 902 41 55 11 Certificado de Empresa de Gestión de la Calidad UNE EN ISO 9001 2015 The International Certification Network Quality Management System ISO 9001 2015 660066400167 V1 18 ...

Reviews: