background image

21

MAINTENANCE

• Warning:  

To prevent electrical shock, be certain the treadmill is turned off and unplugged for cleaning or 
 routine maintenance.

• Important:  

Never use abrasives or solvents to clean the treadmill. To prevent damage to the computer, keep 
liquids away and keep it out of direct sunlight.

• After each workout:  

Wipe off the console and other treadmill surfaces with a clean, water dampened soft cloth to remove 
excess perspiration.

• Weekly:  

Use of a treadmill mat is recommended for ease of cleaning. Dirt from your shoes contacts the belt 
and eventually makes it to underneath the treadmill. Vacuum underneath the treadmill once a week.

• BELT ADJUSTMENT


You may need to adjust the running belt during the first few weeks of use. All running belts are pro-
perly set at the factory. It may stretch or be off-center after use. Stretching is normal during the bre-
ak-in period.

ADJUST THE BELT TENSION


If the running belt feels as though it is “slipping” or hesitating when you plant your foot during a run, 
the tension on the running belt may have to be increased.

TO INCREASE THE RUNNING BELT TENSION:


A)  Place 6MM inner hexagon spanner on the left belt tension bolt located inside the rear end caps. 

Turn the inner hexagon spanner clockwise 1/8 turn to draw the rear roller and increase the belt 
tension.

B)  Repeat STEP A for the right belt tension bolt. You must be sure to turn both bolts the same num-

ber of turns, so the rear roller will stay square relative to the frame.

C) Repeat STEP A and STEP B until the slipping is eliminated.
D)  be careful not to tighten the running belt tension too much as you can create excessive pressure 

on the front and rear roller bearing that will result in bearing noise from the front and rear rollers.

TO DECREASE THE TENSION ON THE RUNNING BELT, TURN BOTH BOLTS COUNTER CLOCKWISE 
EVENELY. 

Summary of Contents for MTK 450

Page 1: ...OWNER S MANUAL RUN MTK 450 ...

Page 2: ...XERCISE GUIDELINES 6 7 WARM UP COOL DOWN 8 9 ASSEMBLY PART LIST 10 ASSEMBLY STEPS 11 13 FOLDING UNFOLDING MOVINGINSTRUCTION 14 CONSOLE 15 16 OPERATION 17 TREADMILL FUNCTION 18 PROBLEM IN CONTROL SYSTEM AND SOLUTION 19 20 MAINTENANCE 21 23 EXPLODED DRAWING 24 PARTS LIST 25 26 ...

Page 3: ... and walking or jogging shoes when exercising Do not wear loose fitting clothing that could getcaught in the equipment Turn off the power after usage Pregnant women should consult with their physician before beginning an exercise program Drink hydrating fluids water before during and after any exercise This treadmill is designed for home use only Do not use for light institutional or commercial ap...

Page 4: ... problems Please read all instructions carefully The treadmill is tested according to EN 957 1 6 class HB for home use with a maximum user weight of 130 kg and is not suitable for therapeutically uses This item may only be used in the way described in this manual Maximum noise level around the treadmill is 70 dB A The weight of the treadmill is about 71 kg 02 ...

Page 5: ...following the grounding guidelines below GROUNDING This unit must be properly grounded to ensure safe operation Should this equipment fail to perform properly grounding reduces the chance of electrical shock The unit must be plugged into a suitab le AC grounded outlet that is correctly installed and grounded in conformance with local codes and ordinances Gather your tool Make sure all the necessar...

Page 6: ... off parts Do not operate under blankets or pillow Excessive heating can occur and cause fire electric shock or injury to persons CAUTION In case of emergency during the running exercise please pull out the safety key to stop the machine The safety key stops the treadmill at any point in your workout In case of emergency seize the handlebar and lift your body then stand on the ground Helpful Instr...

Page 7: ...FEATURES 05 ...

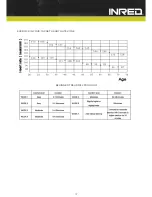
Page 8: ... research has shown us that there is an amount of exercise which is enough to condition the cardio respiratory system and the muscles of the body The amount of exercise is between 60 and 75 of your maximum heart rate measured during a training session This range allows enough exerci se to achieve fitness but not an exercise amount to cause injury If at anytime during exercise you experience dizzin...

Page 9: ...07 EXERCISE IN YOUR TARGET HEART RATE ZONE BEGINNER TREADMILL PROGRAM ...

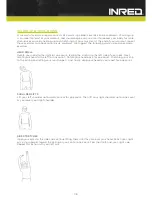
Page 10: ...one count feeling the stretch up the left side of your neck Next rotate your head to the left for one count Rotate your head back for one count stretching your chin to the ceiling and letting your mouth open And finally drop your head to your chest for one count SHOULDER LIFTS Lift your left shoulder up toward your ear for one count Then lift your right shoulder up for one count as you lower your ...

Page 11: ... Hold for 15 counts HAMSTRING STRETCH Sit with one leg extended Bring the sole of the opposite foot toward you and rest it against the inner thigh of your extended leg Reach toward your toes as far as possible Hold for 15 counts then relax Repeat 3 times for each leg Stretches Hamstrings lower back and groin CALF STRETCHES Lean against a wall with your left leg in front of the right and your arms ...

Page 12: ...ASSEMBLY PART LIST 10 BILD FEHLT ...

Page 13: ...ASSEMBLY STEPS STEP 1 Take the treadmill out of the carton 11 ...

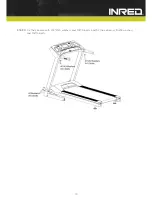
Page 14: ...STEP 2 Unfolded the treadmill 12 ...

Page 15: ...STEP 3 Fix the console with Ø8 Ø20 washers and M8 15 bolts and fix the column with Ø8 washers and M8 15 bolts 13 ...

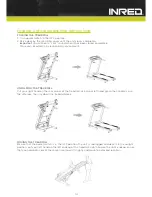
Page 16: ...nment UNFOLDING THE TREADMILL Put your right hand on the rear corner of the treadmill using your left hand grasp the handrails pull the safe lock then lay down the treadmill deck MOVING THE TREADMILL Be sure that the power switch is in the OFF position the unit is unplugged and deck is in the upright position put your left hand on the left endcap of the treadmill right hand on the right endcap ens...

Page 17: ...CONSOLE 15 ...

Page 18: ... stop state press this key to start the machine PAUSE In the running state Press this key to pause the machine speed back to 0 other data keep unchanged STOP In the running state press this key to stop the machine PROG In the running state press this key into P1 P12 U1 MODE In the stop state press this key to set time distance calories SPEED shortcut key on console it is used to adjust the speed I...

Page 19: ...me can be set with SPEED KNOB b There are 16 sections to set speed and incline in the user program The range for speed is 1 0 16 0km h and for incline is 0 15 c The range for time is 10 99min d After all setting finished press START to run During running the speed and incline in the current section can be adjusted but it will be retrieve to the default value when run in the next section e The trea...

Page 20: ...itation for the person with leg hurt OPERATION 1 Turn on the power switch of the treadmill make the speed reach 2 5 3 5 km h this is most com fortable speed Grasp both handlebars and then run on the belt which can make the user run as the same speed as the belt 2 After a few minutes increase the speed to run One hand should grasp the handlebar and another hand can press the keys on the console or ...

Page 21: ...19 PROBLEM CONTROLSYSTEM AND SOLUTION ...

Page 22: ...20 PROBLEM CONTROLSYSTEM AND SOLUTION ...

Page 23: ...nter after use Stretching is normal during the bre ak in period ADJUST THE BELT TENSION If the running belt feels as though it is slipping or hesitating when you plant your foot during a run the tension on the running belt may have to be increased TO INCREASE THE RUNNING BELT TENSION A Place 6MM inner hexagon spanner on the left belt tension bolt located inside the rear end caps Turn the inner hex...

Page 24: ...ing belt is toward the right or left side of the deck a If toward the left side of the deck Using the inner hexagon spanner turn the left adjustment bolt 1 8 turn in a clockwise direction and the right adjustment bolt counter clockwise 1 8 b If toward the right side of the deck Using the inner hexagon spanner turn the right adjustment bolt 1 8 turn in a clockwise direction and the left adjustment ...

Page 25: ...the touch apply one packet of lubricant or 30 40ml of lubricant HOW TO APPLY LUBRICANT 1 Lift one side of tread belt 2 Pour 30 40ml of the lubricant bottle under the center of the tread belt on the top surface of the tread board 3 Walk on the treadmill at a slow speed for 3 to 5 minutes to evenly distribute lubricant NOTE DO NOT over lubricate running board Any excess lubricant that comes out shou...

Page 26: ...EXPLODED DRAWING 24 ...

Page 27: ...PARTS LIST 25 ...

Page 28: ...TS LIST INRED HEALTH TECH CO LTD Telefonhotline für den Kundendienst 49 69 8 700 457 15 Telefonhotline für den Verkaufsdienst 49 69 8 700 457 10 E Mail info inred fitness de Website www inred fitness de 26 ...

Reviews: