background image

10

Insignia Ceramic Tower Heater

www.insigniaproducts.com

6

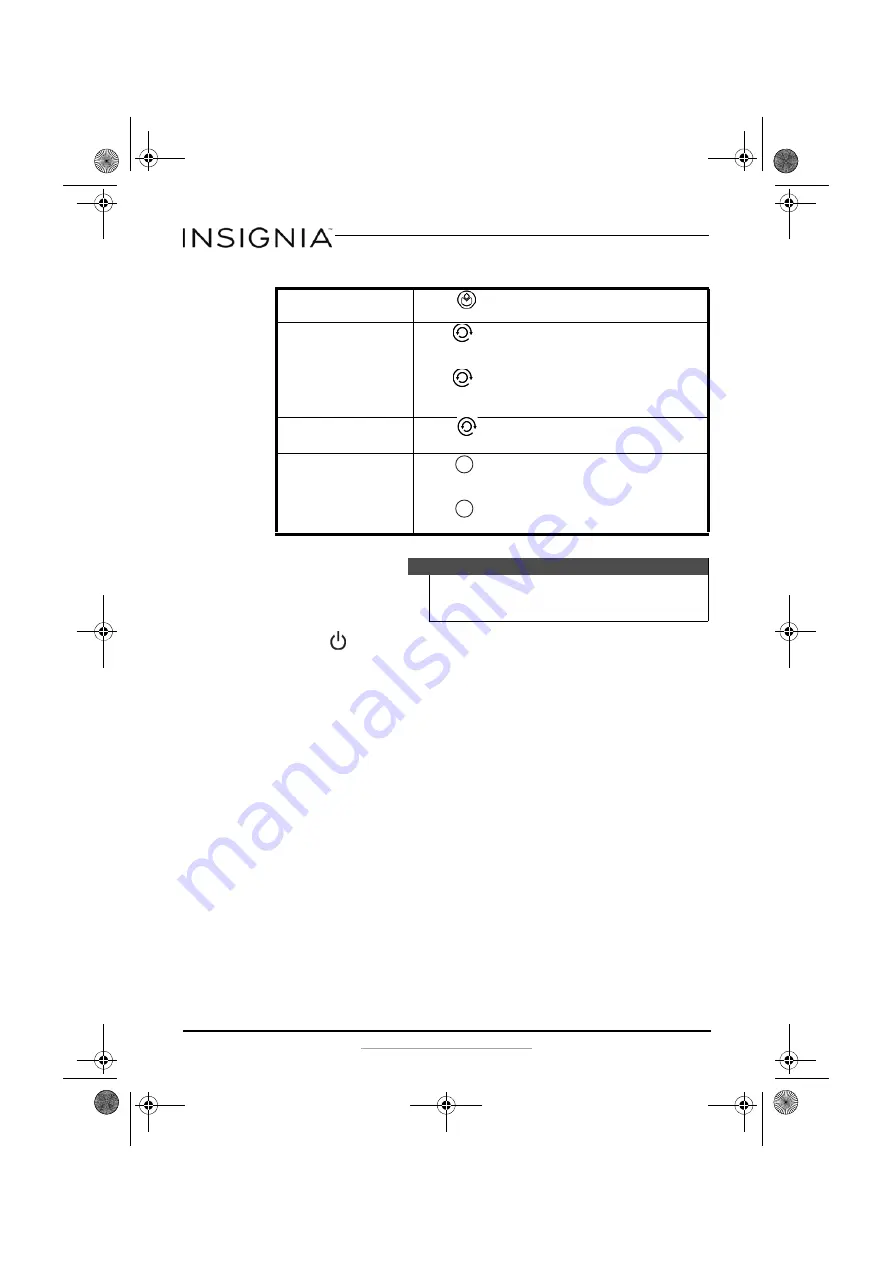
To change the settings when the heater is turned on, do the following:

7

Press the 

 power button to turn the heater off (go to standby mode). 

When you turn the heater back on, the settings remain the same as 
when you turned it off.

Cleaning and maintaining your heater

Always remove the plug from the wall socket and allow the heater to 
cool before cleaning.

Wipe the heater with a soft, damp cloth. Use a mild detergent if 
necessary. DO NOT USE solvents or harsh cleaners or you may damage 
the finish.

Vacuum the grill with your vacuum's brush attachment every few 
weeks for optimal performance.

If the heater will not be used for an extended period of time, store it in 
a dry place.

Safety features

The heater is equipped with double over-heating protection, which 
causes the unit to stop operating in the event that the internal 
temperature exceeds the normal operating temperature. It also includes 
tip-over protection, which turns the heater off in case it is tipped over.

If the heater shuts down:

To switch between low and 
high power setting

• Press 

. The high or low power indicator turns on.

To increase or decrease the 
temperature setting

1. Press 

 twice.

2. Press the + (up) or 

 (down). The temperature setting changes by 

1°C each time you press the button and is shown on the display. 

3. Press 

 again to confirm. The display returns to the current 

room temperature. The heater turns on and stays on until the set 
temperature is reached, then the heater, fan, and swing turn off.

To turn the oscillator on to 
circulate the heat

• Press 

. The swing indicator turns on and the heater begins to 

oscillate. Press again to turn it off. 

To set how long the heater 
stays on

1. Press 

. The time indicator turns on.

2. Press the + (up) or 

 (down). The timer setting changes by one 

hour each time you press the button and is shown on the display.

3. Press 

 to confirm. The heater stays on until the set time 

reaches 0, then the heater returns to standby mode.

Note

The display remains bright for one minute after changes are 
made, then the display dims. Press any button to return the 
display to normal.

SET

SET

NS-HTTCBK6_15-0373_MAN_V1_ENG.fm  Page 10  Friday, May 8, 2015  11:03 AM

Summary of Contents for NS-HTTCBK6

Page 1: ...Before using your new product please read these instructions to prevent any damage USER GUIDE Ceramic Tower Heater NS HTTCBK6 NS HTTCBK6_15 0373_MAN_V1_ENG fm Page 1 Friday May 8 2015 11 03 AM ...

Page 2: ... Introduction Congratulations on your purchase of a high quality Insignia product Your NS HTTCBK6 represents the state of the art in ceramic heater design and is designed for reliable and trouble free performance IMPORTANT INSTRUCTIONS CAUTION RISK OF ELECTRIC SHOCK DO NOT OPEN This symbol indicatesthat dangerousvoltage constitutinga risk of electric shock is present within your heater This symbol...

Page 3: ...r locate the heater where it may fall into a bathtub or other water container 9 Do not run the cord under carpeting Do not cover the cord with throw rugs runners or similar coverings Do not route the cord under furniture or appliances Arrange the cord away from traffic area and where it will not be tripped over 10 To disconnect the heater turn the controls to off then remove the plug from the wall...

Page 4: ...of this heater may vary and its temperature may become intense enough to burn exposed skin Use of this heater is not recommended for persons with reduced sensitivity to heat or an inability to react to avoid burns 24 Do not leave the heater on unattended 25 This appliance has a polarized plug one blade is wider than the other To reduce the risk of electric shock this plug is intended to fit in a p...

Page 5: ...er with 1500W power Electronic button control with LED display Digital temperature control from 59 F to 95 F 12 hour timer Easy carry handle Detachable plastic base Tip over protection Double over heating protection Package contents Ceramic Tower heater Heater base Remote control with pre installed battery User Guide NS HTTCBK6_15 0373_MAN_V1_ENG fm Page 5 Friday May 8 2015 11 03 AM ...

Page 6: ...signia Ceramic Tower Heater www insigniaproducts com Main features Displaypanel Control panel Front mesh Front cover Swing base Back grill NS HTTCBK6_15 0373_MAN_V1_ENG fm Page 6 Friday May 8 2015 11 03 AM ...

Page 7: ...dicator Time andtemp display Swing indicator High power indicator Tempor Time indicator Low power indicator Power button Timer andTemp up button Low power High power button SET button Timer and Temp down button Swing button NS HTTCBK6_15 0373_MAN_V1_ENG fm Page 7 Friday May 8 2015 11 03 AM ...

Page 8: ...the base and the remote control 2 Carefully place your heater face up on a cushioned clean surface to prevent scratches 3 Unscrew the nut from the threaded piece on the bottom of the heater NS RCHTTCBK6 Power button Timer and Temp up button Low power High power button SET button TimerandTemp down button Swing button NS HTTCBK6_15 0373_MAN_V1_ENG fm Page 8 Friday May 8 2015 11 03 AM ...

Page 9: ...0 9 m away from any wall or other objects such as furniture curtains plants or combustible material 4 Fully unwrap the power cord and plug it into a standard wall plug 120 VAC 60 Hz 5 Press the power button to turn the heater on The display shows the current room temperature in F with the F icon turned on The default temperature setting is 77 F and the heater is on low power with the low power ind...

Page 10: ... the heater off in case it is tipped over If the heater shuts down To switch between low and high powersetting Press The high or low power indicator turns on To increase or decrease the temperature setting 1 Press twice 2 Press the up or down The temperature settingchanges by 1 Ceach time youpress the button andis shown on the display 3 Press again to confirm The display returns to the current roo...

Page 11: ...e heater resumes its normal operation Replacing your remote control battery 1 Squeeze then pull the battery holder out of the remote control 2 Insert the battery into the battery holder with the positive side toward the front of the remote control 3 Push the battery holder into the remote control Squeeze together then pull out Squeeze together then pull out Positive towardfront Insert battery NS H...

Page 12: ...otection devices was activated toprevent overheating 1 Place the heater in an upright position 2 Check for any obstructions Ifyou find an obstruction turn the heater off 3 Unplugthe heater andwait at least 10 minutes for it tocool down 4 Carefully remove the obstruction Plug the heater in andrestart it as describedin Using your heater on page 9 5 Ifyoustill noticethesame problem removetheplugfrom ...

Page 13: ... the Warranty Period expires you must pay all labor and parts charges This warranty lasts as long as you own your Insignia Product during the Warranty Period Warranty coverage terminates if you sell or otherwise transfer the Product How to obtain warranty service If you purchased the Product at a Best Buy or Future Shop retail store location please take your original receipt and the Product to any...

Page 14: ...liquids gels or pastes REPAIR REPLACEMENT AS PROVIDED UNDER THIS WARRANTY IS YOUR EXCLUSIVE REMEDY FOR BREACH OF WARRANTY INSIGNIA SHALL NOT BE LIABLE FOR ANY INCIDENTAL OR CONSEQUENTIAL DAMAGES FOR THE BREACH OF ANY EXPRESS OR IMPLIED WARRANTY ON THIS PRODUCT INCLUDING BUT NOT LIMITED TO LOST DATA LOSS OF USE OF YOUR PRODUCT LOST BUSINESS OR LOST PROFITS INSIGNIA PRODUCTS MAKES NO OTHER EXPRESS W...

Page 15: ... trademark of Best Buyandits affiliated companies Registered in some countries Distributed by Best Buy Purchasing LLC 7601 Penn Ave South Richfield MN55423 U S A 2015 Best Buy All rights reserved Made in China V1 ENGLISH 15 0373 NS HTTCBK6_15 0373_MAN_V1_ENG fm Page 16 Friday May 8 2015 11 03 AM ...

Reviews: