background image

3

USB 3.0 Desktop Hard Disk Drive Enclosure

www.insigniaproducts.com

Package contents

• USB 3.0 3.5” SATA hard drive enclosure
• Hi-speed USB 3.0 A - B cable
• 12V/2A AC power adapter
• Quick  Setup  Guide
• Screwdriver
• Screws

Front

Setting up your hard drive 
enclosure

Read the safety precautions before you install your hard drive in 
the enclosure:

• Use only the accessories provided.
• Make sure that you first touch an unpainted, grounded 

metal object to discharge any static electricity stored on 
your clothing or body before touching any electronic 
components. 

• Handle the printed circuit board (PCB) by the edges only. 

Avoid touching the electronic components.

Installing your hard drive in the enclosure

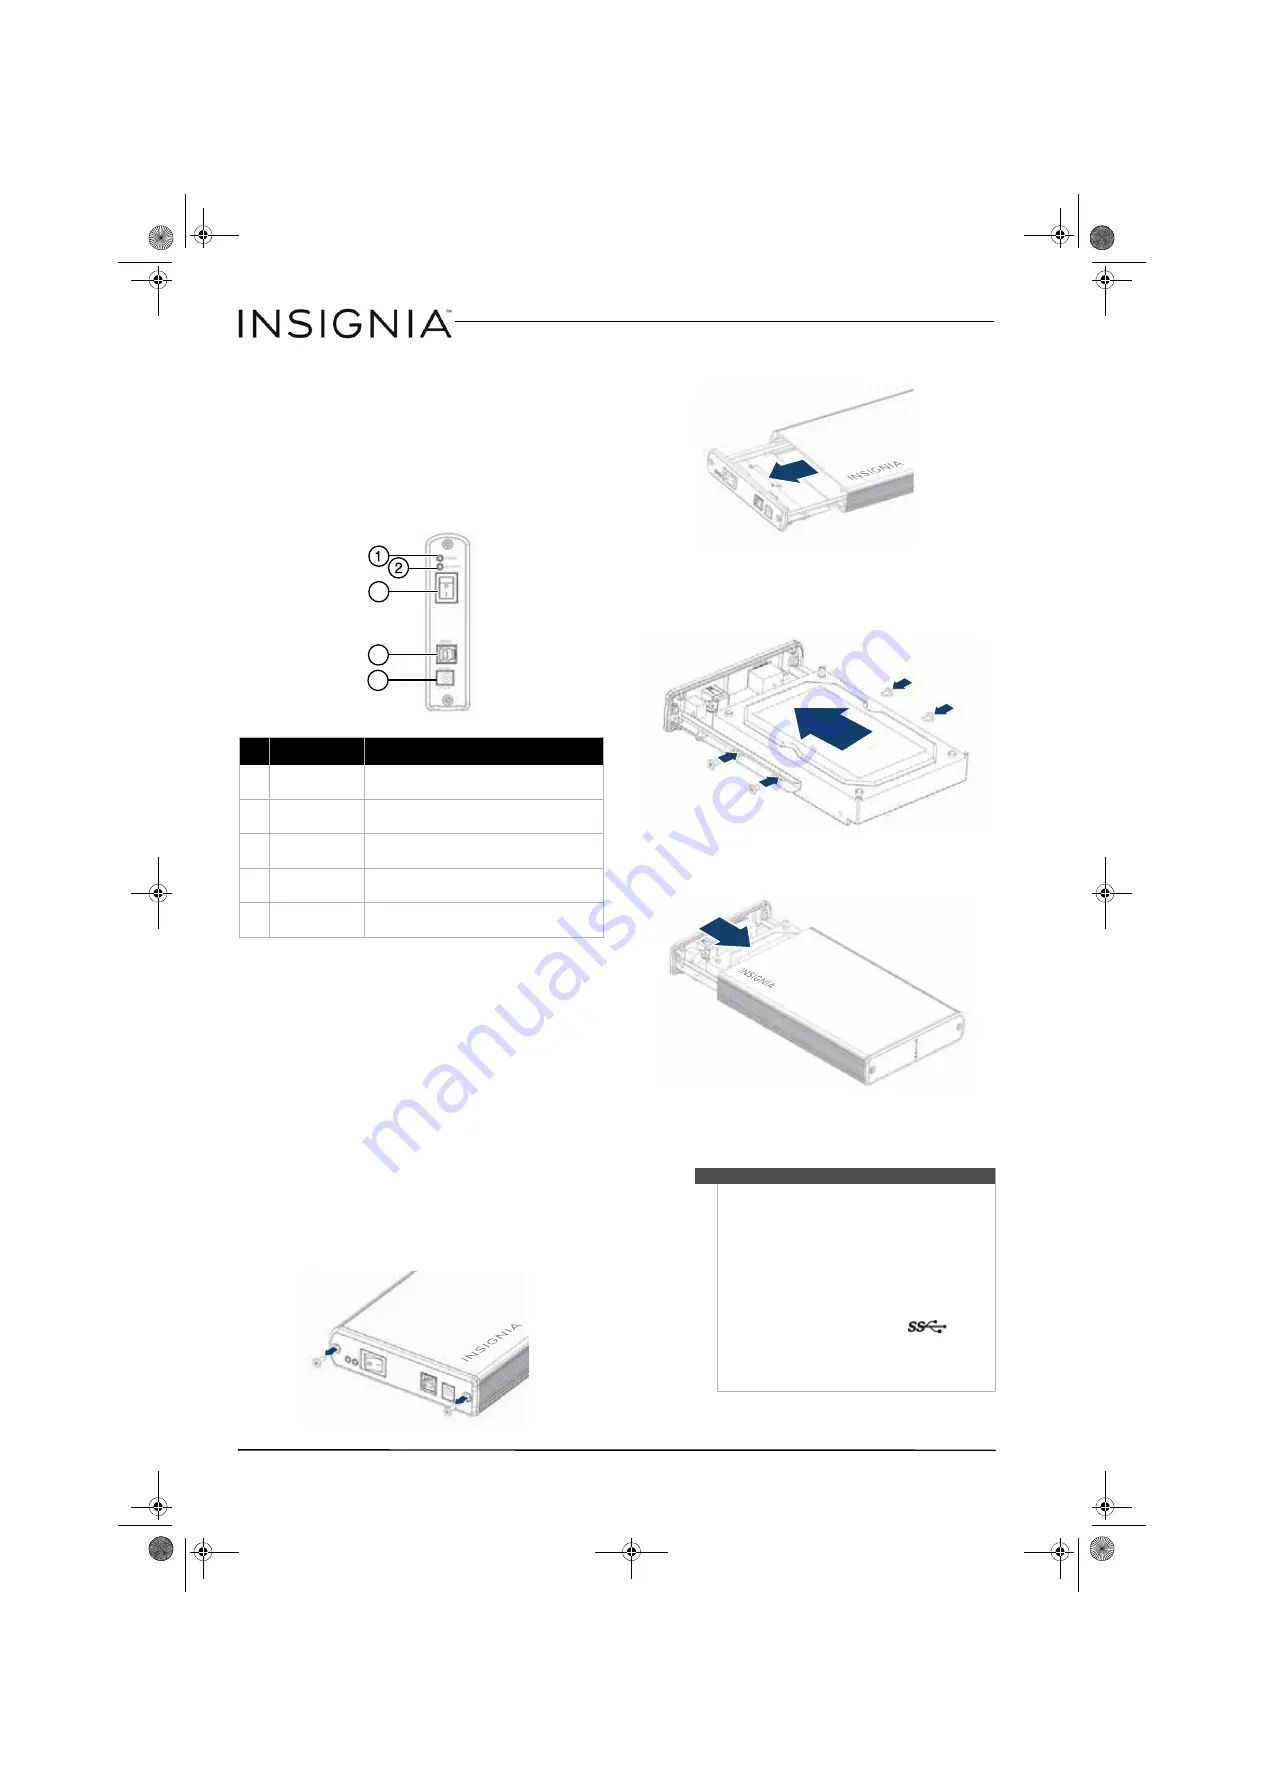
To install your hard drive in the enclosure:

1

Remove the two screws from the panel with the 
USB connector.

2

Remove the plastic end cap and circuit board. 

3

Connect your hard drive’s SATA connector to the 
corresponding connector on the enclosure 
circuit board and secure the drive to the drive 
tray with the screws (4) provided.

4

Gently slide the drive tray, with drive attached, 
into the enclosure.

5

Replace the two screws on the left-side panel.

Connecting the enclosure to your computer

#

Item

Description

1

Power indicator 
(yellow)

Turns on when the hard drive is turned 
on.

2

Activity 
indicator (blue)

Blinks when the hard drive is active.

3

On/Off switch

Press to turn off your hard drive 
enclosure.

4

USB 3.0 B type 
port

Connect a USB cable to this port and to 
your computer.

5

12V DC in port

Connect the AC power adapter to this 
port.

3

4

5

Notes

Make sure you have installed the hard drive into 
the enclosure before connecting the enclosure 
to your computer.

A new hard drive must be initialized and 
partitioned before it will appear in Windows 
Explorer or on your Mac desktop. Refer to your 
hard drive manufacturer’s documentation, or 
see “Formatting the hard drive on your PC” on 
page 4.

For optimal performance, make sure your 
laptop or PC has USB 3.0 ports ( 

). If your 

computer does not have USB 3.0 capability, you 
can plug the USB 3.0 cable into any available 
USB 2.0 port, but it will only run at USB 2.0 
speeds.

NS-PCHD335_NS-PCHD335-C_14-0329_MAN_V1_ENG.fm  Page 3  Friday, May 9, 2014  8:42 AM

Summary of Contents for NS-PCHD335

Page 1: ...rd Disk Drive Enclosure NS PCHD335 NS PCHD335 C Before using your new product please read these instructions to prevent any damage USER GUIDE NS PCHD335_NS PCHD335 C_14 0329_MAN_V1_ENG fm Page 1 Friday May 9 2014 8 42 AM ...

Page 2: ...e hard drive enclosure Do not place anything heavy on top of the hard drive enclosure Use only the accessories provided in the accessory package Before you install or use the hard drive enclosure read the user manual and assemble the enclosure carefully To prevent short circuits do not leave any metal objects inside the enclosure when installing the hard drive To prevent short circuits do not use ...

Page 3: ...ay with the screws 4 provided 4 Gently slide the drive tray with drive attached into the enclosure 5 Replace the two screws on the left side panel Connecting the enclosure to your computer Item Description 1 Powerindicator yellow Turns on when the hard drive is turned on 2 Activity indicator blue Blinks when the hard drive is active 3 On Off switch Press to turn off your hard drive enclosure 4 USB...

Page 4: ...f not locate the new drive right click on it where it reads New Simple Volume then click Initialize This step may not be required for some hard drives 3 Follow the prompts in the wizard 4 When the process is complete locate your hard drive in the bottom right pane Right click on the area with a status bar to the right of the New Simple Volume area then click New Partition 5 Continue following the ...

Page 5: ...lytoyour enclosure and computer Make sure that the USB cable is notbroken or damaged in some way Open the enclosure andmake sure that all of the connections are securelyfastened If youhave a desktopcomputer try usingthe USB portson the back of the computer instead of the front USB ports The cables connectingfront USB ports are not always properly shieldedand may not properlyhandle USB 3 0 speeds Y...

Page 6: ...drive manufacturer Caution Never remove the enclosure while data is being written tothe harddrive Doingsomay cause the harddrive to become corrupt Makesure all applications being run off the disk andall files in use are nolonger in use before removingthe unit For PCs usethe Safely Remove Hardware icon to eject the drive before disconnecting For Mac dragthe harddrive to the trash before disconnecti...

Page 7: ...of the product in the county where the original purchase was made What does the warranty not cover This warranty does not cover Customer instruction education Installation Set up adjustments Cosmetic damage Damage due to weather lightning and other acts of God such as power surges Accidental damage Misuse Abuse Negligence Commercial purposes use including but not limited to use in a place of busin...

Page 8: ...emark ofBest Buy and its affiliatedcompanies Registeredin some countries Distributed by Best Buy Purchasing LLC 7601Penn Ave South Richfield MN55423U S A 2014 BestBuy All rights reserved Made in Taiwan V1 ENGLISH 14 0329 NS PCHD335_NS PCHD335 C_14 0329_MAN_V1_ENG fm Page 8 Friday May 9 2014 8 42 AM ...

Reviews: