background image

15

Insignia NS-R27TR 27" Round Tube TV/DVD/VCR Combo

www.insignia-products.com

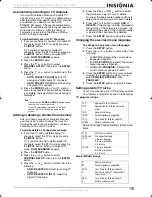
Automatically scanning for TV channels

If you switch between antenna and cable TV 
signals, move your TV combo to a different area 
after the initial setup, need to add a DTV channel 
you deleted, you need to run the AUTO 
PRESET CH search. The search automatically 
searches for available channels in your area and 
stores them in memory. After the search is 
complete, you can press the 

CH

 or 

CH


button to change channels.

To automatically scan for TV channels:

1

If you are scanning for analog TV or cable TV 
channels, select the TV mode by pressing 
the 

INPUT

 button.

Or, if you are scanning for digital TV 
channels, select the DTV mode by pressing 
the 

INPUT

 button. When you select DTV 

mode, 

NOW SCANNING

 appears.

2

Press the 

SETUP

 button.

3

Press the 

 or 

 button to select 

CHANNEL SET UP

, then press the 

ENTER


button.

4

Press the 

 or 

 button to select one of the 

following:

AUTO PRESET CH (CATV)

 for both 

analog and digital cable TV channels.

AUTO PRESET CH (TV)

 for both analog 

and digital TV channels

5

Press the 

ENTER

 button. Your TV combo 

scans for available channels. When the scan 
is complete, the lowest memorized channel is 
displayed.

Adding or deleting a channel from memory

After you have scanned for available channels, 
you may need to add a channel that was not 
included because of poor reception or delete a 
channel you do not want to view.

To add or delete a channel from memory:

1

If you want to add or delete analog TV 
channels, select the TV mode by pressing 
the 

INPUT

 button.

Or, if you want to add or delete digital TV 
channels, select the DTV mode by pressing 
the 

INPUT

 button. When you select DTV 

mode, 

NOW SCANNING

 appears.

2

Press the 

SETUP

 button.

3

Press the 

 or 

 button to select 

CHANNEL SET UP

, then press the 

ENTER


button.

4

Press the 

 or 

 button to select one of the 

following:

ADD / DELETE CH

–Select for analog TV 

channels.

ADD / DELETE CH (DTV)

– Select for 

digital TV channels.

5

Press the 

CH


or 

CH


 button to select 

the channel you want to add or delete.

Or, press the appropriate number buttons to 
select the channel you want to add or delete. 

6

Press the   or   button to select 

ADD

 or 

DELETE

. If the channel number displayed in 

the right top of the screen is blue/green, the 
channel will be added. If the channel number 
is pink/red, the channel will be deleted.

7

Press the 

SETUP

 button to close the menu.

Changing the on-screen menu language

To change the on-screen menu language:

1

Press the 

SETUP

 button.

2

Press the 

 or 

 button to select one of the 

following:

LANGUAGE–Select if the current menu 
language is English.

IDIOMA  (

ESPAÑOL

)–Select if the current 

menu language is Spanish.

LANGAGE (

FRANÇAIS

)–Select if the 

current menu language is French.

3

Press the 

ENTER

 button one or more times 

to select the language you want. You can 
select 

ENGLISH

ESPAÑOL

, OR 

FRANÇAIS

.

4

Press the 

SETUP

 button to close the menu.

Setting parental TV locks

Your TV combo has a V-CHIP that lets you block 
TV programs and movies based on their ratings.

TV program ratings

Some TV ratings have sub-ratings that you can 
block:

Movie (MPAA) ratings

Note

If you press the

 POWER

 or 

SETUP

 button during 

the scan, the scan is canceled.
If your TV combo does not have a TV signal 
source, “NO TV SIGNALS” appears on the 
screen.

TV-Y

Appropriate for all children

TV-Y7

Appropriate for children seven and 
older

TV-G

General audiences

TV-PG

Parental guidance suggested

TV-14

Unsuitable for children under 14

TV-MA

Mature audiences only

TV-Y7

FV–Fantasy violence

TV-PG and 
TV-14

D–Suggestive dialog
L–Coarse language
S–Sexual situations
V–Violence

TV-MA

L–Coarse language
S–Sexual situations
V–Violence

G

General audiences

PG

Parental guidance suggested

PG-13

Unsuitable for children under 13

R

Restricted: under 17 requires adult 
supervision

NC-17

Unsuitable for children under 17

X

Mature audiences only

NS-R27TR.fm  Page 15  Thursday, March 29, 2007  11:41 AM

Summary of Contents for NS-R27TR

Page 1: ...TV DVD VCR Combo Ensemble TV à tube rond de 27 po Lecteur de DVD Magnétoscope Combo de televisor con tubo de imagen curvo de 27 Reproductor de DVD VCR NS R27TR User Guide Guide de l utilisateur Guía del Usuario ...

Page 2: ...ter or track 24 Creating a DVD or audio CD playback loop 24 Creating a CD playlist 24 Randomly playing the tracks on an audio CD 25 Selecting the audio CD sound mode 25 Creating a virtual surround 25 Selecting the DVD audio language 25 Selecting the subtitle language 25 Changing the on screen menu language 26 Viewing DVD screens from different angles 26 Searching on a DVD or CD 26 Using zoom 26 Ad...

Page 3: ... convenience receptacles and the point where they exit from your TV combo Attachments Do not use attachments not recommended by Insignia because they may cause hazards Stand Do not place your TV combo on an unstable cart stand tripod bracket or table Your TV combo may fall causing serious personal injury and serious damage to your TV combo Use only with a cart stand tripod bracket or table recomme...

Page 4: ...or local power company Screen protection Your TV combo s screen is made of glass Do not drop your TV combo or hit the glass screen If the screen breaks be careful of broken glass Outdoor antenna grounding If an outside antenna or cable system is connected to your TV combo make sure that the antenna or cable system is grounded to provide some protection against voltage surges and built up static ch...

Page 5: ...en display in English French or Spanish Stereo sound function Lets you listen to your TV combo in stereo Full function remote control Lets you control all the functions of your TV combo Features of digital broadcasting Digital broadcasting uses the newest broadcasting technology such as compression of audio and video signals and provides better image and sound quality than analog broadcasting A hi...

Page 6: ...ter or title on a DVD or the next track on an audio CD 8 STOP Press to stop disc playback 9 OPEN CLOSE Press to open or close the disc tray 10 DVD indicator Lights when the DVD player is selected 11 INPUT Press to select DVD or TV VCR 12 TV VCR indicator Lights when the TV or VCR is selected 13 CHANNEL Press to change the TV channel 14 Recording indicator Lights when the VCR is recording a tape 15...

Page 7: ...Fi or monaural audio when a videotape is playing In DVD mode press to select the audio or subtitle language or to set the REPEAT settings when a DVD is playing In DVD playback mode press to open menus Press to display the PROGRAM and RANDOM menu In CD playback mode press to select a CD track 13 CLEAR Press to clear timers and reset incorrect input in OSD menus 14 SPEED When recording a videotape p...

Page 8: ...umber Press the 10 100 button then press the last two channel numbers for a three digit channel number For more information see Changing channels on page 10 When accessing parental controls press the number buttons to enter your password When searching for a DVD chapter or CD track If the DVD or CD has more than ten chapters or tracks and you want to select a one digit chapter or track press the 0...

Page 9: ...age to your TV combo always unplug the antenna cable from the ANT jack before you move your TV combo Note If you use an antenna to receive analog TV the same antenna generally will work for DTV reception Outdoor or attic antennas get better reception than set top versions You cannot view some cable channels when your TV combo is connected to an aerial antenna because DTV programming does not cover...

Page 10: ...ber button for the major channel press the ENTER button then press the number button for the minor channel If the major channel has a two digit channel number press the number buttons for the major channel then press the number button for the minor channel If you press the ENTER button after you enter the two digit major channel number your TV combo tunes to the smallest minor channel number Switc...

Page 11: ...button to reset the counter 5 MTS status When you are in TV mode displays the current sound mode for the broadcast STEREO or SAP 6 Channel number When you are in TV mode displays the currently selected channel number If you are using an external device displays AUX 7 Clock Displays the current time Note When closed captioning is turned off pressing the DISPLAY button toggles between the counter di...

Page 12: ...the or button to move to a different item 6 Press the SETUP button to save your settings To automatically set the clock 1 If you are using a cable box or satellite receiver make sure that it is turned on and tuned to the PBS station Also make sure that your TV combo is set to the output channel for your cable box or satellite receiver usually 3 or 4 2 Press the SETUP button 3 Press the or button t...

Page 13: ...ou need to set this option correctly so that your TV combo displays the correct times for programs To adjust the clock for daylight saving time 1 Press the SETUP button 2 Press the or button to select CLOCK SETTINGS then press the ENTER button 3 Press the or button to select D S T then press the ENTER button one or more times to select the daylight saving time option you want You can select OFF Tu...

Page 14: ...o select DTV SET UP then press the ENTER button 4 Press the or button to select DTVCC then press the ENTER button 5 Press the or button to select CAPTION SERVICE 6 Press the ENTER button one or more times to select the option you want You can select OFF Turns off closed captions Service 1 though Service 6 Selects the service option Under normal conditions select Service 1 7 Press the or button to ...

Page 15: ...r button to select one of the following ADD DELETE CH Select for analog TV channels ADD DELETE CH DTV Select for digital TV channels 5 Press the CH or CH button to select the channel you want to add or delete Or press the appropriate number buttons to select the channel you want to add or delete 6 Press the or button to select ADD or DELETE If the channel number displayed in the right top of the s...

Page 16: ...e power fails use the default password 5 Press the or button to select CHANGE PASSWORD then press the ENTER button 6 In the NEW PASSWORD box enter your new password with the number buttons then enter your new code again in the CONFIRM PASSWORD box 7 Press the SETUP button to close the menu Using the VCR Your TV combo can play any videotape that has the VHS mark Use high quality tapes Avoid using p...

Page 17: ...ER button to select ON 4 Press the SETUP button to close the menu 5 Press the PLAY button to start playback Automatically repeating playback You can play a videotape indefinitely To automatically repeat a tape 1 Press the SETUP button 2 Press the or button to select USER S SET UP then press the ENTER button 3 Press the or button to select REPEAT PLAY then press the ENTER button one or more times t...

Page 18: ...r reaches 0 00 00 playback starts automatically 5 To cancel the search press the STOP button on the remote control or STOP EJECT button on the front of your TV combo Searching with index markers Every time you start recording your TV combo adds an index marker to the videotape If you record on a videotape then stop recording when you start recording again another index marker is added to the tape ...

Page 19: ...ule so your TV combo automatically records a program on a specific date and at a specific time You can schedule as many as nine programs within a one year time frame To set up a recording schedule 1 Press the SETUP button 2 Press the or button to select TIMER PROGRAMMING then press the ENTER button 3 Press the or button to select the program position you want then press the button 4 With the first...

Page 20: ... ending hour and minute then press the button 8 Press the or button one or more times to select the tape speed then press the button For more information see Selecting a tape speed for recording on page 18 9 Press the ENTER button 10 To schedule additional recordings repeat Step 3 through Step 9 11 When you have finished scheduling recordings press the SETUP button to close the menu 12 Insert a vi...

Page 21: ...t 5 Press the REC button one or more times to select the beginning and ending time for the recording Each time you press the button the time shifts forward by 10 minutes 6 Press the ENTER button 7 Press the SETUP button to close the menu Using AUTO RETURN After scheduled recordings are finished you can search through the beginnings of the recordings on the videotape To use AUTO RETURN 1 Press the ...

Page 22: ...TOP EJECT button on the front of your TV combo Preventing a videotape from being erased To prevent a videotape from being erased Break off the tab on the back edge of the videotape To reuse a tape that does not have an erase prevention tab Cover the hole where the erase prevention tab was with tape Note For best results do not use the remote control to control the recording The signal from the rem...

Page 23: ...the disc These may damage the disc and your TV combo may not read the disc correctly 11 The region code for your TV combo is 1 You can play DVDs with region code 1 or ALL You cannot play DVDs with other region codes Unplayable discs Do not try to play any of the following discs or you may damage your TV combo DVD RAM CD i Photo CD DVD Audio DVD with a region code other than 1 or ALL DTS CD Video C...

Page 24: ...urn off the status display Using the DVD Disc menu and Title menu Some DVDs have Disc and Title menus If the DVD you are playing has one of these menus you can access this menu during playback To use a DVD Disc or Title menu 1 Press the DISC MENU or TITLE button If the DVD has a Disc or Title menu the menu opens 2 Press the or button to select an option then press the ENTER button Repeating a titl...

Page 25: ...ound 3 Press the RETURN button to close the menu Selecting the DVD audio language To select the DVD audio language 1 During playback press the MODE button 2 Press the or button to select the language you want 3 Press the RETURN button to close the menu Selecting the subtitle language To select a subtitle language 1 During playback press the MODE button one or more times until SUBTITLE appears 2 Pr...

Page 26: ...chapter or track number press 0 then the number Playback starts automatically with the chapter or track you selected If you make a mistake press the CLEAR button and enter the number again 3 Press the RETURN button to close the menu To time search 1 During playback press the MODE button one or more times until SEARCH appears 2 Press the or button to select TIME SEARCH 3 Within 60 seconds use the n...

Page 27: ...SETUP button The OSD opens 4 Press the or button to select CUSTOM then press the ENTER button 5 Press the or button to select PARENTAL then press the ENTER button 6 Enter your password with the number buttons If you have forgotten your password enter 4737 7 Press the or button to select PASSWORD CHANGE then press the ENTER button 8 Enter your new password with the number buttons then press the ENT...

Page 28: ...resolution setting FRAME or FIELD based on the data characteristics of the pictures FIELD stabilizes the pictures although the picture quality may become coarse because of the limited amount of data FRAME displays relatively motionless pictures in higher resolution FRAME improves the picture quality but pictures may be unstable AUDIO Adjusts the audio for DVD playback You can select DRC Dynamic ra...

Page 29: ...nel CATV channel CATV channel CATV channel CATV channel Language Code Mongolian 5960 Nauru 6047 Nepali 6051 Norwegian NOR 6061 O R Occitan 6149 Oriya 6164 Oromo Afan 6159 Panjabi 6247 Pashto Pushto 6265 Persian 5247 Polish POL 6258 Portuguese POR 6266 Quechua 6367 Rhaeto Romance 6459 Romanian RUM 6461 Russian RUS 6467 S Samoan 6559 Sangho 6553 Sanskrit 6547 Scots Gaelic 5350 Serbian 6564 Serbo Cro...

Page 30: ... lukewarm water Never use a solvent or alcohol to clean your TV combo Do not spray insecticide near your TV combo Such chemicals may cause damage and discoloration to the exposed surfaces Checking the IR signal from the remote control You can use an AM radio or a digital camera to make sure that the remote is sending a signal To check the remote control signal with the AM radio 1 Tune an AM radio ...

Page 31: ... condition Change the channels to see if the problem is with the broadcasting station Ghosts in picture If you are using an outside antenna make sure that the wiring is in good condition Change the channels to see if the problem is with the broadcasting station Turn off nearby appliances to see if the problem is caused by interference Bars on the screen Make sure that the antenna cable converter b...

Page 32: ...ce are set correctly No DTS audio is output Your TV combo does not support DTS audio Distorted picture During the playback of a two layered disc pictures may stop for few seconds when the disc shifts from layer one to layer two Distortion happens for a few seconds after fast forwarding or rewinding Audio or subtitle language does not match the setting The language you selected is not available for...

Page 33: ...en the equipment and receiver Connect the equipment into an outlet on a circuit different from that to which the receiver is connected Consult the dealer or an experienced technician for help FCC warning Changes or modifications not expressly approved by the party responsible for compliance with the FCC Rules could void the user s authority to operate this equipment Canada ICES 003 statement This ...

Page 34: ...34 Insignia NS R27TR 27 Round Tube TV DVD VCR Combo www insignia products com ...

Page 35: ...nt of protection as the original packaging To obtain in home warranty service for a television with a screen 25 inches or larger call 1 888 BESTBUY Call agents will diagnose and correct the issue over the phone or will have an Insignia approved repair person dispatched to your home Where is the warranty valid This warranty is valid only to the original purchaser of the product in the United States...

Page 36: ...36 Insignia NS R27TR 27 Round Tube TV DVD VCR Combo www insignia products com ...

Page 37: ...ent 56 d enregistrement 56 Enregistrement d un programme 56 Spécification de la durée d un enregistrement 56 Programmation d un calendrier Modification d un enregistrement programmé 58 Annulation d un enregistrement programmé 58 Augmentation de la durée d enregistrement pour un enregistrement programmé 58 Utilisation de la fonction AUTO RETURN Retour automatique 58 Copie d une bande vidéo 59 Préve...

Page 38: ...oisième plot large ou rond a été prévu pour la sécurité de l utilisateur Si la fiche ne s adapte toujours pas à la prise secteur contacter un électricien afin qu il remplace la prise inadéquate Protection du cordon d alimentation Les cordons d alimentation électrique doivent être acheminés afin que personne ne puisse marcher dessus et qu aucun objet posé dessus ne vienne les entraver Prêter partic...

Page 39: ...ien Débrancher l appareil de la prise secteur et utiliser les services d un technicien qualifié dans les conditions suivantes Lorsque le cordon d alimentation est effiloché ou la prise endommagée si un liquide a été répandu ou des objets sont tombés dans l appareil si l appareil a été exposé à la pluie ou à l eau si l appareil fonctionne anormalement en observant les instructions d utilisation Ne ...

Page 40: ...ne reçoit aucun signal et qu aucune touche n a été appuyée au cours des 15 dernières minutes Arrêt différé Permet de régler l heure souhaitée pour la mise hors tension automatique de l appareil Menus d écran Permettent d ajuster les réglages de l appareil Il est possible d afficher les menus d écran en anglais français ou espagnol Son stéréo Permet d écouter le son de l appareil en stéréo Télécomm...

Page 41: ...e le lecteur de DVD est sélectionné 11 ENTRÉE Permet de sélectionner le lecteur de DVD ou le téléviseur magnétoscope 12 Témoin TV Magnétoscope S allume lorsque le téléviseur ou le magnétoscope est sélectionné 13 CANAL Permet de changer le canal TV 14 Témoin d enregistrement S allume pendant l enregistrement d une cassette vidéo sur le magnétoscope 15 Touche ENREGISTREMENT IMMÉDIAT Permet de config...

Page 42: ... sur cette touche pour supprimer la mise en sourdine 9 CANAL et Permet de passer au canal précédent ou au canal suivant 10 ARRÊT Permet d interrompre la lecture 11 LECTURE Permet de commencer la lecture 12 MODE En mode DTV télévision numérique permet de sélectionner la langue audio En mode ATV télévision analogique permet de sélectionner STÉRÉO SAP et MONO si l émission est diffusée en mode MTS En...

Page 43: ...ouche permet de diminuer ou d augmenter le volume sonore 19 MENU DISQUE Permet d ouvrir le menu du disque d un DVD Certains DVD n ont pas de menu 20 ENTRÉE Appuyer sur les touches directionnelles pour sélectionner les menus et options dans le menu d écran OSD Appuyer sur ENTER Entrée pour confirmer la sélection 21 CONFIGURATIO N Permet de fermer et d ouvrir le menu principal Nº Touche Description ...

Page 44: ...as rechargeables Elles peuvent surchauffer et exploser S il est prévu de ne pas utiliser le téléviseur pendant une période prolongée retirer les piles afin d éviter tout épanchement d acide éventuel pouvant provoquer des dommages ou des blessures Remarque Ne pas mélanger différents types de piles par exemple alcalines et au carbone zinc Ne pas mélanger des piles neuves et usagées Attention Pour év...

Page 45: ...caméra vidéo ou d un jeu vidéo Se référer au schéma ci après pour la connexion d une caméra vidéo ou d un jeu vidéo Connexion d un périphérique audio numérique Se référer au schéma ci après pour la connexion d un périphérique audio numérique Remarque Si le périphérique vidéo utilise un signal monophonique une seule prise audio utiliser la prise AUDIO L du téléviseur ANT Antenne satellite OU TV câb...

Page 46: ...e comporte qu un chiffre appuyer sur numérique correspondant au canal majeur appuyer sur ENTER Entrée puis appuyer sur la touche numérique correspondant au canal mineur Si le numéro du canal majeur comporte deux chiffres appuyer sur les touches numériques correspondant au canal majeur puis sur la touche numérique correspondant au canal mineur Si la touche ENTER est appuyée après la saisie des deux...

Page 47: ...e la durée écoulée d enregistrement ou de lecture Ce témoin ne s affiche pas pour des bandes vidéo vierges ou des sections vierges d une bande vidéo Appuyer sur CLEAR Effacer pour remettre le compteur à zéro 5 État MTS En mode TV affiche le mode sonore en cours pour la diffusion STEREO ou SAP 6 Numéro de canal En mode TV affiche le numéro du canal actuellement sélectionné Lors de l utilisation d u...

Page 48: ...appuyer sur ou pour sélectionner AUTO CLOCK Réglage automatique de l horloge puis appuyer sur ENTER Entrée pour désactiver l option AUTO CLOCK 4 Appuyer sur ou pour sélectionner MANUAL CLOCK SET Réglage manuel de l horloge puis appuyer sur ENTER Entrée Remarque Si les informations du guide des programmes contiennent plus de six lignes appuyer sur ENTER Entrée pour faire défiler le texte vers l ava...

Page 49: ...l de réglage automatique de l horloge Si aucun numéro ne s affiche aucune station ne diffuse le signal de réglage automatique de l horloge Il faudra alors régler l horloge manuellement 7 Appuyer sur RETURN Retour pour revenir à l écran CLOCK SETTINGS Réglage de l horloge 8 Appuyer sur pour sélectionner AUTO CLOCK CH Canal de réglage automatique de l horloge puis appuyer sur ou pour sélectionner un...

Page 50: ... sur l écran et coupe le côté droit et le côté gauche de l image Pour changer le mode d affichage de l écran TVN 1 Vérifier que le téléviseur est en mode TV numérique TVN en appuyant sur INPUT Entrée 2 Appuyer sur SETUP Configuration 3 Appuyer sur ou pour sélectionner DTV SET UP Configuration TVN puis appuyer sur ENTER Entrée pour alterner entre LETTER BOX Boîte aux lettres et ZOOM 4 Appuyer sur S...

Page 51: ...YAN 9 Appuyer sur SETUP Configuration pour fermer le menu Recherche automatique des canaux TV Si la provenance des signaux alterne entre l antenne et la TV câblée si le téléviseur est déplacé vers un endroit différent après la configuration initiale ou s il est nécessaire d ajouter un canal TVN qui a été supprimé il faut effectuer une recherche AUTO PRESET CH Mémorisation automatique des canaux Ce...

Page 52: ...pour fermer le menu Modification de la langue des menus d écran Pour modifier la langue des menus d écran 1 Appuyer sur SETUP Configuration 2 Appuyer sur ou pour sélectionner l une des options suivantes LANGUAGE Sélectionner si la langue actuelle des menus est l anglais IDIOMA ESPAÑOL Sélectionner si la langue actuelle des menus est l espagnol LANGUE FRANÇAIS Sélectionner si la langue actuelle des...

Page 53: ...toscope à droite à l avant du téléviseur Pour interdire des classifications de programme TV 1 Vérifier que le téléviseur est en mode TV VCR Téléviseur magnétoscope en appuyant sur INPUT Entrée 2 Appuyer sur SETUP Configuration 3 Appuyer sur ou pour sélectionner V CHIP SET UP Configuration de la puce antiviolence puis appuyer sur ENTER Entrée 4 Saisir le mot de passe à l aide des touches numériques...

Page 54: ...enregistrement programmé ou d un OTR enregistrement immédiat Amélioration de la qualité de l image Il est possible d améliorer la qualité de l image lors de la lecture de bandes vidéo usées telles que des cassettes louées Pour améliorer la qualité de l image 1 Appuyer sur SETUP Configuration 2 Appuyer sur ou pour sélectionner USER S SET UP Configuration de l utilisateur puis appuyer sur ENTER Entr...

Page 55: ...ure à sauter Il est possible de sélectionner jusqu à 9 heures et 50 minutes par incréments de 10 minutes 4 Appuyer sur ou pour rembobiner ou avancer la bande vidéo jusqu au point spécifié Le temps est décompté pendant la recherche Lorsque le compteur atteint 0 00 00 la lecture commence automatiquement 5 Pour annuler la recherche appuyer sur STOP Arrêt de la télécommande ou sur STOP EJECT Arrêt Éje...

Page 56: ... que la touche est appuyée la durée augmente de 30 minutes La durée spécifiée peut aller jusqu à 8 heures L enregistrement commence immédiatement 4 Pour annuler l enregistrement appuyer sur STOP Arrêt de la télécommande ou sur STOP EJECT Arrêt Éjecter à l avant du téléviseur Programmation d un calendrier d enregistrement Il est possible de programmer un calendrier d enregistrement afin que le télé...

Page 57: ...pour sélectionner la date souhaitée puis appuyer sur Ou pour un enregistrement quotidien appuyer une ou plusieurs fois sur pour sélectionner EVRY DAY Chaque jour puis appuyer sur Ou pour un enregistrement hebdomadaire appuyer une ou plusieurs fois sur jusqu à ce que s affichent EVRY Chaque et le jour de la semaine par exemple MON Lundi puis appuyer sur 7 Appuyer une ou plusieurs fois sur or pour s...

Page 58: ...pour sélectionner le champ à changer le champ clignotera 5 Appuyer sur ou pour changer de champ puis appuyer sur ENTER Entrée Annulation d un enregistrement programmé Pour annuler un enregistrement programmé 1 Allumer l appareil 2 Appuyer sur SETUP Configuration 3 Appuyer sur ou pour sélectionner TIMER PROGRAMMING Enregistrement programmé puis appuyer sur ENTER Entrée Les enregistrements programmé...

Page 59: ...s le compartiment à bande vidéo du téléviseur 4 Appuyer sur SPEED Vitesse pour sélectionner la vitesse de bande souhaitée 5 Appuyer une ou plusieurs fois sur INPUT Entrée pour sélectionner AUX 6 Appuyer sur REC OTR Enregistrement immédiat à l avant du téléviseur 7 Commencer la lecture sur le périphérique vidéo 8 Pour arrêter l enregistrement appuyer sur STOP EJECT Arrêt Éjecter à l avant du télévi...

Page 60: ...ent du disque il est possible que celui ci ne puisse être lu ou que l image et le son soient distordus 9 S il reste trop d espace vierge sur un disque si la partie utilisée est inférieure à 55 mm sa lecture pourra ne pas se faire correctement 10 Ne pas coller de papier ou d autocollants sur le disque Ceux ci peuvent l endommager et empêcher l appareil de le lire correctement 11 Le code régional de...

Page 61: ...Y Affichage pour connaître la durée écoulée et le temps de lecture restant du chapitre en cours Appuyer de nouveau sur DISPLAY pour afficher la durée écoulée et le temps de lecture restant du titre en cours Appuyer de nouveau sur DISPLAY pour afficher le débit binaire et le réglage de répétition actuel En cas de lecture d un DVD double couche le numéro de la couche s affiche également L0 signifie ...

Page 62: ...ur créer une liste de lecture à partir d un CD audio 1 Mettre l appareil sous tension et insérer un CD 2 Si la lecture du CD démarre appuyer sur STOP Arrêt 3 Appuyer sur MODE L écran PROGRAM Programmation s affiche 4 Appuyer sur ou pour sélectionner une piste puis sur ENTER Entrée 5 Répéter l étape 4 pour ajouter d autres pistes 6 Appuyer sur PLAY Lecture pour reproduire la liste de lecture 7 Appu...

Page 63: ...e de menu d écran OSD qui permet de régler divers paramètres Il est possible de modifier la langue du menu d écran Pour changer la langue du menu d écran 1 Appuyer sur INPUT Entrée pour passer au mode TV Magnétoscope ou AUX Auxiliaire 2 Appuyer sur SETUP Configuration 3 Appuyer sur ou pour sélectionner LANGUAGE Langue 4 Appuyer une ou plusieurs fois sur ENTER Entrée pour sélectionner la langue Il ...

Page 64: ...RKER SEARCH Recherche de signets 3 Appuyer sur ou pour sélectionner un numéro de signet entre 1 et 10 4 Lorsque le disque arrive à l endroit souhaité pour mettre un signet appuyer sur la touche ENTER Entrée Le chapitre ou le numéro de piste et le temps écoulé s affiche 5 Lorsque le disque est lu de nouveau répéter les Étapes 1 à 3 pour sélectionner un signet puis appuyer sur ENTER 6 Pour effacer u...

Page 65: ... SETUP Configuration pour fermer le menu Modification du mot de passe Pour définir le mot de passe 1 Vérifier que l appareil est en mode DVD 2 Si un disque est en cours de lecture appuyer sur STOP Arrêt 3 Appuyer sur SETUP Configuration Les menus d écran OSD s affichent 4 Appuyer sur ou pour sélectionner CUSTOM Personnalisé puis sur ENTER Entrée 5 Appuyer sur ou pour sélectionner PARENTAL Contrôle...

Page 66: ...s être disponible sur tous les DVD DISPLAY Affichage Permet de changer le format de l affichage DVD et des messages sur l écran Il est possible de sélectionner TV MODE 4 3 LETTER BOX Mode TV format boîte aux lettres 4 3 par défaut affiche des bandes noires dans les parties inférieure et supérieure de l écran 4 3 PAN SCAN Balayage panoramique 4 3 permet d obtenir une image pleine hauteur tronquée d...

Page 67: ...ot de passe Pour toute information complémentaire voir Modification du mot de passe à la page 65 OTHERS Autres ANGLE ICON Icône d angle de prise de vues Active on ou désactive off l icône d angle de prise de vues lorsque l option d angles de prise de vues multiples est disponible sur un DVD AUTO POWER OFF Mise hors tension automatique Active on ou désactive off la fonction de mise hors tension aut...

Page 68: ... 120 121 122 123 124 125 CATV channel CATV channel CATV channel CATV channel CATV channel CATV channel CATV channel CATV channel Language Code Mongolian 5960 Nauru 6047 Nepali 6051 Norwegian NOR 6061 O R Occitan 6149 Oriya 6164 Oromo Afan 6159 Panjabi 6247 Pashto Pushto 6265 Persian 5247 Polish POL 6258 Portuguese POR 6266 Quechua 6367 Rhaeto Romance 6459 Romanian RUM 6461 Russian RUS 6467 S Samoa...

Page 69: ...Ne pas pulvériser d insecticides près de l appareil Ces produits chimiques peuvent endommager et décolorer les surfaces exposées Vérification des signaux infrarouges de la télécommande Il est possible d utiliser une radio AM ou un appareil photo numérique pour vérifier que la télécommande émet bien un signal Pour vérifier le signal de la télécommande à l aide d une radio AM 1 Syntoniser une radio ...

Page 70: ...s d une station de télévision Lignes ou stries dans l image En cas d utilisation d une antenne externe vérifier que les branchements sont en bon état de marche Changer les canaux pour voir si le problème ne provient pas d une station de télévision Mettre hors tension les appareils électroménagers à proximité pour voir si le problème est dû à une interférence L image est floue En cas d utilisation ...

Page 71: ...but de l enregistrement programmé se chevauche avec une autre programmation prioritaire Vérifier que la bande vidéo ne s est pas terminée Vérifier l absence de panne de courant pendant l enregistrement Anomalie Solution Les images ou les couleurs s estompent et réapparaissent lors de la copie d une bande vidéo La bande vidéo à copier est dotée d une protection contre la copie Il n est pas possible...

Page 72: ...da Cet appareil numérique de la classe B est conforme à la norme NMB 003 du Canada Sécurité du laser Cet appareil utilise un laser Seul un technicien qualifié doit retirer le capot ou entreprendre une réparation sur cet appareil compte tenu du risque de lésions oculaires Droits d auteurs 2007 Insignia Insignia et le logo Insignia sont des marques de commerce de Best Buy Enterprise Services Inc Les...

Page 73: ...assistance technique établira un diagnostic et corrigera le problème au téléphone ou enverra un technicien agréé par Insignia pour la réparation à domicile Où cette garantie s applique t elle Cette garantie ne s applique qu à l acheteur original du Produit aux États Unis et au Canada Ce qui n est pas couvert par cette garantie limitée La présente garantie ne couvre pas la formation du client l ins...

Page 74: ...74 Ensemble TV à tube rond de 27 po Lecteur de DVD Magnétoscope Insignia NS R27TR www insignia products com ...

Page 75: ...elación de una grabación programada 95 Extensión del tiempo de una grabación Uso de AUTO RETURN Retorno automático 96 Copiado de una cinta de video 96 Prevención del borrado de una cinta de video 96 Uso del reproductor de DVD 97 Reproducción de un disco 98 Verificación del estado del DVD 98 Verificación del estado del CD de audio 98 Uso del menú de Disco y del menú de Títulos del DVD 98 Repetición...

Page 76: ...a ancha o conector de tierra se proporcionan para su seguridad Si el enchufe no entra solicite a un electricista que cambie el tomacorriente obsoleto Protección del cable de alimentación Los cables de alimentación deben colocarse de manera que no se pisen ni se los aplaste con artículos colocados sobre ellos o contra ellos Preste atención especial a los cables en los enchufes en los receptáculos a...

Page 77: ... su reparación a personal calificado bajo las siguientes condiciones Cuando el cable de alimentación o el enchufe esté dañado o pelado Si se ha derramado líquido u objetos han caído dentro de su combo TV Si su combo TV ha sido expuesto a la lluvia o al agua Si su combo TV no funciona normalmente aún siguiendo las instrucciones de operación Ajuste únicamente los controles que se describen en las in...

Page 78: ...presionado un botón por 15 minutos Temporizador de apagado automático Le permite establecer el tiempo en el que desea que su combo TV se pague automáticamente Visualización de pantalla le permite ajustar la configuración de su combo TV Puede mostrar la visualización de pantalla y en inglés francés o español Función de sonido estéreo Le permite escuchar el sonido de su combo TV en estéreo Control r...

Page 79: ...a en un CD de audio 8 DETENER Presione para detener la reproducción del disco 9 ABRIR CERRAR Permite abrir o cerrar la bandeja de discos 10 Indicador de DVD Se ilumina cuando el reproductor de DVD está seleccionado 11 ENTRADA Permite seleccionar DVD o TV VCR 12 Indicador TV VCR Se ilumina cuando el TV o el VCR está seleccionado 13 CANAL Presione para cambiar el canal de TV 14 Indicador de grabació...

Page 80: ... el sonido 9 CANAL y Permite cambiar al siguiente canal con un número inferior o superior 10 DETENER Permite detener la reproducción 11 REPRODUCIR Presione para empezar la reproducción 12 MODE Modo En el modo de TV digital DTV permite seleccionar el idioma del audio En el modo de TV analógico ATV permite seleccionar STEREO Estéreo SAP y MONO si el programa cuenta con el sistema MTS En el modo VCR ...

Page 81: ...un DVD 18 VOL y Permite bajar o subir el volumen 19 DISCO MENÚ Permite abrir el menú de disco de un DVD Algunos DVD no tienen menús de disco 20 ENTRAR Presione las flechas para seleccionar los menús y las opciones en el menú de pantalla OSD Presione ENTER Entrar para confirmar su selección 21 CONFIGURACIÓ N Permite abrir el menú principal No Botón Descripción 22 Números 10 100 Mientras ve la telev...

Page 82: ...residuos peligrosos No intente recargar pilas que no son recargables Las pilas podrían sobrecalentarse y reventar Si no planea usar su combo TV durante un período largo de tiempo extraiga las pilas para prevenir daños o lesiones debido a fugas Nota No mezcle pilas de diferente tipo por ejemplo alcalinas y de carbono zinc No combine pilas gastadas y nuevas Advertencia Para evitar lesiones o daños a...

Page 83: ... la siguiente figura para conectar una cámara de video o una consola de videojuegos Conexión de un dispositivo de audio digital Refiérase a la siguiente figura para conectar un dispositivo de audio digital Nota Si el equipo de video externo utiliza audio monofónico solamente un toma de audio use el toma AUDIO L Izquierdo en su combo TV ANT Antena satélite O TV por Cable Receptor de satélite o caja...

Page 84: ...100 Si el canal mayor tiene sólo un dígito presione el botón numérico del canal mayor y presione ENTER luego presione el botón numérico para el canal menor Si el canal mayor tiene dos dígitos presione los botones numéricos del canal mayor y luego presione el botón numérico para el canal menor Si presiona ENTER después de ingresar el número de canal mayor de dos dígitos su combo TV sintonizará el n...

Page 85: ...ación o reproducción Este indicador de estado no aparece en el caso de cintas en blanco o secciones sin grabar de una cinta de video Puede presionar CLEAR Borrar para reiniciar el contador 5 Estado MTS Cuando se encuentra en el modo TV muestra el modo de sonido actual para la transmisión STEREO Estéreo o SAP 6 Número de canal Cuando se encuentra en el modo TV muestra el número de canal seleccionad...

Page 86: ...ara seleccionar otro elemento del menú 6 Presione SETUP para guardar sus ajustes Para ajustar automáticamente el reloj 1 Si está usando una caja de cable o un receptor de satélite asegúrese de que se encuentra encendido y sintonizado a la estación PBS También asegúrese de que su combo TV está configurado para el canal de salida de su caja de cable o receptor de satélite usualmente 3 ó 4 2 Presione...

Page 87: ...te manual de reloj luego presione ENTER 4 Presione para seleccionar un elemento que quiere ajustar 5 Presione o para ajustar el elemento 6 Presione SETUP para cerrar el menú Ajuste del reloj para la hora de verano Su combo TV puede ajustar el reloj automáticamente para que refleje los cambios de la hora de verano Necesita ajustar esta opción correctamente para que su combo TV muestre la hora corre...

Page 88: ...la mitad de la pantalla Esta opción se usa normalmente para un idioma secundario si el programa tiene un idioma secundario grabado TEXT2 Texto 2 Muestra el texto en la mitad de la pantalla Esta opción se usa normalmente para información de la guía de programación u otra información suministrada por el programa 4 Presione SETUP para cerrar el menú Para ver subtítulos optativos en el modo de DTV 1 A...

Page 89: ...ambiar de canal Para escanear canales de TV automáticamente 1 Si está buscando un canal de TV analógico o un canal de TV por cable seleccione el modo de TV presionando INPUT Si está buscando un canal de TV digital seleccione el modo de DTV presionando INPUT Cuando seleccione el modo DTV aparecerá NOW SCANNING Escaneando ahora 2 Presione SETUP 3 Presione o para seleccionar CHANNEL SET UP Configurac...

Page 90: ... Bloquear o VIEW Ver Cuando prohíbe una clasificación se prohibirá dicha clasificación y todas las clasificaciones por encima de ella 7 Si la clasificación que seleccionó contiene sub clasificaciones presione o para seleccionar una sub clasificación y presione ENTER para bloquear la clasificación 8 Presione SETUP para cerrar el menú Para bloquear las clasificaciones de películas 1 Asegúrese de que...

Page 91: ...andas negras y blancas en la pantalla puede ajustar el alineamiento manualmente Para ajustar la alineación manualmente 1 Mientras se reproduce la cinta de video presione CH o CH hasta que las bandas desaparecen Esta función trabaja durante la reproducción normal y en los modos pausado congelado y detenido 2 Para dejar de alinear manualmente detenga la reproducción y comience la reproducción de nue...

Page 92: ...o el contador llega a 0 00 00 7 Para cancelar el retroceso presione STOP Búsqueda hacia adelante o hacia atrás Para buscar hacia adelante o hacia atrás en una cinta de video 1 Durante la reproducción presione SKIP REW para buscar hacia atrás en una cinta de video Presione FWD SKIP para buscar hacia delante en una cinta de video Cuando está buscando el sonido se silencia 2 Presione SKIP REW Saltar ...

Page 93: ...o que desea grabar y luego comenzar la grabación presionando REC OTR al frente de su combo TV A esto se le llama una grabación OTR de un solo toque Su combo TV comienza a grabar y se detiene cuando se ha grabado la cantidad de tiempo especificada Para especificar la cantidad de tiempo de grabación 1 Seleccione el canal que desea grabar 2 Presione SPEED para seleccionar la velocidad de la cinta que...

Page 94: ...echa que gusta y presione Para una grabación diaria presione una o más veces para seleccionar EVRY DAY Todos los días y presione Nota Si presiona REC OTR cuando se muestre OTR 8 00 su combo TV retornará al modo de grabación normal Si presiona POWER durante una grabación OTR su combo TV seguirá grabando En el modo SLP el tiempo de grabación máxima es de ocho hora para una cinta de video T 160 y sei...

Page 95: ...da su combo TV 2 Presione SETUP 3 Presione o para seleccionar TIMER PROGRAMMING Programación con temporizador y presione ENTER La grabación programada aparece en la pantalla 4 Presione SETUP para cerrar el menú Ajuste de una grabación programada Para ajustar una grabación programada 1 Presione SETUP 2 Presione o para seleccionar TIMER PROGRAMMING Programación con temporizador y presione ENTER 3 Pr...

Page 96: ...co y presione ENTER para seleccionar OFF Desactivado Copiado de una cinta de video Para copiar una cinta de video 1 Use la siguiente figura para conectar un equipo de video externo tal cómo un VCR o una cámara de video a su combo TV 2 Inserte la cinta de video de la que desea copiar en el equipo de video externo 3 Inserte la cinta de video en la cual se grabará en el compartimiento de la cinta de ...

Page 97: ...nsulte la guía suministrada con la grabadora de DVD 8 Sólo se pueden reproducir discos grabados en el formato de video y finalizados No se pueden reproducir discos no finalizados Dependiendo del estado de la grabación de un disco es posible que el disco no pueda reproducirse o que se distorsione la imagen o el sonido 9 Si queda demasiado espacio de grabación en un disco la porción que se ha usado ...

Page 98: ...ón del estado del DVD Puede ver la información de estado sobre el DVD que se reproduce actualmente Para ver el estado del DVD Presione DISPLAY Visualización una vez para ver el tiempo transcurrido y el restante del capítulo actual Presione DISPLAY de nuevo para ver el tiempo transcurrido y el restante del título actual Presione DISPLAY otra vez para ver la velocidad de bits actual y el modo de rep...

Page 99: ...e reproducción de un CD de audio 1 Encienda su combo TV e inserte un CD 2 Si el CD comienza a reproducirse presione STOP 3 Presione MODE Modo Aparecerá la pantalla PROGRAM Programa 4 Presione o para seleccionar la pista y presione ENTER 5 Repita el paso 4 para ingresar pistas adicionales 6 Presione PLAY para reproducir la lista de reproducción 7 Presione STOP una vez para pausar la reproducción Pr...

Page 100: ...antalla 1 Presione INPUT para cambiar al modo TV VCR o AUX 2 Presione SETUP 3 Presione o para seleccionar LANGUAGE Idioma 4 Presione ENTER una o más veces para seleccionar el idioma Se puede seleccionar ENGLISH Inglés ESPAÑOL FRANÇAIS Francés 5 Presione SETUP Visualización de pantallas de DVD desde distintos ángulos Algunos DVDs incluyen pantallas que han sido filmadas desde distintos ángulos Si u...

Page 101: ...TER Aparece el número del capítulo o pista y el tiempo transcurrido 5 Cuando reproduzca el disco otra vez repita los pasos del 1 al 3 para seleccionar un marcador y presione ENTER 6 Para borrar un marcador seleccione el número del marcador y presione CLEAR Para borrar todos los marcadores presione o en la lista de marcadores para seleccionar AC y a continuación presione ENTER 7 Presione RETURN par...

Page 102: ...ione ENTER 6 Ingrese su contraseña con los botones numéricos Si se le olvidó su contraseña ingrese 4737 7 Presione o para seleccionar PASSWORD CHANGE Cambio de contraseña y presione ENTER 8 Ingrese su contraseña nueva con los botones numéricos y presione ENTER 9 Presione SETUP para cerrar el menú Uso de la visualización de pantalla OSD Su combo TV tiene una visualización de pantalla OSD para DVD q...

Page 103: ...de la imagen pero las imágenes pueden volverse inestables AUDIO Ajusta el audio para la reproducción de discos DVD Se puede seleccionar DRC Control de rango dinámico comprime el rango de sonido débil a fuerte predeterminado Seleccione ON Activado u OFF Desactivado DOWN SAMPLING Reducción por muestreo Si selecciona ON Activado la salida de audio se configura en 48 kHz Si selecciona OFF Desactivado ...

Page 104: ... 123 124 125 CATV channel CATV channel CATV channel CATV channel CATV channel CATV channel CATV channel CATV channel Language Code Mongolian 5960 Nauru 6047 Nepali 6051 Norwegian NOR 6061 O R Occitan 6149 Oriya 6164 Oromo Afan 6159 Panjabi 6247 Pashto Pushto 6265 Persian 5247 Polish POL 6258 Portuguese POR 6266 Quechua 6367 Rhaeto Romance 6459 Romanian RUM 6461 Russian RUS 6467 S Samoan 6559 Sangh...

Page 105: ... suave ligeramente humedecido con agua templada Nunca utilice un disolvente o alcohol para limpiar el combo TV No rocíe insecticida cerca del combo TV Esta clase de productos químicos podría dañar y decolorar las superficies expuestas Verificación de la señal infrarroja del control remoto Se puede usar una radio AM o una cámara digital para comprobar que el control remoto está enviando una señal P...

Page 106: ...o una antena exterior asegúrese de que el cableado se encuentra en buena condición Cambie los canales para ver si el problema está relacionado con la estación transmisora Apague aparatos cercanos para ver si el problema está causado por interferencia La imagen está borrosa Si está usando una antena exterior asegúrese de que el cableado se encuentra en buena condición Cambie los canales para ver si...

Page 107: ...istro eléctrico durante la grabación La imagen o el color pierde intensidad cuando se copia una cinta de video La cinta de video que quiere copiar tiene protección contra copiado No podrá copiar este tipo de cintas Síntoma Solución No hay imagen Asegúrese de que el disco sea compatible Su combo TV no puede reproducir discos DVD RAM discos CD i CD de fotos CD de video o DVD con códigos regionales q...

Page 108: ...arato digital de Clase B cumple con el ICES 003 canadiense Seguridad del láser Su TV utiliza un láser Sólo el personal de servicio calificado puede retirar la cubierta o intentar dar servicio a este dispositivo ya que existe la posibilidad de que se lesionen los ojos Derechos de reproducción 2007 Insignia Insignia y el logotipo de Insignia son marcas de comercio de Best Buy Enterprise Services Inc...

Page 109: ...diagnosticará y corregirá el problema por teléfono o enviará un técnico certificado por Insignia a su casa En dónde es válida la garantía Esta garantía sólo es válida al comprador original del Producto en los Estados Unidos y en Canadá Qué es lo que no cubre la garantía Esta garantía no cubre Formación del cliente Instalación Ajuste de configuración Daños cosméticos Daños debido a actos de la natu...

Page 110: ...110 Combo de televisor con tubo de imagen curvo de 27 Reproductor de DVD VCR Insig www insignia products com ...

Page 111: ...111 Combo de televisor con tubo de imagen curvo de 27 Reproductor de DVD VCR Insig www insignia products com ...

Page 112: ...All other products and brand names are trademarks of their respective owners 2007 produits Insignia Tous droits réservés Tous les autres produits ou noms de marques sont des marques de commerce qui appartiennent à leurs propriétaires respectifs 2007 productos Insignia Todos los derechos reservados Todos los demás productos y marcas son marcas comerciales de sus respectivos dueños P77B0UT 1EMN22138...

Reviews: