background image

3

4-Burner Electric Range

www.insigniaproducts.com

Pliers

1/4”  Nut  Driver

Level

1 – REMOVE PACKAGING MATERIALS

Failure to remove packaging materials could result in damage to the appliance. Remove all packing parts from 
oven, racks, heating elements, and drawer. Also, remove protective film and labels on the outer door, cooktop, 
and backguard.

2 – PREPARE THE OPENING (FOR INDOOR USE ONLY)

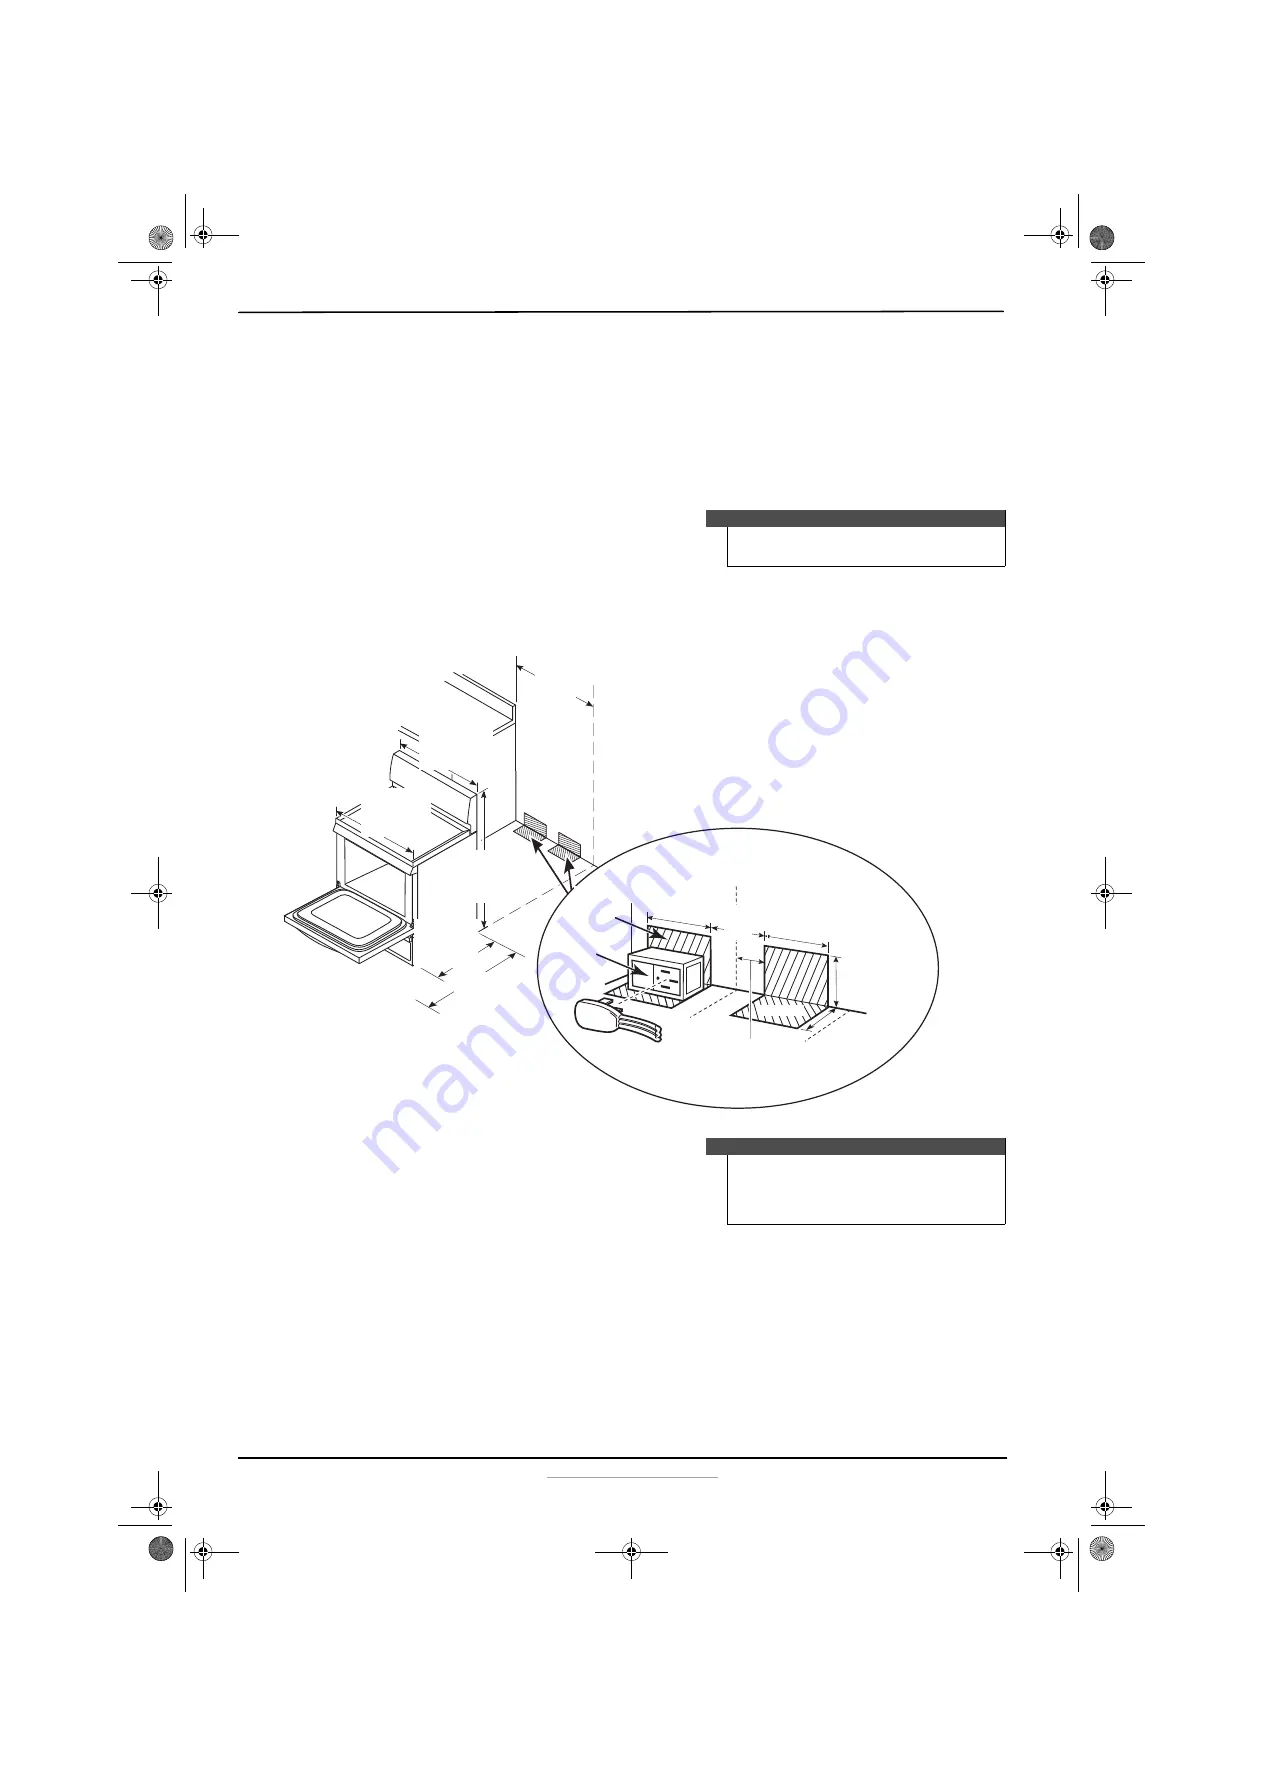
See illustrations for all rough-in and spacing dimensions.

Note

Cut the orange shipping ties from the power cord, being 
careful not to damage the cord.

Note

Use a four foot (1.2 m) power cord to prevent interference 
with the storage drawer. Power cords four to six feet (1.2 
to 1.8 m) long may have to be dressed to allow for proper 
drawer closing.

78.7 cm
(31

)

76.2 cm
(30”)

75.8 cm
(29-7/8”)

121.3 cm
(47-3/4”)

66 cm
(26”)

116.8 cm
(46”)

Install the outlet box on 
either side of the centerline

Centerline of range

Wall

Outlet box

Cord

19 cm
(7-1/2”)

19 cm
(7-1/2”)

12.7 cm
(5”)

Floor

8.9 cm
(3-1/2”)

5.7 cm
(2-1/4”)

17.7cm
(7”)

NS-RNE4BWH8-C_NS-RNE4BMSS9-C_NS-RNEC4BSS9-C_18-0194_Install MAN_V1_EN.fm  Page 3  Wednesday, March 28, 2018  2:26 PM

Summary of Contents for NS-RNE4BWH8-C

Page 1: ...ge INSTALLATION GUIDE 4 Burner Electric Range NS RNE4BWH8 C NS RNE4BMSS9 C NS RNEC4BSS9 C 205C1713P016 NS RNE4BWH8 C_NS RNE4BMSS9 C_NS RNEC4BSS9 C_18 0194_Install MAN_V1_EN fm Page 1 Wednesday March 2...

Page 2: ...ian Proper installation is the responsibility of the installer Product failure due to improper installation is not covered under warranty WARNING This appliance must be properly connected by means of...

Page 3: ...ote Cut the orange shipping ties from the power cord being careful not to damage the cord Note Usea fourfoot 1 2 m powercordto prevent interference with the storage drawer Power cords four to six feet...

Page 4: ...tter and heat To reduce the risk of burns or fire when reaching over hot surface elements cabinet storage space above the cooktop should be avoided If cabinet storage space is to be provided above the...

Page 5: ...does not reach the rear wall align the back edge of the bracket with the rear panel of the range in its final location If bracket does not touch the rear wall you MUST screw bracket to FLOOR as descri...

Page 6: ...ket is NOT properly installed and MUST be reinstalled following these instructions The anti tip bracket must be PROPERLY INSTALLED and the rear leveling leg must be FULLY ENGAGED into the bracket to p...

Page 7: ...l for proper replacement Check to make sure that the rear leveling leg is fully inserted into the Anti Tip bracket and that the bracket is securely installed OPERATION CHECKLIST Turn on one of the sur...

Page 8: ...signiaproducts com 1 877 467 4289 U S and Canada or 01 800 926 3000 Mexico V4 ENGLISH 18 0194 NS RNE4BWH8 C_NS RNE4BMSS9 C_NS RNEC4BSS9 C_18 0194_Install MAN_V1_EN fm Page 8 Wednesday March 28 2018 2...

Reviews: