9
Built-in 4.9 Cu. Ft. Wine Cooler
www.insigniaproducts.com
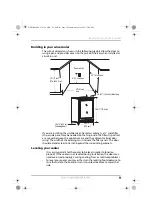
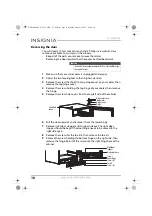
Building in your wine cooler
The cutout dimensions shown in the following graphic allow the door to
swing open and provides access to the pull-out shelves when installed as
a built-in unit.
If you are installing the unit between frameless cabinets, a ½” wide filler
strip or side panel may be needed on the hinge side. The filler strip will act
as a spacer between the appliance case and the adjacent cabinet door
swing. The width of the opening must include the filler panels. The door
should extend at least one inch beyond the surrounding cabinets.
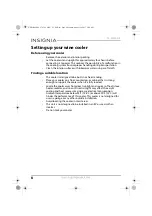
Leveling your cooler
•
It is very important for the cooler to be level in order to function
properly. If the cooler is not leveled during installation, the door may
not close or seal properly, causing cooling, frost, or moisture problems.
•
To level your cooler, you may either turn the leveling foot clockwise to
raise that side to the cooler or turn it counter-clockwise to lower that
side.
Power outlet
24-1/2” (62.2 cm)
(including door)
6” (15.2 cm) max.
34-1/2” to 35”
(87.6 to 88.9 cm)
24” (61 cm) min.
20-4/5” (52.8 cm) Cabinet only
34-2/5” (87.4 cm)
23-2/5”
(59.4 cm)
24” (61 cm)
min.
NS-WB44SS8_17-0586_MAN_V1_ENG.fm Page 9 Monday, August 14, 2017 8:44 AM


