background image

10

www.insigniaproducts.com

10

Replace the glass door, then reinstall the upper hinge. Make sure that you 
align the door and check the tightness of the door gasket.

11

Adjust the leveling feet to level your cooler.

Grounding requirement

Your cooler must be grounded. Your cooler is equipped with a cord having a 
grounding wire with a grounding plug. The plug must be inserted into an outlet 
that is correctly installed and grounded.
Consult a qualified electrician or service person if you don’t understand the 
grounding instructions, or if you aren’t sure whether your cooler is correctly 
grounded.

Connecting to power

• Plug your cooler into a dedicated, correctly installed grounded wall outlet. 

Your cooler should be operated on a separate electrical circuit from other 
operating appliances.

• Plug in and run your cooler for three to four hours before making any 

temperature adjustments and before adding wine. This allows your cooler to 
reach a stable temperature.

WARNINGS:

• Incorrect use of the grounding plug can result in a risk of electric shock.
• Do not, under any circumstances, cut or remove the third ground prong 

from the supplied power cord.

CAUTION:

 Your cooler is not designed to be installed in an RV or used with an 

inverter.

Notes:

• Check your local power source. Your cooler requires a 110 V ~ 120 V, 60 Hz 

power supply.

• Use a receptacle that accepts the grounding prong. The power cord is 

equipped with a 3-prong (grounding) plug which plugs into a standard 
3-prong (grounding) wall outlet to minimize the possibility of electric shock 
hazard from your cooler.

• To prolong the service life of the compressor, wait for at least five minutes 

before restarting your cooler after a power failure.

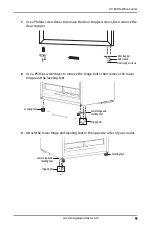
Axle sleeve

Hinge cover

Hinge bolts

Upper hinge

Axle sleeve

Rivets

Summary of Contents for NS-WC29SS9

Page 1: ...Before using your new product please read these instructions to prevent any damage USERGUIDE 29 Bottle Wine Cooler NS WC29SS9 NS WC29SS9 C...

Page 2: ...onnecting to power 10 Using your cooler 11 Setting the temperature 11 Memory function 11 Using the display 11 Lighting your cooler 11 Locking and unlocking your cooler 11 Using the wine shelves 11 Arr...

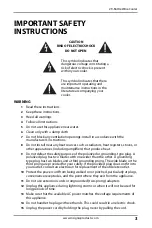
Page 3: ...If the provided plug does not fit into your outlet consult an electrician for replacement of the obsolete outlet 10 Protect the power cord from being walked on or pinched particularly at plugs conveni...

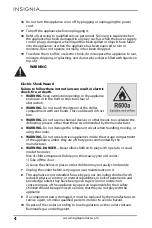
Page 4: ...means to accelerate the defrosting process other than those recommended by the manufacturer 4 WARNING Do not damage the refrigerant circuit when handling moving or using the cooler 5 WARNING Do not us...

Page 5: ...any flammable liquids inside or in the vicinity of this cooler 14 Do not use extension cords or ungrounded two prong adapters with this cooler If the power cord is too short have a qualified electric...

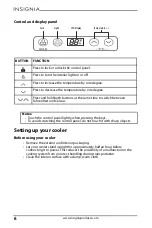
Page 6: ...g during transportation Clean the interior surface with a damp warm cloth BUTTON FUNCTION Press to lock or unlock the control panel Press to turn the interior light on or off Press to increase the tem...

Page 7: ...location Avoid placing your cooler in moist areas Your cooler is not designed to be installed in an RV or used with an inverter Do not stack your cooler For your cooler to operate normally avoid placi...

Page 8: ...ling feet to their highest positions 3 Use a blade to remove the rivets 4 Use a blade to remove the hinge cover then use a Phillips screwdriver to remove the hinge bolts 5 Remove the upper hinge 6 Rem...

Page 9: ...8 Use a Phillips screwdriver to remove the hinge bolts then remove the lower hinge and the leveling feet 9 Attach the lower hinge and leveling feet to the opposite sides of your cooler Door stopper Ax...

Page 10: ...appliances Plug in and run your cooler for three to four hours before making any temperature adjustments and before adding wine This allows your cooler to reach a stable temperature WARNINGS Incorrec...

Page 11: ...ting your cooler Press the light button to turn the interior light on or off A beep sounds when the light is turn on or off Locking and unlocking your cooler Press the lock button to lock or unlock th...

Page 12: ...n your cooler The cork of an opened bottle should always be moistened when returning it to the bottle Red wine should be allowed to breathe oxygenate before drinking We suggest that you put pink rose...

Page 13: ...rost in a compressor off cycle Defrost water drains out of your cooler passing through the drain outlet in the inner back wall into a drain pan located above the compressor The water evaporates from t...

Page 14: ...mperature sensor fault E4 Defrost sensor fault If any of these error codes appears on the display contact your local dealer or service center Do not try to repair your cooler yourself Note Make sure t...

Page 15: ...your cooler is in a room that is 50 85 F 10 29 4 C or place your cooler in a cooler location Make sure that the door is closed correctly Clean the door gaskets Set the control to a colder setting Dim...

Page 16: ...parts charges This warranty lasts as long as you own your Insignia Product during the Warranty Period Warranty coverage terminates if you sell or otherwise transfer the Product How to obtain warranty...

Page 17: ...T BE LIABLE FOR ANY INCIDENTAL OR CONSEQUENTIAL DAMAGES FOR THE BREACH OF ANY EXPRESS OR IMPLIED WARRANTY ON THIS PRODUCT INCLUDING BUT NOT LIMITED TO LOST DATA LOSS OF USE OF YOUR PRODUCT LOST BUSINE...

Page 18: ...S and Canada or 01 800 926 3000 Mexico INSIGNIA is a trademark of Best Buy and its affiliated companies Distributed by Best Buy Purchasing LLC 7601 Penn Ave South Richfield MN 55423 U S A 2020 Best B...

Reviews: