Le logo Emerson est une marque de commerce et une marque de service de Emerson Electric Co.
Imprimé aux É.-U. © 2015 InSinkErator, une unité commerciale d'Emerson Electric Co. Tous droits réservés.
Le logo Emerson est une marque de commerce et une marque de service de Emerson Electric Co.
Imprimé aux É.-U. © 2015 InSinkErator, une unité commerciale d'Emerson Electric Co. Tous droits réservés.
10
E N G L I S H
For all grounded, cord-connected disposers:
This disposer must be grounded to reduce the risk of electric shock
in the event of a malfunction or breakdown. Grounding provides a
path of least r esistance for electric current. If your disposer did not
include a factory installed power cord, use a cord having an equipment-
grounding conductor and a grounding plug. (InSinkErator power cord
accessory CRD-00 recommended.) The plug must be plugged into an
outlet that is properly installed and grounded in accordance with all
local codes and ordinances.
For permanently connected disposers:
This disposer must be connected to a grounded, metal, permanent
wiring system; or an equipment-grounding conductor must be run with
the circuit conductors and connected to the equipment-grounding
terminal or lead on the disposer.
W A R N I N G
Personal Injury: Do not position your head or body under disposer;
unit could fall during removal or installation.
Improper connection of the equipment-grounding conductor can
result in a risk of electric shock. Check with a qualified electrician
or serviceman if you are in doubt as to whether the disposer is
properly grounded. If the plug you are using does not fit the outlet,
do not modify the plug or attempt to force the plug into the outlet –
have a proper outlet installed by a qualified electrician.
• This disposer must be properly grounded.
• Do not attach ground wire to gas supply line.
• Disconnect power before installing or servicing disposer.
• If three-prong grounded plug is used, plug must be inserted into
three-hole grounded receptacle.
• All wiring must comply with local electrical codes.
• Do not reconnect electrical current at main service panel until
proper grounds are installed
.
W A R N I N G
N O T I C E
• Do not use plumber’s putty on any other disposer connection
other than sink flange. Do not use thread sealants or pipe dope.
These may harm disposer and cause property damage.
• Do not operate disposer without Anti-Vibration Tailpipe Mount™
as water leaks may result.
• Failure to use the spring-load hose clamp provided voids the
warranty.
• To properly drain and prevent standing water in the disposer
when utilizing a straight pipe discharge tube, the tube connection
opposite the disposer outlet must be lower, not higher, than the
disposer outlet.
IMPORTANT SAFETY INSTRUCTIONS
GROUNDING INSTRUCTIONS
INSTRUCTIONS PERTAINING TO RISK OF FIRE, ELECTRIC SHOCK,
INJURY TO PERSONS OR DAMAGE TO PROPERTY
Installing Bio-Charge
®
Bottle
Use only InSinkErator
®
Bio-Charge
®
septic assist bottles. Do not squeeze the Bio-Charge
®
Bottle; squeezing the bottle may cause Bio-Charge
®
to
discharge and spill.
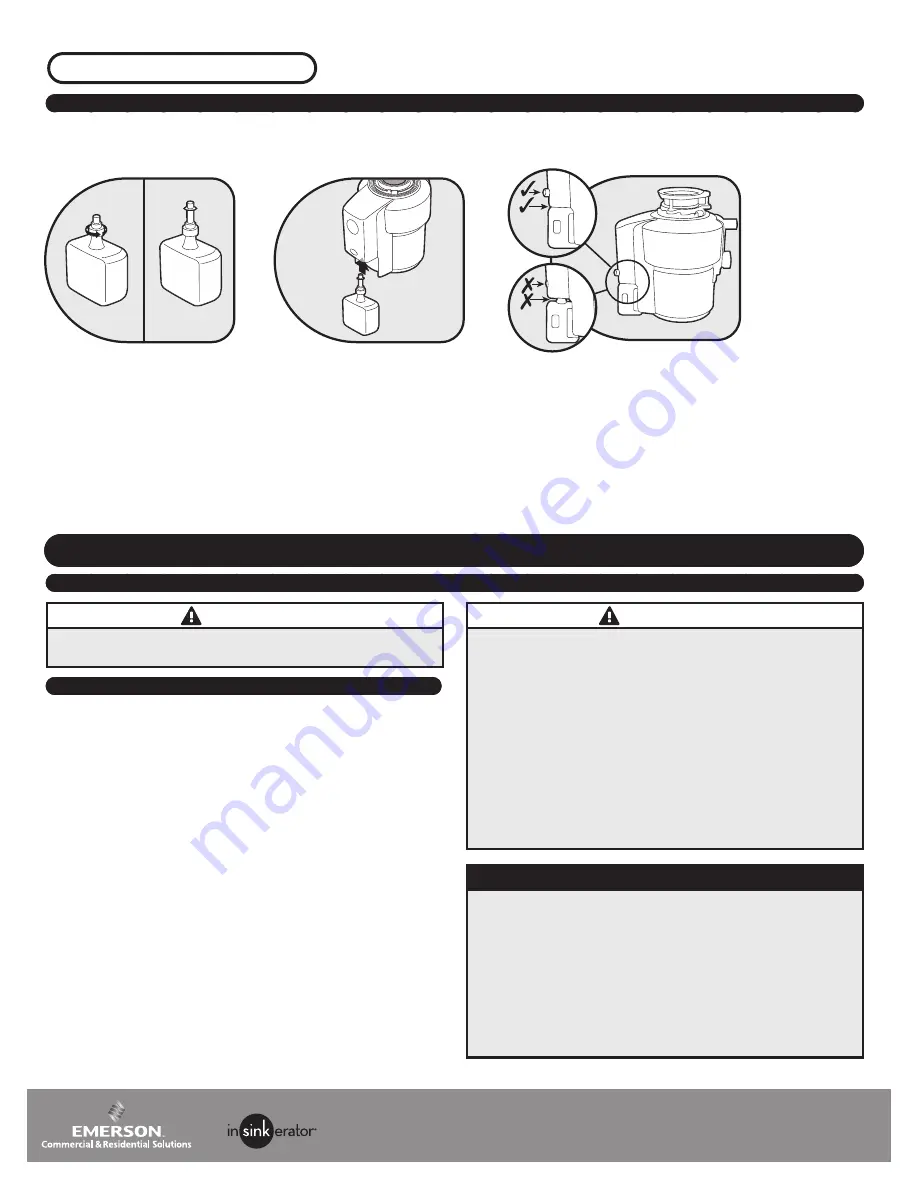
• Unscrew Bio-Charge
®
dispenser cap nozzle counterclockwise until nozzle pops upward to dispensing position. Do not remove dispenser cap
nozzle.
• Align bottle with concave side toward disposer. IMPORTANT: Press septic assist bottle firmly into place. The bottle MUST be seated into the
dispose housing for proper operation; there SHOULD NOT be a gap. (When installed correctly, the button on the disposer housing will be
fully ejected.
• Release button. Pull bottle down slightly to ensure it is engaged.
Replacing Bio-Charge
®
Bottle
To keep your septic system operating at peak efficiency, replace the Bio-Charge
®
bottle when it is empty.
• Make sure disposer is off.
• Press button on disposer just above bottle and pull bottle down to remove it. (Do not refill or reuse empty bottle.)
INSTALLING AND REPLACING THE BIO-CHARGE
®
BOTTLE


