background image

9

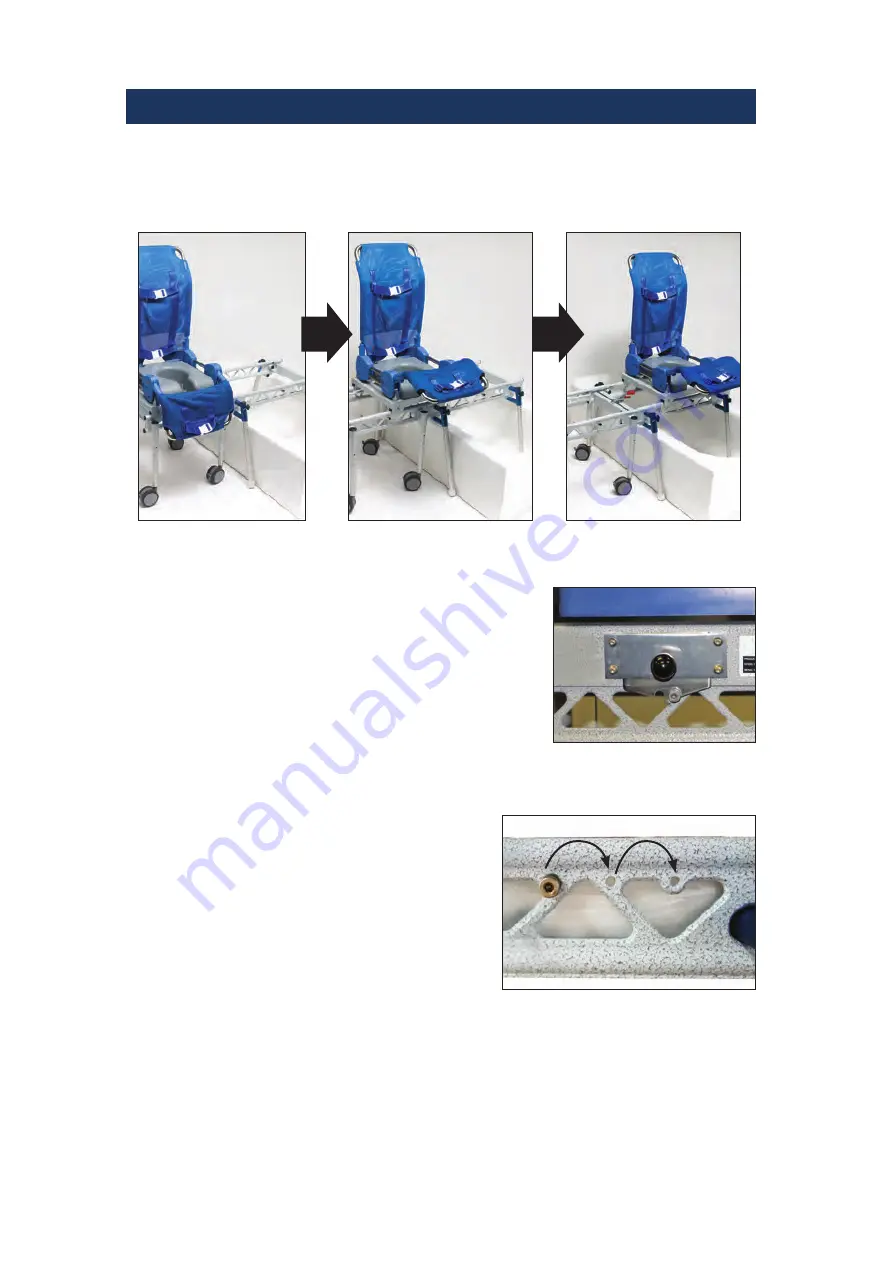
6. Prior to transfer, raise the calf support high enough to clear the sides 

of the tub (Fig. 18).

7. When transferring, roll the shuttle base 

until the latch on the back clicks into the 
position lock bolt (Fig. 19). There are 
position lock bolts on rolling base and 
tub base. These will lock the seating into 
a secure position and eliminate any side 
movement and/or rolling during use. 

Note: The lock bolt on the tub base can be 
repositioned into two other locations 
for better positioning of the individual 
over the tub in certain applications 
(Fig. 20).

8. To release the lock, pull upward on 

the black knob on the lower back 
of the slider and allow it to travel 
between the coupled rolling base and 
bath tub base.

Figure 19

Figure 18

Figure 20

OPERATING THE TRANSFER SYSTEM

Summary of Contents for Ultima Large

Page 1: ...ust be passed on to the user of this product Please do not remove this manual before delivery to the end user SUPPLIER This manual must be given to the user of this product USER Before using this prod...

Page 2: ...Determine with a physician or therapist the suitability of this product for the intended user 4 Check regularly that all tubing bolts buckles and other parts are tight at ALL times 5 When occupied ma...

Page 3: ...kage you will find these following pieces Back Frame Calf Frame Adjustment Pull Handle s 4 Casters Cover and Hardware Kit 4 Leg Tubes Seating Frame Rolling Base Transfer Frame Adjustment Pull Handle R...

Page 4: ...e frame Fig 2 Firmly press the stainless steel caps over the ends of the pull handle Please ensure that the end cap fits tightly over the groove on the pull handle Test it by tugging at the cap If it...

Page 5: ...installed the pull tab should click into place and completely engaged into the slot There should not be a gap between the pull tab and connector See the figures below Adjustments to the bath transfer...

Page 6: ...k Angle 1 Locate the adjustment pull handle A on the back of the seating under the cover it is not necessary to remove the cover to operate the lever Using both hands grip the lever and back frame and...

Page 7: ...osition on the base Fig 10 Note To remove the seating from base release the safety latch in the back and press the Slider Safe button Fig 11 5 If ordering with footrests insert them by aligning the sl...

Page 8: ...legs to the desired height Tighten the adjusting knobs when the height is set 4 When the heights of the tub base and the rolling base are equal move the rolling base as close as possible to the tub ba...

Page 9: ...ck the seating into a secure position and eliminate any side movement and or rolling during use Note The lock bolt on the tub base can be repositioned into two other locations for better positioning o...

Page 10: ...g fade resistant and machine washable Cleaning Instructions 1 Remove the seating cover by following these steps below Adjust the back and calf support frames to horizontal Turn the seating up side dow...

Page 11: ...dbydrive com Head Support Pad Designed for better head positioning Lateral Support Pad Designed for better torso positioning Positioning Belt Quick release strap for various loops on chair allowing fo...

Page 12: ...ects in material and workmanship Our obligation under this warranty is limited to repair or replacement of any part or entire unit at our option for a period of one year from date of delivery to the o...

Reviews: