background image

8

Product Overview

Zest

 Plus Rice & Grain Cooker 

Instant

 Zest

 Plus Rice & Grain Cookers automatically cook a variety  

of grains to perfection.

Illustrations are for reference only and may differ from the actual appliance.

Heating Element

(Interior)

Cooker Base

Control Panel

Lid

Lid Handle

Condensation Collector

Lid Release

Lid Lock

Power Cord

Steam Vent

Summary of Contents for ZEST

Page 1: ...e Grain 20 Cup Cooker User Manual Welcome Important Safeguards Initial Setup Product Overview Control Panel Initial Test Run Smart Programs Care and Cleaning Troubleshooting Warranty Support and Contact Information ...

Page 2: ...ealthy delicious meals more easily and in less time We have partnered with chefs authors and bloggers to compile a collection of recipes that we hope you enjoy Happy cooking Download the FREE Instant Pot App Original Recipes New User Tips Getting Started Videos Find dozens of easy to follow recipes at recipes instantpot com and with the Instant Pot app at instantpot com app Robert J Wang Founder C...

Page 3: ...ical components Always use the inner pot for cooking 6 This appliance is NOT to be used by children or by persons with reduced physical sensory or mental capabilities Close supervision is necessary when any appliance is used near children and these individuals Children should not play with this appliance 7 Press Cancel then unplug from outlet when not in use and before cleaning Let appliance cool ...

Page 4: ...8 A short power supply cord is provided to reduce risks resulting from becoming entangled in or tripping over a long cord 19 Do not use unit in electric systems other than 120V 60Hz for North America Do not use with power converters or adapters 20 CAUTION Spilled food can cause serious burns A short power supply cord is provied to reduce the hazards resulting from grabbing entanglement and trippin...

Page 5: ...afe distance when opening the cooker 25 Rice should not be left in the inner cooking pot with the Keep Warm function on for more than 12 hours 26 To prevent damage or deformation do not use the inner cooking pot on a stovetop or burner 27 To reduce the risk of electrical shock cook only in the removable inner cooking pot provided 28 Do not wrap or tie cord around appliance SAVE THESE INSTRUCTIONS ...

Page 6: ...11 26W 11 34H cm 28 7L 28 6W 28 8H Read this manual carefully and completely and retain for future reference Failure to adhere to safety instructions may result in serious injury WARNING WARNING THE FAILURE TO FOLLOWANY OF THE IMPORTANT SAFEGUARDSAND THE IMPORTANT INSTRUCTIONS FOR SAFE USE ISAMISUSE OF YOURAPPLIANCE THAT CAN VOID YOUR WARRANTYAND CREATE THE RISK OF SERIOUS INJURY WARNING Electrica...

Page 7: ...sent See Product Overview below Place the appliance on a stable level surface away from external heat sources Read and follow Care and Cleaning instructions to clean the appliance before first use Do not remove safety warnings or rating labels from the appliance CAUTION Heat from externals source will damage the appliance Never use the appliance on a stovetop Do not place the appliance on or in cl...

Page 8: ...ain Cookers automatically cook a variety of grains to perfection Illustrations are for reference only and may differ from the actual appliance Heating Element Interior Cooker Base Control Panel Lid Lid Handle Condensation Collector Lid Release Lid Lock Power Cord Steam Vent ...

Page 9: ...9 Product Overview Zest Plus Rice Grain Cooker Accessories Illustrations are for reference only and may differ from the actual appliance Inner Pot Steamer Tray Rice Spoon Measuring Cup ...

Page 10: ...am control Illuminated when a Smart Program is selected or running Status Icons Delay Start is counting down The heating element is engaged Keep Warm is active Sound is off or on Display Shows cooking times and status messages Smart Programs for Automatic Cooking White Rice Oatmeal Brown Rice Barley Quinoa Couscous Mixed Grains Bulgur Risotto Smart Programs for Other Food Preparation Methods Steam...

Page 11: ...y Display will change to MM SS when less than 10 minutes of cooking time remains and counts down to Smart Program end Indicates the time remaining in the Delay Start cycle or Smart Program cooking time remaining when using the Oatmeal Steam Sauté or Slow Cook Smart Programs Display will change to MM SS when less than 1 hour remains until Delay Start or Smart Program completion Indicates that the c...

Page 12: ...atically keep food warm for a maximum of 12 hours after the Smart Program has ended Press Keep Warm to toggle Keep Warm on or off at any time Optionally press Delay Start to delay the start of the Smart Program Delay Start is OFF by default Turn ON by pressing the Delay Start control Use the controls to adjust the delayed start time in increments of 10 minutes to a maximum of 24 hours 2 Press Star...

Page 13: ...ker in Standby mode Display reads OFF press Steam Display will read HH MM Optionally press Keep Warm to turn the Keep Warm program OFF Note that Keep Warm is ON by default and the cooker will automatically keep food warm for a maximum of 12 hours after the Smart Program has ended Press Keep Warm to toggle Keep Warm on or off at any time Optionally press Delay Start to postpone the Smart Program No...

Page 14: ...will read HI or LO Press Slow Cook again to toggle between HI and LO slow cooking programs Optionally press Keep Warm to turn the Keep Warm program OFF Keep Warm is ON by default and the cooker will automatically keep food warm for a maximum of 10 hours after the Smart Program has completed Press Cancel to end Keep Warm at any time Optionally press Delay Start to delay the start of the Smart Progr...

Page 15: ...g Keep Warm as a standalone food preparation method and do not affect Keep Warm when it is used in conjunction with other Smart Programs 3 Press Start to save warming time and temperature and begin the Keep Warm program 4 Press Start to begin cooking If Delay Start is active the Display will show the countdown to the delayed start time When cooking starts the Display will count down the remaining ...

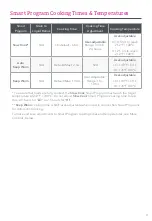
Page 16: ...White Rice 1 1 5 Automatic 25 60 min per vol N A 212 F 100 C Not user adjustable Brown Rice 1 2 Automatic 40 90 min per vol Quinoa 1 1 5 Automatic 30 60 min per vol Mixed Grains 1 2 Automatic 40 90 min per vol Steam N A Default 10 min User adjustable Range 5 60 min 212 F 100 C Not user adjustable Sauté N A Default 30 min User adjustable Range 1 30 min User adjustable LO 221 F 105 C HI 320 F 160 C ...

Page 17: ... 65 C HI 176 F 80 C Keep Warm N A Default Max 10 hrs User Adjustable Range 1hr 10 hrs User adjustable LO 149 F 65 C HI 176 F 80 C To ensure that foods are fully cooked the Slow Cook Smart Program must reach the target temperature of 212 F 100 C Do not adjust Slow Cook Smart Program cooking time to less than 4 5 hours for LO or 2 5 hours for HI Keep Warm cooking time is NOT user adjustable when use...

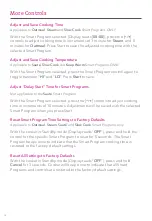
Page 18: ...o the Sauté Smart Program With the Smart Program selected press the controls to adjust cooking time in increments of 10 minutes Adjustments will be saved with the selected Smart Program when you press Start Reset Smart Program Time Settings to Factory Defaults Applicable to Oatmeal Steam Sauté and Slow Cook Smart Programs only With the cooker in Standby mode Display reads OFF press and hold the co...

Page 19: ...ooker audio alerts OFF When cooker is in Standby mode Display reads OFF press and hold for 3 seconds will be illuminated To turn cooker audio alerts ON When cooker is in Standby mode Display reads OFF press and hold for 3 seconds will be extinguished ...

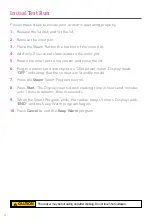
Page 20: ...id 6 Plug the power cord directly into a 120V power outlet Display reads OFF indicating that the cooker is in Standby mode 7 Press the Steam Smart Program control 8 Press Start The Display counts down cooking time in hours and minutes until 1 minute remains then in seconds 9 When the Smart Program ends the cooker beeps 5 times Display reads END and the Keep Warm program begins 10 Press Cancel to e...

Page 21: ...ris is fully removed Optionally spray with non stick cooking spray before adding food Hand Wash Lid Clean after each use Wipe with a soft damp cloth or sponge Cooker Base If wet food or grease enters the cooker base wipe clean with a soft damp cloth or sponge Clean the exterior with a soft damp cloth or sponge and wipe dry to avoid streaking WARNING Do not immerse the appliance in water Do not rin...

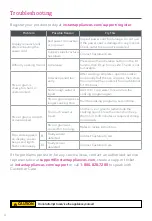
Page 22: ... additional 5 10 minutes Not enough water or liquid Add to 1 cup water mix and run the cooking program again Rice or grain requires a longer cooking time Run the cooking program a second time Rice or grain is too soft or overcooked Too much water or liquid Stir the rice or grain to redistribute the cooking liquid Close the lid and run Keep Warm for 10 30 minutes as required stirring occasionally R...

Page 23: ...gistration Please visit www instantappliances com support register to register your new Instant Brands appliance and validate your warranty within thirty 30 days of purchase You will be asked to provide the store name date of purchase model number found on the back of your appliance and serial number found on the bottom of your appliance along with your name and email address The registration will...

Page 24: ...fe operation of the appliance and will void this Limited Warranty This Limited Warranty does not apply in respect of any appliance or any part thereof that has been altered or modified unless such alterations or modifications were expressly authorized by an Instant Brands representative Limitation and Exclusions The liability of Instant Brands if any for any allegedly defective appliance or part s...

Page 25: ...today at instantappliances com support register Contact Customer Care 1 800 828 7280 support instantappliances com instantappliances com Chat instantappliances com store instantappliances com Instant Brands Inc 11 300 Earl Grey Dr Suite 383 Ottawa Ontario K2T 1C1 Canada ...

Reviews: