background image

© Intatec Ltd 2014

3

Installation

   Step 2 - Installing the tap

   4.   Secure the tap to the basin or work surface using the retaining nut and washer.

  Step 3 - Connecting the water supply

   1.   A service ball valve must be installed in the supply pipe to 
         enable the tap to be isolated for servicing should it be required.

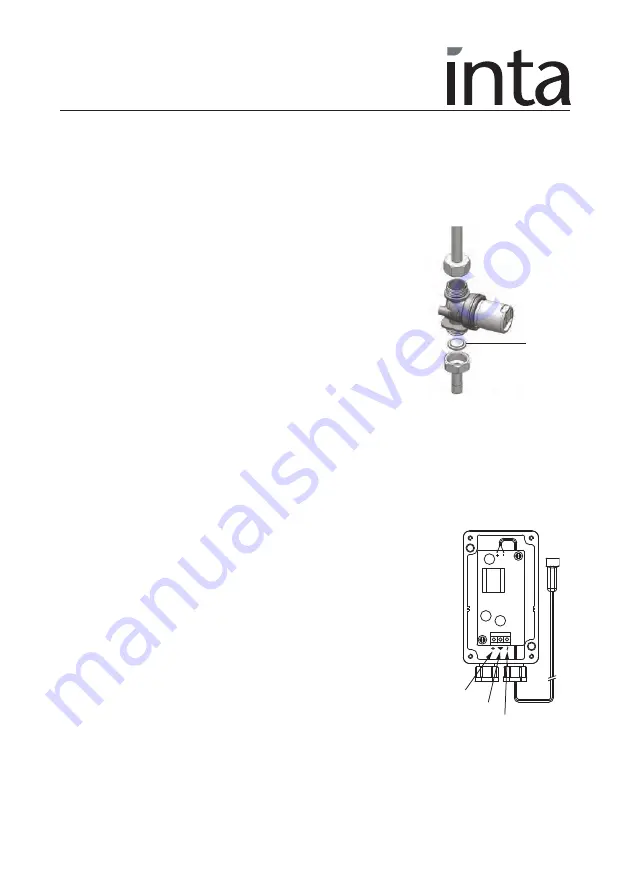
   2.   Connect the tap to the solenoid valve and then from the 
         solenoid valve to the service ball valve.

         Ensure the flow direction through the solenoid valve is the same
         as indicated by the arrow on the valve body.

   3.   Ensure the filter is assembled between the inlet joint and the 
         solenoid valve.

   4.   Turn on the water supply and check all joints for leakage. 

   5.   Isolate via the service ball valve and tighten or remake joints if 
         leakage occurs.


Step 4 - Connecting the power supply

   1.   Install the battery box on the wall under the basin using the screws provided or the two 
         sided adhesive foam tape.

   2.   Wait a few seconds before activating the tap.

   3.   If the range is unsatisfactory, refer to the ‘Range Adjustment’ section. 


Step 4 - IR121CP only

   1.   The IR06530021 electronic 240V conversion kit is only to be 
         used with the IR121CP in lieu of the 9V DC standard battery 
         pack.

   2.   Install the transformer box on the wall under the basin using the 
         screws provided or the two sided adhesive foam tape.

   3.   Connect the electricity supply using the second connection point 
         and connect as shown.

         Input Characteristics 

- 100 or 240V 


- 50 to 60 Hz

         Output Characteristics - Voltage = 9V ± 5%


- Load Current = 300mA


IMPORTANT:

   This product must be installed by a suitably qualified and competent person carrying the 
   relevant current IEE electrical qualification.

Water Outlet

Water Outlet

Filter

Neutral

Earth

Live

Summary of Contents for IR120CP

Page 1: ...s possible We cannot accept any responsibility should it be found that in any respect the information is inaccurate or incomplete or becomes so as a result of further developments or otherwise Intatec...

Page 2: ...y box IR120CP Infra red basin mounted tap with electronic transformer IR121CP Check Contents Before commencing remove all components from packaging and check each component with the contents list Ensu...

Page 3: ...high visibility or other reflective clothing To prevent reflection problems it is recommended to keep a minimum distance of 1 5m between the tap and other objects Preparation for installation Flush t...

Page 4: ...occurs Step 4 Connecting the power supply 1 Install the battery box on the wall under the basin using the screws provided or the two sided adhesive foam tape 2 Wait a few seconds before activating the...

Page 5: ...eks To replace the battery 1 Carefully open the battery box 2 Remove the old battery 3 Replace with 6 x AA batteries a lithium battery is recommended 4 Close the battery box Maintenance Filter cleanin...

Page 6: ...covered by a limited warranty for one year from the date of purchase During this period Intatec Ltd undertakes at its option to repair or replace any faults caused by defective material or manufacturi...

Page 7: ...sudden increase in water supply pressure that the check valve or double check valve prevents from dropping even after the water supply pressure falls below 8 bar Connect the electronic unit s connect...

Page 8: ...co uk E O E 10 06 14 To active your product warranty please visit www intatec co uk and click on Product Registration Notes Security Mode If the sensor is covered for more than 90 seconds the tap wil...

Reviews: