background image

© Intatec Ltd 2017

4

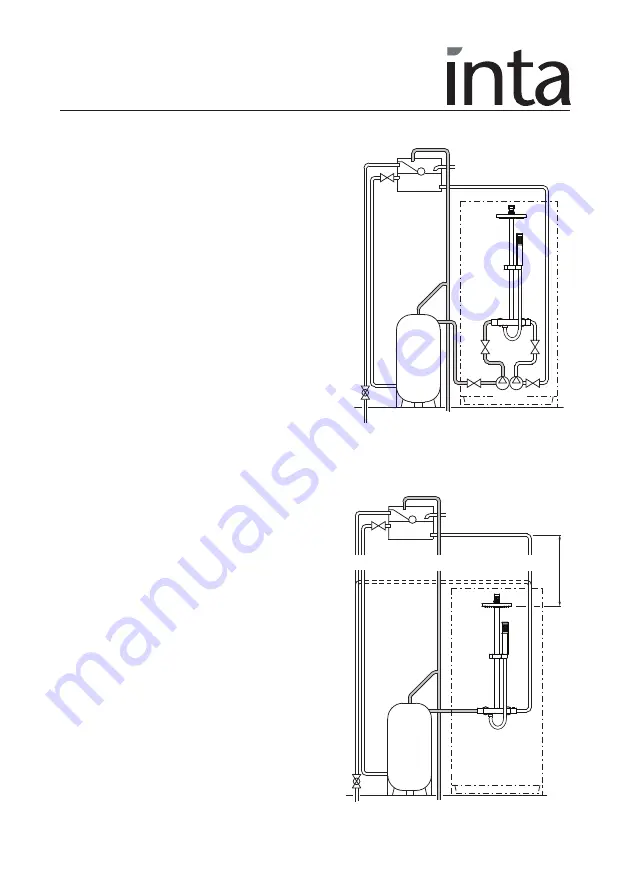
Pumped Systems

    Pumped systems use a booster pump to increase the 
    pressure of the gravity fed water supplies. 

    These booster pumps are used where the head of 
    water is insufficient to provide a satisfactory shower 
    or where a high performance shower is required.

   Please ensure that the performance of the pump is 

    matched to suit the shower.

    Follow the instructions for gravity fed installations 
    taking into account the installation requirements of 
    the pump.

    Ensure that the hot and cold water storage capacity 
    is sufficient to supply the shower and any other 
    draw off points that may be used simultaneously.

    Most pumps require a minimum head of water to 

    allow the flow switches to operate automatically. 

    Where this is not available a negative head kit 

    may be required to operate the pump.

    Please consult the pump manufacturer’s installation requirements

Gravity System

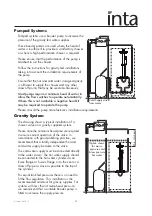
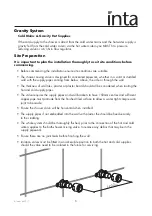
    The drawing shows a typical installation of a 
    shower valve on a gravity supplied system. 

    Please note the minimum head pressure required 
    to ensure correct operation of the valve. In 
    accordance with good plumbing practice, we 
    recommend that a totally independent hot and 
    cold water supply be taken to the valve.

    The cold water supply must be connected directly 
    to the water cistern. The hot water supply should 
    be connected to the hot water cylinder via an 
    Essex flange or Sussex flange or to the vent or a 
    draw off pipe as close as possible to the top of 
    the cylinder. 

    For equal tank fed pressures there is no need to 
    fit the flow regulators. This installation is the 
    recommended minimum for gravity supplies. For 
    systems with less than 4 metre head pressure, 
    we recommend that a suitable booster pump is 
    fitted to increase the supply pressure.

Cold Supply direct

from mains

Pumps

Option shown

for mains

pressure cold

& low pressure

hot water

Min. 4m head

Summary of Contents for Nulo CB10032CP

Page 1: ...tion as accurate as possible We cannot accept any responsibility should it be found that in any respect the information is inaccurate or incomplete or becomes so as a result of further developments or...

Page 2: ...d at a safe temperature to suit the users The shower is pre set using ideal conditions to 38 C at the stop with a manual push button override to 46 C can be re set to suit site conditions or user pref...

Page 3: ...t Temperature 85 C Max Inlet Pressure Dynamic 5 bar Pre Set Factory Temp Setting 38 C Min Operating Pressure Dynamic 0 4 bar Temperature Stability 2 C Max Unbalanced Pressure Ratio 5 1 Min Temp Differ...

Page 4: ...her than the hot supply we recommend that a separate pressure reducing valve is fitted to the cold supply as close as possible to the shower valve and with no draw off points between it and the shower...

Page 5: ...lt the pump manufacturer s installation requirements Gravity System The drawing shows a typical installation of a shower valve on a gravity supplied system Please note the minimum head pressure requir...

Page 6: ...plaster or plaster board should all be considered when routing the hot and cold supply pipes The valve requires the supply pipes and wall brackets to have 150mm centres and sufficient copper pipe mus...

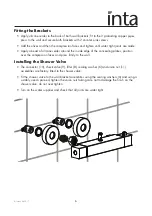
Page 7: ...inside edge of the concealing plates position over the compression faces and press firmly to the wall Installing the Shower Valve The connector 10 check valve 9 filter 8 sealing washer 6 and union nu...

Page 8: ...ow control 1 and allow the outlet temperature to stabilise from the bottom outlet Temporarily refit the control knob bush 8 and control knob 6 and using a digital thermometer it is possible to increas...

Page 9: ...have a high quality finish and should be treated with care An occasional wipe with a mild washing up liquid on a soft damp cloth followed by a thorough rinsing is all that is required The nozzles in t...

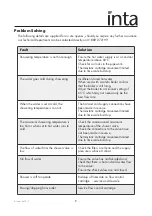
Page 10: ...maximum showering temperature is too hot or when set to hot water runs to cold Check the commissioned maximum temperature of the shower valve Check the connections to the valve have not been made in r...

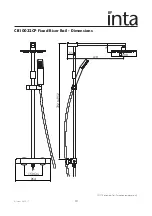
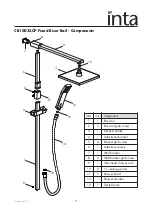
Page 11: ...Intatec Ltd 2017 10 NOTE drawing for illustration purposes only CB10032CP Fixed Riser Rail Dimensions 150 Ctrs 264 722 to 952 55 410 71 200...

Page 12: ...0 Item Qty Component 1 1 Riser rail 2 1 Riser rail grub screw 3 1 Handset holder 4 1 Adjustment bracket 5 4 Bracket grub screw 6 1 Adjustment piece 7 1 Wall bracket 8 2 Wall bracket grub screw 9 1 Ove...

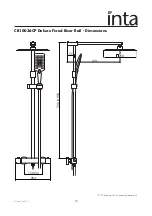
Page 13: ...Intatec Ltd 2017 12 CB10036CP Deluxe Fixed Riser Rail Dimensions NOTE drawing for illustration purposes only 150 Ctrs 264 55 410 250 722 to 952...

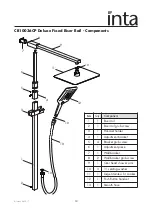
Page 14: ...m Qty Component 1 1 Riser rail 2 1 Riser rail grub screw 3 1 Handset holder 4 1 Adjustment bracket 5 4 Bracket grub screw 6 1 Adjustment piece 7 1 Wall bracket 8 2 Wall bracket grub screw 9 1 Over hea...

Page 15: ...ithin the markings and using the hole as a template drill a 6mm diameter hole If drilling into ceramic tiles use a ceramic bit To avoid cracking ensure the wall plug is pushed all the way behind the c...

Page 16: ...ure the conditions of use are appropriate for the valve Introduction The thermostatic shower valve has been specifically designed and manufactured to meet the requirements of BS EN1111 1999 and TMV2 T...

Page 17: ...99 and also be aware of their responsibility and duty of care to ensure that all aspects of the installation comply with the regulations It has been brought to our attention that flushing water system...

Page 18: ...e s to within the limits as quoted previously 8 Any thermostatic shower valve must be fitted with a back flow prevention device such as check valves to prevent the cross contamination of supplies The...

Page 19: ...eratures are established before any attempt to commission 4 Once the supply temperatures are stable and the normal operating conditions are established the shower valve can be commissioned The followi...

Page 20: ...g performance checks shall be carried out 1 Measure the mixed water temperature at the outlet 2 Carry out the cold water supply isolation test by isolating the cold water supply wait for five seconds...

Page 21: ...Intatec Ltd 2017 20 Notes...

Page 22: ...Intatec Ltd 2017 21 Notes...

Page 23: ...Intatec Ltd 2017 22 Notes...

Page 24: ...n Staffordshire ST18 0PF Tel 01889 272 180 Fax 01889 272 181 email sales intatec co uk web www intatec co uk E O E 11 08 17 To activate your product warranty please visit www intatec co uk and click o...

Reviews: