background image

81

IT – ITALIANO

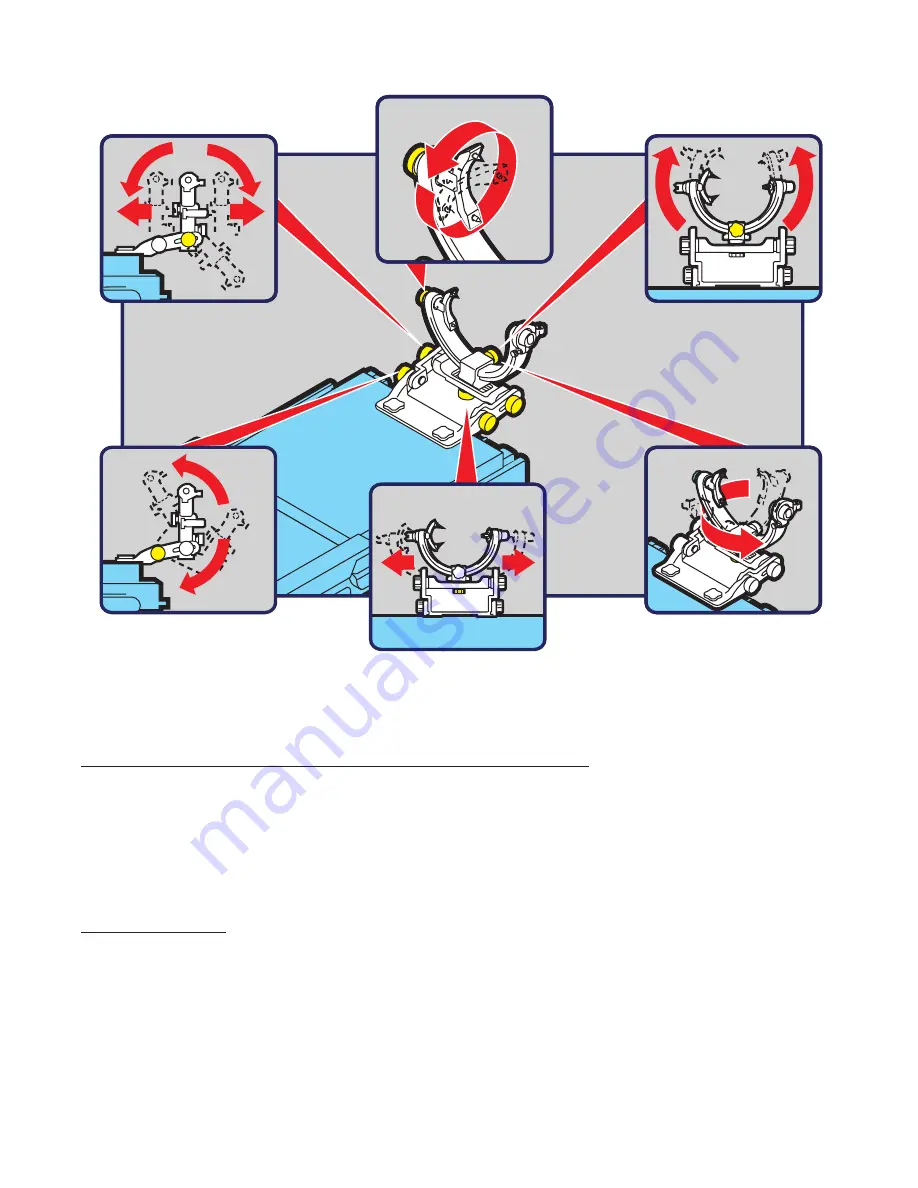
Figura 27 Manopole di regolazione

Uso del sistema con l’angiografia a sottrazione digitale

1. Il chirurgo deve posizionare la morsa ferma-cranio e l’unità della base in modo da ridurre al 

minimo la massa di materiale radiolucente che il fascio dell’arco a C deve penetrare. È possibile 

che sia visibile un artefatto minimo.

NOTA: occorre usare la sottrazione digitale. Seguire le istruzioni del produttore dell’apparecchiatura 
angiografica.

Note di servizio

Occorre completare controlli ad intervalli regolari molto prima di ciascun caso per evitare problemi 
imprevisti. Si raccomandano i seguenti controlli: bloccare e sbloccare la manopola di bloccaggio. In 
caso di problemi, restituire l’unità per la manutenzione:

Service Department, Telefono: 877-444-1114 (esclusivamente per gli Stati Uniti) 
Integra 
4900 Charlemar Drive, Building A 
Cincinnati, Ohio 45227

Vista laterale

Vista laterale

Vista dall'estremità

Vista dall'estremità

Summary of Contents for MAYFIELD A1117

Page 1: ...979 Fax 513 271 1915 integralife com Integra LifeSciences Services France SAS Immeuble Séquoia 2 97 allée Alexandre Borodine Parc Technologique de la Porte des Alpes 69800 Saint Priest FRANCE Phone 33 0 4 37 47 59 00 Fax 33 0 4 37 47 59 99 EN ENGLISH 3 FR FRANÇAIS 29 IT ITALIANO 57 DE DEUTSCH 85 ES ESPAÑOL 113 NL NEDERLANDS 139 BR PORTUGUÊS 167 PL POLSKI 195 CZ ČEŠTINA 221 IMPORTANT Please Read ...

Page 2: ...2 This page is intentionally left blank ...

Page 3: ...915 integralife com Integra LifeSciences Services France SAS Immeuble Séquoia 2 97 allée Alexandre Borodine Parc Technologique de la Porte des Alpes 69800 Saint Priest FRANCE Phone 33 0 4 37 47 59 00 Fax 33 0 4 37 47 59 99 EN ENGLISH MAYFIELD MR X ray Skull Clamp with Excite 3 0T Adaptor A1117 Instruction Manual IMPORTANT Please Read ...

Page 4: ...complies with the requirements of directive 93 42 EEC Manufacturer Authorized Representative in the European Community Consult Instructions for Use Caution Federal US law restricts this device to sale by or on the order of a licensed healthcare practitioner Some components of this device are not indicated for use in MR environment Catalog number Date of manufacture YYYY MM DD Lot number Serial num...

Page 5: ...A1117 MAYFIELD MR X ray Skull Clamp with Table Adaptor includes F D E E A B A B C C G H Description Part Number C D E F G H Small Adult Rocker Assembly Larger Adult Rocker Assembly Applicator Assembly GE Skull Clamp Assembly Transfer Board Knob Qty 2 Table Adaptor Child Rocker Assembly Optional Decagon Mounting Assembly Optional 428A2030 428A2040 428A2020 428C1000 428A2004 428C1001 428A2050 428A20...

Page 6: ...aded Engagement Shaft Long GE Piston Long Qty 2 GE Piston Short Qty 2 Threaded Engagement Shaft Short Small Locking Nut Qty 2 Hex Engagement Teeth Qty 2 Small Adult Rocker Arm Large Adult Rocker Arm Caliper Gauge Decagon Lock Ring Qty 2 Piston Driver Force Applicator 428A1019 428A2010L 428A1022B 428A1022A 428A2010S 428A1017 428A1015 428A1014A 428A1014 428A1066 428A1071 428A1060 428A1008 Figure 1a ...

Page 7: ...n Part Number Thumbscrew Threaded Engagement Shaft Long GE Piston Long Small Locking Knob Hex Engagement Teeth Child Rocker Arm Decagon Lock Ring Qty 2 Navigation Arm Assemblies Qty 2 428A1019 428A2010L 428A1022B 428A1017 428A1015 428A1014C 428A1071 428A1083 S S I J N O V W W K G H Figure 1b Optional Accessories ...

Page 8: ...ure to read and follow instructions furnished in this product insert may result in skull pin slippage and serious patient injury such as scalp lacerations skull fracture or even death WARNING When using this skull clamp in a Magnetic Resonance environment use ONLY MRI compatible skull pins WARNING The force applicator is NOT MR compatible and must be removed prior to scanning in an MR environment ...

Page 9: ...rgeon taking into account the patient s anatomy pressure points neck flexibility and access to the surgical target In the chart above the ovals representing the patient s head have centerlines drawn on them The diagrams show examples of proper and improper applications of the skull clamp The direction of the single pin should point directly through the center point created by the centerlines of th...

Page 10: ...or attaches to the Excite 3 0T diagnostic table The MAYFIELD MR X ray Skull Clamp is designed to allow the surgeon more freedom in positioning the fixation pins Avoidance of critical areas of the skull is made possible by a swiveling rocker arm which rotates 360 making application much easier In addition the swiveling rocker arm can rotate 360 under full skeletal force making final positioning aft...

Page 11: ...the table 2 Use the provided threaded fasteners to lock the table adaptor in place 3 1 2 D Figure 2 Mounting Table Adaptor CAUTION CAUTION Make sure the table adaptor is properly secured to the operating table NOTE If desired the table adaptor may be used without the extension arms permitting the skull clamp to be positioned lower on the table See Figure 3 ...

Page 12: ...sure the patient s head as shown in Figure 5 below with the GE Caliper 428A1066 provided Next lay the Caliper indicating the width of the patient s head onto the Gauge Template provided with this instruction manual The Gauge Template will show whether to use the Small Adult or the Large Adult rocker arm See Figure 6 C a l i p e r G a u g e T e m p l a t e im ag ination at work C h il d R o c k e r...

Page 13: ... the indicated Piston into the clamp upright as shown in Figure 7 The end of the Piston should be positioned as shown 1 J I M or K L or Figure 7 Piston Installation 2 Assemble the rocker arm to the clamp upright as shown in Figure 8 1 2 3 x2 O N P Q V or or Figure 8 Rocker Arm Assembled to Clamp 3 Attach rocker arm to skull clamp with small locking knob turning 2 rotations DO NOT overtighten ...

Page 14: ... and the single pin side of the clamp See Figure 9 and 10 below Use only MAYFIELD brand Disposable Skull Pins with this clamp NOTE It is recommended that a spare set of skull pins always be kept available 1 1 Figure 9 Rocker Arm Skull Pins Installation 1 Figure 10 Skull Pin Installation Single Side of Clamp ...

Page 15: ... pins so there is no gap between the shoulder of the pin and the face of the socket Seat pins so there is no gap between the shoulder of the pin and the face of the socket Adult Rocker Childs Rocker Arm Figure 10a Proper Skull Pin Installation ...

Page 16: ...mmended for children All force settings are at the user s discretion NEVER exceed 80 lbs 356 N of force Do not over tighten 1 Unlock the locking knob so the rocker arm can rotate freely 360 The locking knob is unlocked by rotating it counter clockwise one 1 complete turn or 360 2 Rotate the rocker arm into the desired position This position is normally perpendicular to the floor for prone or supin...

Page 17: ... See Figure 12 below The engagement shaft should be inserted near flush with the exterior face of the threaded housing The appropriate piston length should be threaded into the engagement shaft until the skull pin makes contact with the skull A Piston Driver is provided for use when the piston is difficult to access Threaded Housing Engagement Shaft Piston Figure 12 5 The skull pins should be firm...

Page 18: ... clamping force being applied Force Applicator Visual Readout Thumbscrew Torque Screw Line Indicator Clamping Force 1 2 3 4 20 lbs 89 N 40 lbs 178 N 60 lbs 267 N 80 lbs 356 N Figure 15 NOTE To achieve independent fixation for adults it is recommended that a minimum of 60 lbs 267 N of force be applied by the Skull Clamp An additional force of 80 lbs 356 N is available if desired WARNING WARNING Loa...

Page 19: ...ct is achieved do not tighten the thumbscrew The applicator can now be removed 11 Figure 16 NOTE Stop rotation when thumbscrew is touching skull clamp Over rotating will increase force on pin 4 0 2 0 1 2 12 U Figure 17 IMPORTANT Force Applicator must be removed prior to scanning in an MR environment Remove Force Applicator only after thumbscrew is set ...

Page 20: ... shown Figure 18 2 Once the patient is pinned rotate the skull clamp beneath the patient s head Figure 19 3 Lock the rocker arm in place by rotating the locking knob clockwise until it becomes tight The rocker arm is now fully locked and the skull clamp is securely fastened to the patient ...

Page 21: ...f Skull Clamp Cont 4 Ensure there is at least 3 cm of clearance for MR imaging coil placement 3 cm 3 cm Coil Coil Figure 20 5 Check for proper MR bore clearance with bore template Adjust patient s position if necessary Figure 21 ...

Page 22: ...e crossrail bracket assembly 1 on the skull clamp so it converges with the crossrail slide mechanism 2 See Figure 22 2 Tighten the slide lock knob 2 by turning clockwise 3 Maneuver the patient s head and the skull clamp to the desired and appropriate position 1 2 Figure 22 Mounting Skull Clamp to Adaptor 4 All the adjustment knobs in yellow need to be checked and tightened Figure 23 ...

Page 23: ...e two extension knobs 5 and side lock knobs 6 by turning them clockwise CAUTION CAUTION Always be sure all joints and locking mechanisms are secure after completing adjustments Failure to do so may result in serious patient injury NOTE The extensions of the adaptor are stopped from passing below horizontal to prevent potential collisions with the table during scanning If necessary it is possible t...

Page 24: ... Assembly 1 Attach navigation arm assembly to skull clamp and secure with decagon lock ring 1 2 4 3 S W Figure 25 Mounting Navigational Assembly 2 Recheck MR bore clearance with bore template Adjust navigation arm assembly if necessary Figure 26 ...

Page 25: ... may cause damage to the rocker arm CAUTION CAUTION Make certain to always support the patient s head when unlocking this system or any similar device Failure to do so may result in serious patient injury 2 Rotate the skull clamp to the newly desired position 3 Lock the locking knob by rotating it clockwise until it is tight Side View Side View End View End View Figure 27 Adjustment Knobs ...

Page 26: ...fully disassemble all of the components of both the skull clamp and the table adaptor 5 With a soft brush and neutral pH detergent scrub each component thoroughly to remove any traces of blood or debris from interfering with connections or movement 6 Rinse each component to remove all traces of detergent 7 With a soft cloth gently dry each component While drying the components examine them for any...

Page 27: ... lease rental or installment purchase agreement and that requires repair service during the term of such placement agreement shall be repaired in accordance with the terms of such agreement If any covered defect occurs during the warranty period or term of such placement agreement the purchaser should communicate directly with INTEGRA s home office If purchaser seeks to invoke the terms of this wa...

Page 28: ...lly or by any conduct Service and Repair For service and repairs outside the United States contact your local authorized Integra representative Inside the United States send all instruments for service or repair to Integra 4900 Charlemar Drive Building A Cincinnati Ohio 45227 U S Patent 7 507 244 Always include the purchase order number and a written description of the problem Or phone 877 444 111...

Page 29: ...tegralife com Integra LifeSciences Services France SAS Immeuble Séquoia 2 97 allée Alexandre Borodine Parc Technologique de la Porte des Alpes 69800 Saint Priest FRANCE Phone 33 0 4 37 47 59 00 Fax 33 0 4 37 47 59 99 FR FRANÇAIS Clameau crânien pour IRM rayons X MAYFIELD avec adaptateur Excite 3 0T A1117 IMPORTANT À lire attentivement Mode d emploi ...

Page 30: ...sur prescription d un médecin ou d un praticien Certains composants de ce dispositif ne sont pas indiqués pour être utilisés dans un environnement d IRM Référence catalogue Date de fabrication AAAA MM JJ Numéro de lot N de série Signification des symboles utilisés dans ce manuel FRANÇAIS ATTENTION Dangers pouvant causer des dommages au matériel ou à aux biens AVERTISSEMENT Dangers pouvant causer d...

Page 31: ...ayons X MAYFIELD A1117 avec l adaptateur pour table comprend F D E E A B A B C C G H Description Numéro de pièce C D E F G H Ensembe oscillant adulte petit Ensemble oscillant adulte grand Ensemble applicateur Ensemble de clameau crânien GE Bouton pour planche de transfert 2 pièces Adaptateur pour table Ensemble oscillant enfant en option Ensemble oscillant décagonal en option 428A2030 428A2040 428...

Page 32: ...iston GE long 2 pièces Piston GE court 2 pièces Tige d engagement filetée courte Petit écrou de verrouillage 2 pièces Dentures d engagement hexagonales 2 pièces Bras oscillant adulte petit Bras oscillant adulte grand Pied à coulisse Anneau de verrouillage décagonal 2 pièces Tournevis à piston Applicateur de force 428A1019 428A2010L 428A1022B 428A1022A 428A2010S 428A1017 428A1015 428A1014A 428A1014...

Page 33: ...eilles Tige d engagement filetée longue Piston GE long Petit bouton de verrouillage Dentures d engagement hexagonales Bras oscillant enfant Anneau de verrouillage décagonal 2 pièces Ensembles de bras de navigation 2 pièces 428A1019 428A2010L 428A1022B 428A1017 428A1015 428A1014C 428A1071 428A1083 S S I J N O V W W K G H Figure 1b Accessoires en option ...

Page 34: ...s cette notice risque d entraîner le glissement des pointes crâniennes et des lésions graves chez le patient notamment des lacérations du cuir chevelu une fracture du crâne ou même le décès AVERTISSEMENT Lors de l utilisation de ce clameau crânien dans un environnement d IRM utiliser uniquement des pointes crâniennes compatibles avec l IRM AVERTISSEMENT L applicateur de force n est PAS compatible ...

Page 35: ...l anatomie du patient des points de pression de la fexibilité du cou et de la voie d abord au site chirurgical Dans le tableau ci dessous les ovales qui représentent la tête du patient comportent un axe cen tral indiqué par une ligne en tirets Les schémas montrent des exemples corrects et incorrects de la mise en place du clameau crânien L orientation de la pointe unique doit passer directement pa...

Page 36: ...MAYFIELD avec l adaptateur pour ta ble sont conçus pour positionner le patient en procubitus ou en décubitus L adaptateur pour table se fixe à la table de diagnostic Excite 3 0T Le clameau crânien pour IRM rayons X MAYFIELD est conçu pour donner au chirurgien plus de liberté pour le positionnement des pointes de fixation Les régions critiques peuvent être évitées grâce à un bras oscillant pivotant...

Page 37: ...s de l ensemble de support sur les inserts filetés de la table 2 Utiliser les pièces de fixation filetées fournies pour verrouiller l adaptateur pour table en place 3 1 2 D Figure 2 Montage de l adaptateur pour table ATTENTION ATTENTION S assurer que l adaptateur pour table est fermement fixé à la table d opération ...

Page 38: ...vec les bras d extension Sélection du bras oscillant pour le patient 1 Choisir le bras oscillant approprié tel qu indiqué pour le patient Un bras oscillant enfant est disponible en option Pour déterminer le bras oscillant à utiliser mesurer la tête du patient tel qu illustré dans la Figure 5 ci dessus avec le pied à coulisse GE 428A1066 fourni Ensuite poser le pied à coulisse indiquant la largeur ...

Page 39: ...a gabarit Montage du clameau crânien 1 L utilisation du gabarit de mesure a indiqué s il faut utiliser un piston court ou long ainsi que le bras oscillant petit ou grand qu il faut utiliser pour le patient Insérer le piston indiqué dans le clameau à la verticale comme illustré dans la Figure 7 L extrémité du piston doit être position née de la façon illustrée 1 J I M ou K L ou Figure 7 Installatio...

Page 40: ...rrer excessivement 4 Enfonçer les pointes câniennes compatibles avec l IRM aussi loin que possible dans les loge ments prévus dans le bras oscillant et dans le côté à pointe unique du clameau Voir Figures 9 et 10 ci dessous Utiliser uniquement des pointes crâniennes à usage unique de marque MAY FIELD avec ce clameau REMARQUE Il est recommandé d avoir à disposition à tout moment un jeu de pointes c...

Page 41: ...FR FRANÇAIS 41 1 1 Figure 9 Installation des pointes crâniennes du bras oscillant ...

Page 42: ...ntes de sorte à n avoir aucun écart entre l épaulement de la pointe et la face du logement Bras oscillant adulte Bras oscillant enfant Figure 10a Installation correcte d une pointe crânienne Fixation du clameau crânien sur le patient AVERTISSEMENT AVERTISSEMENT Tout manquement à positionner correctement le patient et à serrer complètement tous les parties réglables de ce dispositif ou d un disposi...

Page 43: ...as trop serrer 1 Déverrouiller le bouton de verrouillage de sorte que le bras oscillant puisse tourner librement à 360 Le bouton de verrouillage est déverrouillé en le tournant d un tour complet ou de 360 dans le sens anti horaire 2 Tourner le bras oscillant dans la position souhaitée Cette position est habituellement perpendiculaire au sol pour les positions en procubitus et en décubitus Ceci ali...

Page 44: ...s La tige d engagement doit être insérée quasiment de niveau avec la face extérieure du logement fileté La longueur de piston appropriée doit être vissée dans la tige d engagement jusqu à ce que a pointe crânienne entre en contact avec le crâne L utilisation du poussoir de piston fourni est recommandée quand l accès au piston est difficile Boîtier fileté Tige d engagement Piston Figure 12 5 Les po...

Page 45: ...orce signale au chirurgien la force appliquée par le clameau Applicateur de force Relevé visuel Vis à oreilles Ligne de repère de la vis de serrage Force de clampage 1 2 3 4 20 lbs 89 N 40 lbs 178 N 60 lbs 267 N 80 lbs 356 N Figure 15 REMARQUE Pour obtenir une fixation indépendante chez l adulte il est recommandé d appliquer une force minimum de 60 lbs 267 N au clameau crânien Une force supplément...

Page 46: ...er la vis à oreilles jusqu à ce qu elle entre en contact avec la face interne du clameau Une fois en contact ne pas serrer la vis à oreilles L applicateur peut maintenant être retiré 11 Figure 16 REMARQUE Arrêter la rotation quand la vis à oreilles touche le clameau Une rotation excessive augmente la force exercée sur la pointe 4 0 2 0 1 2 12 U Figure 17 ...

Page 47: ... Retirer l applicateur de force uniquement après que la vis à oreilles soit fixée Positionnement du clameau crânien 1 Positionner le châssis du clameau crânien sur le patient de la manière illustrée Figure 18 2 Une fois les pointes appliquées faire pivoter le clameau crânien sous la tête du patient Figure 19 ...

Page 48: ...nt complètement verrouillé et le cla meau crânien est fermement fixé au patient Positionnement du clameau crânien suite 4 S assurer d avoir au moins 3 cm de dégagement pour la mise en place de la bobine d IRM 3cm 3cm Bobine Bobine Figure 20 5 Vérifier le dégagement pour l entrée de l appareil d IRM avec un gabarit approprié Ajuster la position du patient selon les besoins ...

Page 49: ...onnement en position déverrouillée 1 Positionner l ensemble de support de traverse n 1 sur le clameau crânien de sortie qu il con verge avec le mécanisme à glissière de la traverse n 2 Voir Figure 22 2 Serrer le bouton de verrouillage de la glissière n 2 en le tournant dans le sens horaire 3 Manœuvrer la tête du patient et le clameau crânien dans la position souhaitée et appropriée ...

Page 50: ...itée les deux boutons d arrêt n 8 peuvent être reculés en les tournant dans le sens anti horaire permettant ainsi aux bras d ex tension de pivoter plus haut 5 Verrouiller le bouton de verrouillage de la glissière n 7 en le tournant dans le sens horaire jusqu à ce que les dents soient engagées sur l ensemble de support de traverse 6 Verrouiller le bouton du support à pince n 9 en le tournant dans l...

Page 51: ...assage des extensions de l adaptateur dans une position inférieure au plan horizontal est empêché pour éviter une collision potentielle avec la table au cours du scannage Si nécessaire il est possible de circonvenir à cette limite en tournant les boutons de verrouillage n 6 dans le sens anti horaire Les extensions ne peuvent pas être verrouillées dans une position in férieure au plan horizontal Fi...

Page 52: ...2 4 3 S W Figure 25 Montage de l ensemble de navigation 2 Vérifier à nouveau le dégagement pour l entrée de l appareil d IRM avec un gabarit approprié Régler l ensemble du bras de navigation selon les besoins Figure 26 ...

Page 53: ... bras oscillant pivotant ATTENTION ATTENTION Toujours maintenir la tête du patient lors du déverrouillage de ce système ou de tout dispositif similaire Tout manquement à cet avertissement risque d entraîner des lésions graves au patient 2 Tourner le clameau crânien dans la nouvelle position souhaitée 3 Verrouiller le bouton de verrouillage en le tournant dans le sens horaire jusqu à ce qu il soit ...

Page 54: ...ts du clameau crânien et de l adaptateur pour table 5 En utilisant une brosse douce et un détergent à pH neutre frotter soigneusement chacun des composants pour éliminer toutes les traces de sang ou débris qui risquent d interférer avec le montage ou l articulation 6 Rincer chaque composant pour éliminer toute trace de détergent 7 Sécher soigneusement chacun des composants en les essuyant avec un ...

Page 55: ... un contrat de crédit bail de location ou de paiement échelonné et qui requiert des services de réparation pendant la durée d un tel contrat sera réparé conformément aux termes dudit contrat Si un défaut couvert survient pendant la période de garantie ou pendant la durée d un tel contrat l acheteur est tenu de communiquer directement avec le siège social d INTEGRA Si l acheteur souhaite invoquer l...

Page 56: ...rès vente et les réparations en dehors des États Unis contacter un représentant Integra agréé Pour le service après vente et les réparations aux États Unis renvoyer les instruments à Integra 4900 Charlemar Drive Building A Cincinnati Ohio 45227 États Unis Brevet U S 7 507 244 Toujours inclure le numéro de commande et une description du problème par écrit Ou appeler le 877 444 1114 États Unis seule...

Page 57: ...ww integralife com Integra LifeSciences Services Francia SAS Immeuble Séquoia 2 97 allée Alexandre Borodine Parc Technologique de la Porte des Alpes 69800 Saint Priest FRANCIA Phone 33 0 4 37 47 59 00 Fax 33 0 4 37 47 59 99 IT ITALIANO Morsa ferma cranio MR Raggi X MAYFIELD con Adattatore Excite 3 0T A1117 IMPORTANTE Leggere Manuale d uso ...

Page 58: ...o dispositivo tramite o su ordine di un medico Alcuni componenti di questo strumento non sono indicati per l uso in un ambiente di risonanza magnetica Numero di catalogo Data di fabbicazione AAAA MM GG Numero di lotto Numero di serie Significato dei simboli usati in questo Manuale ITALIANO ATTENZIONE Pericoli che potrebbero risultare in danni ad apparecchiature o proprietà AVVERTENZA Pericoli che ...

Page 59: ...a tavolo A1117 MAYFIELD include F D E E A B A B C C G H Descrizione Numero parte C D E F G H Gruppo bilanciere per adulti misura piccola Gruppo bilanciere per adulti misura grande Gruppo applicatore Gruppo morsa ferma cranio GE Manopola tavola di trasferimento 2 Ada atore da tavolo Gruppo bilanciere per bambini opzionale Gruppo di montaggio Decagon opzionale 428A2030 428A2040 428A2020 428C1000 428...

Page 60: ...a lunga Pistone GE lungo 2 Pistone GE corto 2 Asta file ata corta Dato autobloccante piccolo 2 Denti di innesto esagonali 2 Braccio a bilanciere per adulti misura piccola Braccio a bilanciere per adulti misura grande Misuratore a compasso Anello di fermo Decagon 2 Azionatore del pistone Applicatore della forza 428A1019 428A2010L 428A1022B 428A1022A 428A2010S 428A1017 428A1015 428A1014A 428A1014 42...

Page 61: ...e Vite a testa zigrinata Asta file ata lunga Pistone GE lungo Manopola di bloccaggio piccola Denti di innesto esagonali Braccio a bilanciere per bambini Anello di fermo Decagon 2 Gruppi braccio di navigazione 2 428A1019 428A2010L 428A1022B 428A1017 428A1015 428A1014C 428A1071 428A1083 S S I J N O V W W K G H Figura 1b Accessori opzionali ...

Page 62: ... prodotto si rischia lo scorrimento del perno per cranio mettendo gravemente a rischio l incolumità del paziente con lesioni come lacerazioni del cuoio capelluto frattura del cranio o persino la morte AVVERTENZA Quando si usa questa morsa ferma cranio in un ambiente di risonanza magnetica utilizzare ESCLUSIVAMENTE chiodi cranici compatibili con la risonanza magnetica AVVERTENZA L applicatore della...

Page 63: ...e dovrebbe essere accettabile per il chirurgo tenendo presenti l anatomia del paziente i punti di pressione la flessibilità del collo e l accesso al target chirurgico Nello schema qui sopra gli ovali che rappresentano la testa del paziente hanno assi centrali Lo schema mostra esempi di applicazioni corrette ed errate della morsa ferma cranio Per la maggio re stabilità la linea di direzione del chi...

Page 64: ... ferma cranio MR Raggi X con adattatore da tavolo MAYFIELD è prevista per pazienti nella posizione prona o supina L adattatore da tavolo si connette al tavolo diagnostico Excite 3 0T La morsa ferma cranio MR Raggi X MAYFIELD offre al chirurgo una maggiore libertà nel posizionare i chiodi di fissaggio Un bilanciere a perno che ruota a 360 consente di evitare le aree critiche del cranio facilitando ...

Page 65: ...viti fornite per bloccare in posizione l adattatore da tavolo Figura 2 Montaggio dell adattatore da tavolo ATTENZIONE ATTENZIONE accertarsi che l adattatore da tavolo sia fissato bene al tavolo operatorio NOTA se si desidera è possibile usare l adattatore da tavolo senza i bracci di prolungamento per poter posizionare la morsa ferma cranio più in basso sul tavolo Vedere la Figura 3 3 1 2 D ...

Page 66: ...l capo del paziente come illustrato nella Figura 5 qui sotto con il compasso GE 428A1066 in dotazi one Quindi sistemare il compasso che indica la larghezza del capo del paziente sulla dima del misuratore in dotazione con questo manuale d uso La dima del misuratore indica se utilizzare il braccio a bilanciere per adulti della misura piccola o grande Vedere la Figura 6 C a l i p e r G a u g e T e m ...

Page 67: ...te come illustrato nella Figura 7 L estremità del pistone deve essere collocato come da figura Figura 7 Installazione del pistone 2 Montare il braccio a bilanciere sulla morsa verticalmente come illustrato nella Figura 8 Figura 8 Montaggio del braccio a bilanciere sulla morsa 3 Fissare il braccio a bilanciere alla morsa ferma cranio con la manopola di bloccaggio piccola ruotando 2 giri NON serrare...

Page 68: ...o della morsa Vedere la Figura 9 e la Figura 10 qui sotto Usare esclusivamente chiodi cranici monouso MAYFIELD con questa morsa ferma cranio NOTA si raccomanda di avere sempre a disposizione un set di chiodi cranici di ricambio Figura 9 Installazione dei chiodi cranici del braccio a bilanciere Figura 10 Installazione del chiodo cranico sul lato a chiodo singolo della morsa 1 1 1 ...

Page 69: ...i fra la spalla del chio do e la superficie frontale dell alloggiamento Figura 10a Installazione corretta dei chiodi cranici Inserire i chiodi in modo da non lasciare spazi fra la spalla del chiodo e la superficie frontale dell alloggiamento Bilanciere per adulti Braccio a bilanciere per bambini ...

Page 70: ...NE si raccomandano 60 libbre 267 N di forza per gli adulti 40 libbre 178 N di forza per i bambini Tutte le impostazioni della forza sono a discrezione dell utente NON superare MAI 80 libbre 356 N di forza Non serrare eccessivamente 1 Sbloccare la manopola di bloccaggio in modo che il braccio a bilanciere possa ruotare libera mente a 360 Per sbloccare la manopola di bloccaggio ruotarla in senso ant...

Page 71: ...anio richiede la selezione di un pistone e asta della lunghezza appro priata Vedere la figura 12 qui sotto L asta deve essere inserita quasi a livello con la superficie esterna dell alloggiamento filettato Il pistone della lunghezza appropriata deve essere inserito nell asta fino a quando il chiodo cranico non entra in contatto con il cranio Una guida apposita è inclusa per l uso nei casi in cui l...

Page 72: ... cranio facendo avanzare l applicatore della forza sull im postazione desiderata come indicato sulla lettura visiva e quindi arretrare di 90 gradi Figura 14 NOTA la lettura visiva sull applicatore della forza indica al chirurgo la forza di serraggio applicata 1 2 T ...

Page 73: ...tre 80 libbre 356 N 7 Prima di rimuovere l applicatore della forza la vite a testa zigrinata deve essere fatta avanzare fino a quando non entra in contatto con la superficie interna della morsa Una volta ottenuto il contatto non serrare la vite a testa zigrinata È ora possibile rimuovere l applicatore Applicatore della forza Le ura visiva Vite a testa zigrinata Indicatore della linea della vite di...

Page 74: ... con la morsa ferma cranio Una rotazione eccessiva aumenta la forza sul chiodo Figura 17 IMPORTANTE rimuovere l applicatore della forza prima della scansione in un ambiente di risonanza magnetica Rimuovere l applicatore della forza solamente una volta sistemata la vite a testa zigrinata 11 4 0 2 0 1 2 12 U ...

Page 75: ...olta sistemati i chiodi sul paziente ruotare la morsa ferma cranio sotto il capo del pazi ente Figura 19 3 Bloccare il braccio a bilanciere in posizione ruotando la manopola di bloccaggio in senso orario fino a quando non sia ben stretta Il braccio a bilanciere è ora completamente bloccato e la mor sa ferma cranio è fissata sicuramente sul paziente ...

Page 76: ...i siano almeno 3 cm di spazio per il posizionamento della bobina di imaging della risonanza magnetica Figura 20 5 Controllare che vi sia spazio sufficiente per il bore del magnete con la dima apposita Regolare se necessario la posizione del paziente Figura 21 3cm 3cm Bobina Bobina ...

Page 77: ...rra trasversale 1 sulla morsa ferma cranio in modo che converga con il meccanismo scorrevole della barra trasversale 2 Vedere la Figura 22 2 Serrare la manopola di bloccaggio scorrevole 2 ruotando in senso orario 3 Muovere la testa del paziente e la morsa ferma cranio nella posizione desiderata idonea Figura 22 Montaggio della morsa ferma cranio sull adattatore 4 Tutte la manopole di regolazione i...

Page 78: ... 7 Bloccare le due manopole di prolungamento 5 e le manopole di bloccaggio laterali 6 ruotandole in senso orario ATTENZIONE ATTENZIONE accertarsi sempre che tutti i giunti e i meccanismi di bloccaggio siano sicuri dopo aver completato le regolazioni per non mettere a grave rischio l incolu mità del paziente NOTA i prolungamenti dell adattatore non possono passare sotto il livello orizzontale in mo...

Page 79: ...io dei componenti Montaggio del gruppo di navigazione opzionale 1 Collegare il gruppo del braccio di navigazione alla morsa ferma cranio e fissare con l anello di fermo Decagon Figura 25 Montaggio del gruppo di navigazione 1 2 4 3 S W ...

Page 80: ...so antiorario a 360º AVVERTENZA AVVERTENZA non tenere o usare il braccio a bilanciere per fare leva quando si sblocca l unità per evitare di danneggiarlo ATTENZIONE ATTENZIONE sostenere sempre il capo del paziente quando si sblocca questo siste ma o uno strumento simile per non mettere a grave rischio l incolumità del paziente 2 Ruotare la morsa ferma cranio nella nuova posizione 3 Bloccare la man...

Page 81: ...ione digitale Seguire le istruzioni del produttore dell apparecchiatura angiografica Note di servizio Occorre completare controlli ad intervalli regolari molto prima di ciascun caso per evitare problemi imprevisti Si raccomandano i seguenti controlli bloccare e sbloccare la manopola di bloccaggio In caso di problemi restituire l unità per la manutenzione Service Department Telefono 877 444 1114 es...

Page 82: ...ntarli 9 Una volta puliti ed asciugati i componenti rimontarli negli stessi gruppi in cui sono stati usati per l intervento Nota devono essere rimontati prima di riporli nelle loro custodie Sebbene non sia generalmente necessario o raccomandato la morsa ferma cranio e l adattatore da tavolo possono essere completamente sterilizzati usando il metodo dell ossido di etilene ETO secondo le istruzioni ...

Page 83: ...Il prodotto difettoso deve essere restituito prontamente imballato adeguatamente con le spese di spedizione prepagate Perdita o danni verificatisi nella spedizione a INTEGRA saranno a rischio del CLIENTE L unica responsabilità di INTEGRA secondo questa garanzia sarà la riparazione o sostituzione a sola discrezione di INTEGRA a spese di INTEGRA secondo i termini di questa garanzia e dei contratti a...

Page 84: ...etto U S A 7 507 244 Includere sempre il numero dell ordine di acquisto e una descrizione scritta del problema O telefonare al numero 877 444 1114 esclusivamente per gli Stati Uniti Integra e il logo di Integra sono marchi registrati di Integra LifeSciences Corporation negli Stati Uniti e o in altri Paesi MAYFIELD è un marchio registrato di SM USA Inc ed è utilizzato da Integra in licenza 2017 Int...

Page 85: ... integralife com Integra LifeSciences Services Frankreich SAS Immeuble Séquoia 2 97 allée Alexandre Borodine Parc Technologique de la Porte des Alpes 69800 Saint Priest FRANKREICH Phone 33 0 4 37 47 59 00 Fax 33 0 4 37 47 59 99 DE DEUTSCH MAYFIELD MR RÖntgen Schädelklemme mit Excite 3 0T Adaptor A1117 WICHTIG Bitte lesen Gebrauchsanleitung ...

Page 86: ...ur durch eine lizenzierte medizinische Fachkraft oder auf deren Anordnung verkauft werden Einige Komponenten dieser Vorrichtung sind nicht zur Anwendung im MR Bereich indiziert Katalog Nr Herstellungsdatum JJJJ MM TT Chargennummer Seriennummer Bedeutung der in diesem Handbuch verwendeten Symbole DEUTSCH VORSICHT Gefahren die zu Geräte oder Sachschäden führen könnten ACHTUNG Gefahren die zu schwere...

Page 87: ...Schädelklemme mit Tischadapter A 1117 besteht aus folgenden Teilen F D E E A B A B C C G H Beschreibung Teilnummer C D E F G H Kleine Kipphebel Baugruppe für Erwachsene Große Kipphebel Baugruppe für Erwachsene Applikator Baugruppe GE Klemmenbaugruppe Transferpla en Drehknopf 2 St Tischadapter Kipphebel Baugruppe für Kinder wahlweise Dekagon Befestigungsbaugruppe wahlweise 428A2030 428A2040 428A202...

Page 88: ...e 4 St Eingriffswelle mit Gewinde lang GE Kolben lang 2 St GE Kolben kurz 2 St Eingriffswelle mit Gewinde kurz Kleine Sicherungsmu er 2 St Sechskant Rastzähne 2 St Kleiner Kipphebel für Erwachsene Großer Kipphebel für Erwachsene Messlehre Dekagon Sicherungsring 2 St Kolbendreher Kra applikator 428A1019 428A2010L 428A1022B 428A1022A 428A2010S 428A1017 428A1015 428A1014A 428A1014 428A1066 428A1071 4...

Page 89: ...eelnummer Rändelschraube Eingriffswelle mit Gewinde lang GE Kolben lang Kleiner Feststellknopf Sechskant Rastzähne Kipphebel für Kinder Dekagon Sicherungsring 2 St Dekagon Navigationshebel Baugruppe 2 St 428A1019 428A2010L 428A1022B 428A1017 428A1015 428A1014C 428A1071 428A1083 S S I J N O V W W K G H Abbildung 1b Wahlweises Zubehör ...

Page 90: ...ten und Nichtbefolgen von Anweisungen in dieser Packungsbeilage kann es zu Schädelstiftschlupf und schweren Verletzungen des Patienten kommen wie z B Kopfhautverletzungen Schädelfrakturen oder sogar Tod ACHTUNG Bei Verwenden dieser Schädelklemme im Magnetresonanzfeld dürfen NUR MR kompatible Schädelstifte verwendet werden ACHTUNG Der Kraftapplikator ist NICHT MR kompatibel und muss vor dem Scannen...

Page 91: ...Anatomie des Patienten die entsprechenden Druckpunkte die Beweglichkeit des Halses und der Zugang zum Zielbereich der Operation in Betracht zu ziehen In der obigen Tabelle stellen die Ovale den Kopf des Patienten mit den eingezeichneten Mittellinien dar Die Zeichnungen zeigen verschiedene Beispiele von richtigen und falschen Anwendungen der Schädelklemme Die Ausrichtung des Einzelstifts muss direk...

Page 92: ...enlage geeignet Der Tischadapter wird am Diagnosetisch Excite 3 0T befestigt Die MAYFIELD MR Röntgen Schädelklemme soll dem Operateur mehr Freiheit bei der Positionierung der Fixationsstifte geben Kritische Bereiche des Schädels werden durch einen schwenkbaren Kipphebel mit einem Schwenkbereich von 360 vermieden und vereinfachen dadurch die Anwendung Außerdem ermöglicht der schwenkbare Kipphebel e...

Page 93: ...elieferten Gewindebefestigungselementen den Tischadapter verriegeln 3 1 2 D Abbildung 2 Anbringen des Tischadapters VORSICHT VORSICHT Sicherstellen dass der Tischadapter richtig gesichert am Operationstisch befestigt ist HINWEIS Erforderlichenfalls kann der Tischadapter ohne die Verlängerungsarme verwendet werden wodurch die Schädelklemme weiter unten an dem Tisch positioniert werden kann Siehe Ab...

Page 94: ...des mitgelieferten GE Greifzirkels 428A1066 wie in Abbildung 5 unten gezeigt vermessen Danach legen Sie den die Kopfbreite des Patienten anzeigenden Greifzirkel auf die dieser Gebrauchsanleitung beiliegende Vermessungsschablone Die Vermessungsschablone zeigt an ob der kleine Kipphebel für Erwachsene oder der große Kipphebel für Erwachsene verwendet werden soll Siehe Abbildung 6 Abbildung 5 Vermess...

Page 95: ...mme wie in Abbildung 7 gezeigt ein Das Kolbenende muss sich in der gezeigten Lage befinden 1 J I M or K L or Abbildung 7 Einsetzen des Kolbens 2 Montieren Sie den Kipphebel an der aufrecht gestellten Klemme wie in Abbildung 8 gezeigt 1 2 3 x2 O N P Q V or or Abbildung 8 Montieren des Kipphebels an der Klemme 3 Befestigen Sie den Kipphebel mit dem kleinen Feststellknopf der Schädelklemme mit zwei U...

Page 96: ...Klemme Siehe Abbildung 9 und 10 unten Verwenden Sie nur Einmal Schädelstifte der Marke MAYFIELD mit dieser Schädelklemme HINWEIS Es wird empfohlen dass ein Reservesatz von Schädelstiften immer vorrätig ist 1 1 Abbildung 9 Einsetzen der Schädelstifte im Kipphebel 1 Abbildung 10 Einsetzen der Schädelstifte an der Einzelstiftseite der Schädelklemme ...

Page 97: ...en der Schulter des Stifts und der Stirnfläche der Aufnahme keine Lücke besteht Die Stifte müssen so sitzen dass zwischen der Schulter des Stifts und der Stirnfläche der Aufnahme keine Lücke besteht Kipphebel für Erwachsene Kipphebel für Kinder Abbildung 10a Richtiges Einsetzen der Schädelstifte ...

Page 98: ...US lbs wird bei Erwachsenen empfohlen Eine Kraft von 178 N 40 US lbs wird bei Kindern empfohlen Alle Krafteinstellungen liegen im Ermessen des Benutzers Die Kraft von 356 N 80 US lbs NIE überschreiten Nicht zu fest anziehen 1 Den Feststellknopf entriegeln damit der Kipphebel um 360 frei drehbar ist Der Feststellknopf wird entriegelt indem man ihn eine 1 volle Umdrehung bzw 360 im Gegenuhrzeigersin...

Page 99: ... des Schädels erfordert die Wahl der geeigneten Kolbenlänge sowie der geeigneten Eingriffswelle Siehe Abbildung 12 unten Die Eingriffswelle muss so eingesetzt werden dass sie mit der äußeren Stirnfläche des Gewindegehäuses annähernd bündig ist Die geeignete Kolbenlänge muss in die Eingriffswelle bis zum Anschlag des Schädelstifts am Schädel eingeschraubt werden Ein Kolbendreher steht für schwer zu...

Page 100: ...e Kraft durch Vorwärtsdrehen des Kraftapplikators auf die gewünschte Einstellung wie an der Sichtanzeige angegeben einstellen dann eine Vierteldrehung zurückdrehen Abbildung 14 HINWEIS Sie Sichtanzeige am Kraftapplikator zeigt dem Operateur die jeweils angewendete Kraft an ...

Page 101: ...er Schädelklemme angewendet Eine zusätzliche Kraft von 80 lbs 356 N kann gegebenenfalls angewendet werden ACHTUNG ACHTUNG NICHT EMPFOHLEN ist eine Belastung von mehr als 80 lbs 356 N 7 Vor dem Entfernen des Kraftapplikators muss die Rändelschraube vorwärts gedreht werden bis sie mit der inneren Klemmenfläche in Berührung ist Nachdem die Berührung hergestellt ist darf die Rändelschraube nicht weite...

Page 102: ... U Abbildung 17 WICHTIG Der Kraftapplikator muss vor dem Scannvorgang im MR Bereich entfernt werden Entfernen Sie den Kraftapplikator erst wenn die Rändelschraube festgestellt ist Positionierung der Schädelklemme 1 Positionieren Sie den Schädelklemmenrahmen wie gezeigt am Patienten Abbildung 18 2 Nach Anbringung der Stifte drehen Sie die Schädelklemme unter den Kopf des Patienten ...

Page 103: ...lknopfes im Uhrzeigersinn um den Kipphebel fest zu verriegeln Der Kipphebel ist jetzt fest verriegelt und die Schädelklemme ist sicher am Patienten befestigt 4 Vergewissern Sie sich dass bei der Anbringung der MRT Spule zur Bildgebung mindestens 3 cm Abstand bestehen 3cm 3cm Spule Spule Abbildung 20 ...

Page 104: ...ereinheit muss fest am Tisch angesetzt sein und alle Positionierknöpfe müssen sich in der entriegelten Stellung befinden 1 Die Traversen Baugruppe 1 so an der Schädelklemme positionieren dass sie mit dem Verschiebemechanismus 2 der Traverse zusammenläuft Siehe Abbildung 22 2 Den verschiebbaren Feststellknopf 2 im Uhrzeigersinn anziehen 3 Den Kopf des Patienten und die Schädelklemme in die gewünsch...

Page 105: ...heneinstellung erforderlich sein können die beiden Anschlagknöpfe 8 durch Drehen im Gegenuhrzeigersinn wieder herausbewegt werden und so die gemeinsame Höherdrehung der Verlängerungsarme ermöglichen 5 Zum Verriegeln des Feststellknopfs 7 diesen im Gegenuhrzeigersinn drehen bis die Zähne in die Traversen Baugruppe eingreifen 6 Zum Verriegeln des Klemmenhalterknopfs 9 diesen im Uhrzeigersinn drehen ...

Page 106: ... schwere Verletzung des Patienten zur Folge haben HINWEIS Die Adapterverlängerungen werden während des Scannvorgangs von einem Anschlag daran gehindert sich unter die Horizontale zu bewegen wodurch mögliche Zusammenstöße mit dem Tisch vermieden werden Erforderlichenfalls kann dieser Anschlag durch Drehen der Feststellknöpfe 6 im Gegenuhrzeigersinn umgangen werden Die Verlängerungen können nicht un...

Page 107: ...ppe an der Schädelklemme befestigen und dann mit dem Dekagon Sicherungsring sichern 1 2 4 3 S W Abbildung 25 Befestigen der Navigationsbaugruppe 2 Den Abstand in der MRT Röhre nochmals mit der Röhrenschablone prüfen Erforderlichenfalls den Navigationshebel entsprechend justieren Abbildung 26 ...

Page 108: ...den Kipphebel beschädigen VORSICHT VORSICHT Beim Entriegeln dieses Systems bzw eines ähnlichen Geräts muss sichergestellt sein dass der Kopf des Patienten immer gestützt ist Die Unterlassung kann die schwere Verletzung des Patienten zur Folge haben 2 Die Schädelklemme in die gewünschte neue Stellung drehen 3 Den Feststellknopf im Uhrzeigersinn drehen bist er fest angezogen ist Seitenansicht Seiten...

Page 109: ...mal Stifte sachgemäß entsorgen 2 Die Schädelklemme vom Tischadaptor abnehmen 3 Den Tischadapter vom Tisch abnehmen 4 Die Schädelklemme und den Tischadapter vorsichtig in alle Einzelteile zerlegen 5 Mit einer weichen Bürste und einem pH neutralen Waschmittel jedes Teil gründlich bürsten um zu verhindern dass irgendwelche Rückstände von Blut oder sonstigen Gewebeteilchen die Anschlussstellen beeintr...

Page 110: ... des Geräts HINWEIS Zur Entsorgung des Geräts sind die im Krankenhaus geltenden Verfahren zu befolgen Integra LifeSciences Garantie INTEGRA LIFESCIENCES CORPORATION INTEGRA garantiert dem ursprünglichen Käufer nur dass jedes neue MAYFIELD Produkt bei normaler Verwendung und Pflege für einen Zeitraum von einem Jahr außer wenn für Zubehörteile ausdrücklich anders angegeben ab dem Lieferdatum durch I...

Page 111: ...von INTEGRA bereitgestellten Anweisungen DIESE EINGESCHRÄNKTE GARANTIE GILT AUSSCHLIESSLICH UND AN STELLE ALLER ANDEREN GARANTIEN AUSDRÜCKLICH ODER STILLSCHWEIGEND SOWIE ALLER ANDEREN VERPFLICHTUNGEN ODER HAFTUNGEN SEITENS INTEGRA UND INTEGRA ÜBERNIMMT IM ZUSAMMENHANG MIT INTEGRA PRODUKTEN KEINE HAFTUNG IRGENDWELCHER ART UND BEVOLLMÄCHTIGT AUCH KEINE VERTRETUNG ODER PERSON IM NAMEN VON IHR IRGENDE...

Page 112: ...45227 USA US Patentnr 7 507 244 Bitte legen Sie immer die Bestellnummer und eine schriftliche Beschreibung des Problems bei Oder Tel 877 444 1114 nur USA Integra und das Logo von Integra sind eingetragene Marken der Integra LifeSciences Corporation in den USA und oder anderen Ländern MAYFIELD ist eine eingetragene Marke von SM USA Inc und wird von Integra unter Lizenz genutzt 2017 Integra LifeScie...

Page 113: ...fe com Integra LifeSciences Services Francia SAS Immeuble Séquoia 2 97 allée Alexandre Borodine Parc Technologique de la Porte des Alpes 69800 Saint Priest FRANCIA Phone 33 0 4 37 47 59 00 Fax 33 0 4 37 47 59 99 ES ESPAÑOL Fijador craneal MAYFIELD para RM radiografías con Adaptador Excite 3 0T A1117 IMPORTANTE Sírvanse leer Manual de instrucciones ...

Page 114: ...oducto cumple con los requisitos de la directiva 93 42 CEE Fabricante Representante autorizado en la Comunidad Europea Consulte las instrucciones de uso Precaución las leyes federales EE UU limitan la venta de este instrumento a la prescripción del médico Algunos componentes de este dispositivo no están indicados para utilizarse en un entorno de RMN Número de catálogo Fecha de fabricación AAAA MM ...

Page 115: ...diografías con adaptador de mesa incluye F D E E A B A B C C G H Descripción Número de pieza C D E F G H Unidad del brazo oscilante para adulto pequeño Unidad del brazo oscilante para adulto más grande Unidad del aplicador Unidad del fijador craneal GE Botón del tablero de transferencia Cant 2 Adaptador de mesa Unidad del brazo oscilante para niños Opcional Unidad de montaje decagonal Opcional 428...

Page 116: ...cado largo Pistón de GE largo Cant 2 Pistón de GE corto Cant 2 Eje de engranaje roscado corto Tuerca de fijación pequeña Cant 2 Dientes de engranaje hexagonal Cant 2 Brazo oscilante para adulto pequeño Brazo oscilante para adulto grande Calibrador de medida Anillo decagonal de fijación Cant 2 Empujador de pistón Aplicador de fuerza 428A1019 428A2010L 428A1022B 428A1022A 428A2010S 428A1017 428A1015...

Page 117: ...ornillo de mariposa Eje de engranaje roscado largo Pistón de GE largo Botón de fijación pequeño Dientes de engranaje hexagonal Brazo oscilante para niño Anillo decagonal de fijación Cant 2 Unidades del brazo de navegación Cant 2 428A1019 428A2010L 428A1022B 428A1017 428A1015 428A1014C 428A1071 428A1083 S S I J N O V W W K G H Figura 1b Accesorios opcionales ...

Page 118: ...trucciones dadas en la literatura provista con este producto puede causar el desplazamiento de la punta craneal y lesiones graves al paciente como laceración del cuero cabelludo fractura de cráneo o incluso la muerte ADVERTENCIA Al utilizar este fijador craneal en un entorno de resonancia magnética emplear SOLO puntas craneales compatibles con RMN ADVERTENCIA El aplicador de fuerza NO es compatibl...

Page 119: ...niendo en cuenta la anatomía los puntos de presión y la flexibilidad del cuello del paciente así como el acceso a la diana quirúrgica En el diagrama anterior los óvalos que representan la cabeza del paciente tienen líneas dibujadas en su centro Los diagramas muestran ejemplos de aplicaciones correctas e incorrectas del fijador craneal Para obtener el grado más alto de estabilidad el lado con punta...

Page 120: ... o supina El adaptador de mesa se fija en la mesa de diagnóstico Excite 3 0T El Fijador craneal MAYFIELD para RM radiografías está diseñado para dar más libertad al cirujano en la colocación de las puntas de fijación Es posible evitar las áreas críticas del cráneo con el brazo oscilante giratorio que gira 360 lo cual hace que la aplicación sea mucho más fácil Además el bra zo oscilante giratorio p...

Page 121: ...ce los sujetadores roscados provistos para fijar el adaptador de mesa en su lugar 3 1 2 D Figura 2 Montaje del adaptador de mesa PRECAUCIÓN PRECAUCIÓN Cerciorarse de que el adaptador de mesa esté bien fijado en la mesa de operaciones NOTA Si se desea el adaptador de mesa puede utilizarse sin los brazos de extensión lo que per mite colocar el fijador craneal en una posición más baja en la mesa Véas...

Page 122: ... paciente como se ilustra en la Figura 5 a continuación con el calibrador GE 428A1066 provisto Después coloque el calibrador indicando el ancho de la cabeza del paciente en la plantilla de medida provista con este manual de instrucciones La plantilla de medida mostrará si debe utilizarse el brazo oscilante para adultos pequeño o el grande Véase la Figura 6 C a l i p e r G a u g e T e m p l a t e i...

Page 123: ...be utilizarse con el paciente Inserte el pistón indica do en el soporte del fijador como se ilustra en la Figura 7 El extremo del pistón también debe posicionarse como se ilustra 1 J I M o K L o Figura 7 Instalación del pistón 2 Monte el brazo oscilante en el soporte del fijador como se ilustra en la Figura 8 1 2 3 2 giros O N P Q V o o Figura 8 Brazo oscilante montado en el fijador ...

Page 124: ...ta del brazo oscilante y en el lado de la punta única del fijador Véanse las Figuras 9 y 10 a continuación Utilice solo las puntas craneales desechables de la marca MAYFIELD con este fijador NOTA Se recomienda siempre tener disponible un juego de puntas craneales de repuesto 1 1 Figura 9 Instalación de las puntas craneales del brazo oscilante 1 Figura 10 Instalación de punta craneal en el lado de ...

Page 125: ...ADVERTENCIA ADVERTENCIA Se recomienda no utilizar los fijadores craneales MAYFIELD con niños menores de cinco 5 años de edad En los casos pediátricos debe procederse con suma precaución debido al cráneo delgado PRECAUCIÓN PRECAUCIÓN Se recomienda una fuerza de 60 lbs 267 N para los adultos Se recomienda una fuerza de 40 lbs 178 N para los niños Todos los parámetros de fuerza quedan a discreción de...

Page 126: ...n el fijador craneal se interseque en el centro de la cabeza del paciente y el brazo oscilante para sujetar correctamente la cabeza del paciente en el fijador craneal 4 La fijación apropiada al cráneo requiere la selección de un eje de engranaje y pistón de longitud adecuada Véase la Figura 12 a continuación El eje de engranaje debe insertarse casi alineado con el lado exterior del encaje roscado ...

Page 127: ...se firmemente en la lámina craneal roscando el aplicador de fuerza en el encaje roscado del fijador 1 2 T Figura 13 6 Aumente la fuerza del fijador craneal haciendo avanzar el aplicador de fuerza al parámetro de seado según se indica en la lectura visual y después hágalo retroceder un cuarto de vuelta ...

Page 128: ...indicadora del tornillo de ajuste Fuerza de fijación 1 2 3 4 20 lbs 89 N 40 lbs 178 N 60 lbs 267 N 80 lbs 356 N Figure 15 NOTA Para lograr una fijación independiente para adultos se recomienda aplicar un mínimo de 60 lbs 267 N de fuerza con el fijador craneal Una fuerza adicional de 80 lbs 356 N está disponible si se desea ADVERTENCIA ADVERTENCIA NO SE RECOMIENDA una carga superior a 80 lbs 356 N ...

Page 129: ...ornillo de mariposa El aplicador puede sacarse ahora 11 Figura 16 NOTA Dejar de hacer girar cuando el tornillo de mariposa toque el fijador craneal El giro exce sivo aumentará la fuerza en la punta 4 0 2 0 1 2 12 U Figure 17 IMPORTANTE El aplicador de fuerza debe sacarse antes de hacer la exploración en un entorno de RM Retire el aplicador de fuerza solo después de que el tornillo de mariposa esté...

Page 130: ...ez que se hayan colocado las puntas en el paciente haga girar el fijador craneal debajo de la cabeza del paciente Figura 19 3 Fije el brazo oscilante en su lugar haciendo girar el botón de fijación en sentido horario hasta que quede apretado El brazo oscilante está totalmente fijado ahora y el fijador craneal bien sujetado en el paciente ...

Page 131: ... de que haya por lo menos 3 cm de espacio libre para la colocación de una bobina de imagenología de RM 3cm 3cm Bobina Bobina Figura 20 5 Verifique que haya el espacio libre adecuado para la RM con un gálibo apropiado Ajuste la posición del paciente en caso necesario Figura 21 ...

Page 132: ...esaño 1 en el fijador craneal de modo que conver ja con el mecanismo deslizante del travesaño 2 Véase la Figura 22 2 Apriete el botón de fijación del mecanismo deslizante 2 haciéndolo girar en sentido horario 3 Manipule la cabeza del paciente y el fijador craneal a la posición deseada y apropiada 1 2 Figura 22 Montaje del fijador craneal en el adaptador 4 Es necesario revisar y apretar todos los b...

Page 133: ...nes de extensión 5 y los botones de fijación lateral 6 haciéndolos girar en sentido horario PRECAUCIÓN PRECAUCIÓN Siempre debe cerciorarse de que todas las uniones y mecanismos de fijación estén asegurados después de terminar los ajustes No hacerlo puede derivar en lesiones graves al paciente NOTA Las extensiones del adaptador tienen un mecanismo que le impide pasar debajo de la superficie horizon...

Page 134: ...e navegación en el fijador craneal y asegúrela con el anillo decagonal de fijación 1 2 4 3 S W Figura 25 Montaje de la unidad de navegación 2 Vuelva a verificar el espacio libre para la bobina de RM con un gálibo apropiado Ajuste la unidad del brazo de navegación en caso necesario Figura 26 ...

Page 135: ...ar daño al brazo oscilante PRECAUCIÓN PRECAUCIÓN Siempre debe cerciorarse de sostener la cabeza del paciente al des bloquear este sistema o cualquier dispositivo similar No hacerlo puede derivar en lesiones graves al paciente 2 Haga girar el fijador craneal a la nueva posición deseada 3 Fije el botón de fijación haciéndolo girar en sentido horario hasta que quede apretado Vista lateral Vista later...

Page 136: ...ador craneal y el adaptador de mesa 5 Utilice un cepillo suave y detergente con un pH neutro para restregar cada componente minuciosamente y eliminar todo residuo de sangre o desechos que interfiera con las conexiones o el movimiento 6 Aclare cada componente para eliminar todo residuo de detergente 7 Utilice un paño suave para secar con cuidado cada componente Mientras seca los componentes examíne...

Page 137: ...gicos están libres de defectos en material y mano de obra si reciben el mantenimiento y limpieza apropiados y se utilizan normalmente para el propósito para el que fueron destinados Cualquier producto cubierto que INTEGRA coloque en forma de arrendamiento alquiler o acuerdo de venta a plazos y que requiera servicio de reparación durante el término de dicho acuerdo de colocación deberá ser reparado...

Page 138: ... ejecutivo de INTEGRA Estas limitaciones de creación o modificación de esta garantía no pueden dispensarse ni modificarse oralmente o mediante otra acción Servicio de mantenimiento y reparación Para servicio de mantenimiento y reparaciones fuera de Estados Unidos dirigirse a su representante local autorizado de Integra Dentro de Estados Unidos enviar todos los instrumentos para servicio de manteni...

Page 139: ...life com Integra LifeSciences Services FRANKRIJK SAS Immeuble Séquoia 2 97 allée Alexandre Borodine Parc Technologique de la Porte des Alpes 69800 Saint Priest FRANKRIJK Phone 33 0 4 37 47 59 00 Fax 33 0 4 37 47 59 99 NL NEDERLANDS MAYFIELD schedelklem voor MRI radiografie met Excite 3 0T Adaptor A1117 BELANGRIJK A u b lezen Instructiehandleiding ...

Page 140: ...uct voldoet aan de eisen van richtlijn 93 42 EEG Fabrikant Gevolmachtigd vertegenwoordiger in de Europese Unie Raadpleeg vóór gebruik de gebruiksaanwijzing Let op Volgens de Amerikaanse federale wetgeving mag dit hulpmiddel uitsluitend op voorschrift van een bevoegde arts worden verkocht Sommige componenten van dit hulpmiddel zijn niet bestemd voor gebruik in een MR omgeving Catalogusnummer Produc...

Page 141: ...adiografie met tafeladapter omvat F D E E A B A B C C G H Omschrijving Onderdeelnummer C D E F G H Kleine schommelarm voor volwassene met toebehoren Grote schommelarm voor volwassene met toebehoren Applicator met toebehoren GE schedelklem met toebehoren Knop transferplaat 2 stuks Tafeladapter Schommelarm voor kind met toebehoren optioneel Decagon montageconstructie optioneel 428A2030 428A2040 428A...

Page 142: ...erdeelnummer Duimschroef 4 stuks Lange aanzetstang GE piston lang 2 stuks GE piston kort 2 stuks Korte aanzetstang Kleine borgmoer 2 stuks Zeskan andstuk 2 stuks Kleine schommelarm voor volwassene Grote schommelarm voor volwassene Passer Decagon borgring 2 stuks Pistondraaier Krachtapplicator 428A1019 428A2010L 428A1022B 428A1022A 428A2010S 428A1017 428A1015 428A1014A 428A1014 428A1066 428A1071 42...

Page 143: ... N O V S W Omschrijving Onderdeelnummer Duimschroef Lange aanzetstang GE piston lang Kleine borgknop Zeskan andstuk Schommelarm voor kind Decagon borgring 2 stuks Navigatie armen 2 stuks 428A1019 428A2010L 428A1022B 428A1017 428A1015 428A1014C 428A1071 428A1083 S S I J N O V W W K G H Figuur 1b Optionele accessoires ...

Page 144: ...en nauwgezet gevolgd worden kan dat resulteren in wegglijden van de schedelpennen en ernstig letsel van de patiënt zoals laceratie van de hoofdhuid schedelbreuk of zelfs overlijden WAARSCHUWING Bij gebruik van de schedelklem in een MR omgeving mogen UITSLUITEND met MRI compatibele schedelpennen worden gebruikt WAARSCHUWING De krachtapplicator is NIET MR compatibel en moet worden verwijderd alvoren...

Page 145: ...etreft de anatomie van de patiënt de drukpunten de flexibiliteit van de nek en de toegang tot het chirur gisch doel In bovenstaande tabel staan de ovalen voor het hoofd van de patiënt waarop centerlijnen zijn gete kend De tekeningen tonen enige voorbeelden van juist en foutief aanbrengen van de schedelklem Het verlengde van de enkele pen dient het snijpunt te passeren dat wordt gevormd door de cen...

Page 146: ...schedelklem voor MRI radiografie biedt de chirurg grotere vrijheid bij het positio neren van de fixatiepennen Het vermijden van kritieke locaties op de schedel wordt mogelijk gemaakt door een schommelarm die 360 kan draaien wat het aanbrengen aanzienlijk vereenvoud igt De schommelarm kan daarnaast 360 draaien onder de volledige skeletlast wat het uiteindelijk positioneren van de patiënt na het vas...

Page 147: ...gaten in de tafel 2 Bevestig de tafeladapter met de meegeleverde schroeven 3 1 2 D Figuur 2 Aanbrengen van de tafeladapter LET OP LET OP Zorg dat de tafeladapter goed op de operatietafel wordt bevestigd NB De tafeladapter kan desgewenst zonder de verlengarmen worden gebruikt de schedelklem kan dan lager op de tafel worden bevestigd Zie figuur 3 ...

Page 148: ... het hoofd van de patiënt zie figuur 5 hieronder met de meegeleverde GE passer 428A1066 Leg de passer die de breedte van het hoofd van de patiënt aangeeft vervolgens op de meetsjabloon die is meegeleverd met deze instructiehandleiding De meetsjabloon geeft aan of u de grote of kleine schommelarm voor volwassene moet gebruiken Zie figuur 6 C a l i p e r G a u g e T e m p l a t e im ag ination at wo...

Page 149: ... de aangegeven piston in de staander van de klem zie figuur 7 Het uiteinde van de piston wordt geplaatst zoals afgebeeld 1 J I M of K L of Figuur 7 Installeren van de piston 2 Installeer de schommelarm op de staander van de klem zie figuur 8 1 2 3 x2 O N P Q V of of Figuur 8 De op de klem bevestigde schommelarm 3 Bevestig de schommelarm op de schedelklem met de kleine borgknop en draai deze 2 slag...

Page 150: ...de klem Zie figuur 9 en 10 hieronder Gebruik uitsluitend disposable schedelpennen van het merk MAYFIELD met deze klem NB Het verdient aanbeveling altijd een set schedelpennen in reserve te houden 1 1 Figuur 9 Installatie van de schedelpennen op de schommelarm 1 Figuur 10 Installatie van de schedelpen op de kant met enkele pen van de klem ...

Page 151: ...geen ruimte overblijft tussen de schouder van de pen en de voorkant van de fitting Plaats de pennen zo dat er geen ruimte overblij tussen de schouder van de pen en de voorkant van de fi ing Schommelarm volwassene Schommelarm kind Figuur 10a Juiste installatie van de schedelpen ...

Page 152: ...LET OP Voor volwassenen wordt een klemkracht van 60 lb 267 N aanbevolen Voor kinderen wordt een klemkracht van 40 lb 178 N aanbevolen Alle krachtinstellingen zijn de verantwoordelijkheid van de gebruiker Gebruik NOOIT een klemkracht van meer dan 80 lb 356 N Niet te ver aandraaien 1 Ontgrendel de borgknop zodat de schommelarm vrij 360 kan draaien U ontgrendelt de borgknop door hem een 1 volle slag ...

Page 153: ...e schedel moeten een piston en aanzetstang van de juiste lengte worden geselecteerd Zie figuur 12 hieronder De aanzetstang moet bijna tot de hoogte van het buitenoppervlak van de draadbehuizing worden ingestoken De piston van de juiste lengte wordt nu in de aanzetstang geschroefd totdat de schedelpen de schedel raakt Er is een piston draaier meegeleverd voor het geval dat de piston slecht toeganke...

Page 154: ...de schedelklem door de krachtapplicator naar voren te brengen tot de gewenste instelling zoals aangegeven op de schaal en draai hem ver volgens een kwartslag terug Figuur 14 NB De schaal op de krachtapplicator toont de operateur de klemkracht die wordt uitgeoefend ...

Page 155: ...t van ten minste 60 lb 267 N uit te oefenen Desgewenst is een aanvul lend klemkrachtbereik tot 80 lb 356 N beschikbaar WAARSCHUWING WAARSCHUWING Gebruik van een klemkracht van meer dan 80 lb 356 N wordt NIET AANBEVOLEN 7 Voordat de krachtapplicator wordt verwijderd moet de duimschroef worden aangedraaid totdat hij het binnenoppervlak van de klem raakt Draai de duimschroef niet verder aan nadat hij...

Page 156: ...e krachtapplicator moet worden verwijderd alvorens scans in een MR omgeving te verrichten Verwijder de krachtapplicator pas nadat de duimschroef is aangedraaid Positioneren van de schedelklem 1 Positioneer het frame van de schedelklem bij de patiënt zoals afgebeeld Figuur 18 2 Nadat de pennen bij de patiënt zijn vastgezet draait u de schedelklem onder het hoofd van de patiënt ...

Page 157: ... de schommelarm op zijn plaats door de borgknop rechtsom te draaien tot hij strak zit De schommelarm is nu geheel vergrendeld en de schedelklem is goed vastgezet bij de pa tiënt 4 Zorg dat er ten minste 3 cm ruimte is voor het plaatsen van de MR spoel 3cm 3cm Spoel Spoel Figuur 20 ...

Page 158: ...klem op de adapter NB De tafeladapter hoort stevig op de tafel bevestigd te zijn met alle positioneringsknoppen in ontgrendelde positie 1 Plaats de dwarsrailbeugel nr 1 zo op de schedelklem dat hij op het schuifmechanisme van de dwarsrail nr 2 komt te rusten Zie figuur 22 2 Draai de schuifvergrendelingsknop nr 2 rechtsom aan 3 Breng het hoofd van de patiënt en de schedelklem naar de gewenste en ge...

Page 159: ...t u de twee aanslagknoppen nr 8 link som iets los zodat de verlengarmen omhoog kunnen worden gedraaid 5 Vergrendel de schuifvergrendelingsknop nr 7 door hem rechtsom te draaien totdat de tanden de dwarsrailbeugel hebben gegrepen 6 Vergrendel de klembeugelknop nr 9 door hem rechtsom aan te draaien 7 Vergrendel de twee verlengarmknoppen nr 5 en zijvergrendelingsknoppen nr 6 door ze rechtsom aan te d...

Page 160: ...ter kunnen niet lager dan horizontaal worden afgesteld om botsingen met de tafel tijdens het scannen te voorkomen Indien nodig kunt u deze aanslagposi tie opheffen door de borgknoppen nr 6 linksom te draaien De verlengarmen kunnen dan in een positie onder horizontaal worden vastgezet Figuur 24 Montagecomponenten Monteren van de optionele navigatie constructie 1 Bevestig de navigatie arm op de sche...

Page 161: ...navigatie constructie 2 Controleer opnieuw op de juiste speling in de MR opening met behulp van de sjabloon Pas de positie van de navigatie arm zo nodig aan Figuur 26 Verplaatsen van de schedelklem 1 Ontgrendel de borgknoppen door ze 360 linksom te draaien ...

Page 162: ...OP Ondersteun het hoofd van de patiënt altijd wanneer u het systeem of vergelijkbare hulpmiddelen ontgrendelt Nalatigheid in deze kan ernstig letsel van de patiënt veroorzaken 2 Draai de schedelklem naar de nieuwe gewenste positie 3 Vergrendel de borgknoppen door ze rechtsom strak aan te draaien Zijaanzicht Zijaanzicht Eindaanzicht Eindaanzicht Figuur 27 Stelknoppen ...

Page 163: ... voor eenmalig gebruik zorgvuldig en voer ze op gepaste wijze af 2 Neem de schedelklem van de tafeladapter 3 Neem de tafeladapter van de tafel 4 Haal alle componenten van de schedelklem en de tafeladapter voorzichtig uit elkaar 5 Borstel alle onderdelen grondig schoon met een zachte borstel en detergens met neutrale zuur graad om alle resten bloed en weefselafval te verwijderen die in de weg zoude...

Page 164: ...NB Voor de afvoer van dit hulpmiddel dienen de ziekenhuisprocedures te worden opgevolgd Garantie van Integra LifeSciences INTEGRA LIFESCIENCES CORPORATION INTEGRA garandeert de oorspronkelijke koper uitsluitend dat elk nieuw MAYFIELD product vrij van fabricagefouten is voor wat betreft materialen en vervaardiging bij normaal gebruik en onderhoud gedurende één jaar behalve waar uitdrukkelijk anders...

Page 165: ...gelukken of dat op andere wijze is gebruikt dan volgens de door INTEGRA verstrekte instructies DEZE BEPERKTE GARANTIE IS EXCLUSIEF EN VERVANGT ALLE ANDERE GARANTIES HETZIJ UITDRUKKELIJK DAN WEL IMPLICIET ALSMEDE ALLE ANDERE VERPLICHTINGEN OF AANSPRAKELIJKHEDEN VAN DE ZIJDE VAN INTEGRA INTEGRA AANVAARDT NOCH VERLEENT ENIGE VERTEGENWOORDIGER OF ANDERE PERSOON DE BEVOEGDHEID TOT HET UIT HAAR NAAM AAN...

Page 166: ... Amerikaans octrooi 7 507 244 Overleg altijd het nummer van de aankooporder en een schriftelijke beschrijving van het probleem Of bel 877 444 1114 alleen VS Integra en het Integra logo zijn gedeponeerde handelsmerken van Integra LifeSciences Corporation in de Verenigde Staten en of andere landen MAYFIELD is een gedeponeerd handelsmerk van SM USA Inc en wordt onder licentie gebruikt door Integra 20...

Page 167: ...om Integra LifeSciences Services France SAS Immeuble Séquoia 2 97 allée Alexandre Borodine Parc Technologique de la Porte des Alpes 69800 Saint Priest FRANCE Phone 33 0 4 37 47 59 00 Fax 33 0 4 37 47 59 99 BR PORTUGUÊS Imobilizador craniano MAYFIELD para RM radiografias com Adaptador Excite 3 0T A1117 IMPORTANTE Para ler atentamente Manual de Instruções ...

Page 168: ... O produto cumpre os requisitos da directiva 93 42 CEE Fabricante Representante autorizado na Comunidade Europeia Consultar as Instruções de Utilização Atenção A lei federal dos E U A limita a venda deste dispositivo a médicos ou por prescrição médica Alguns componentes deste dispositivo não são indicados para uso num ambiente de RM Número de catálogo Data de fabrico AAAA MM DD Número do lote Núme...

Page 169: ...7 para RM radiografias com adaptador de mesa inclui Figura 1 Componentes F D E E A B A B C C G H Descrição Número de peça C D E F G H Unidade do braço oscilante para adulto pequeno Unidade do braço oscilante para adulto maior Unidade do aplicador Unidade do imobilizador craniano GE Botão da placa de transferência 2 pecas Adaptador de mesa Unidade do braço oscilante para crianças opcional Unidade d...

Page 170: ...oscado longo Pistão GE longo 2 peças Pistão GE curto 2 peças Eixo de engrenagem roscado curto Porca de fixação pequena 2 peças Dentes de engrenagem hexagonais 2 peças Braço oscilante para adulto pequeno Braço oscilante para adulto grande Calibrador de medida Anel de fixação decagonal 2 peças Accionador de pistão Aplicador de força 428A1019 428A2010L 428A1022B 428A1022A 428A2010S 428A1017 428A1015 ...

Page 171: ... Parafuso de orelhas Eixo de engrenagem roscado longo Pistão GE longo Botão de fixação pequeno Dentes de engrenagem hexagonais Braço oscilante para criança Anel de fixação decagonal 2 peças Unidades do braço de navegação 2 peças 428A1019 428A2010L 428A1022B 428A1017 428A1015 428A1014C 428A1071 428A1083 S S I J N O V W W K G H Figura 1b Acessórios opcionais ...

Page 172: ...A Se as instruções fornecidas no folheto deste produto não forem lidas nem seguidas isso pode causar lesões graves ao paciente ADVERTÊNCIA Quando este imobilizador craniano for utilizado num ambiente de ressonância mag nética devem usar se UNICAMENTE pinos para o crânio compatíveis com RM ADVERTÊNCIA O aplicador de força NÃO é compatível com a RM e deve retirar se antes da ex ploração num ambiente...

Page 173: ...itável para o cirurgião e ter em conta a anatomia os pontos de pressão e a flexibilidade do pescoço do paciente assim como o acesso ao alvo cirúrgico No diagrama anterior os óvulos que representam a cabeça do paciente têm linhas desenhadas no seu centro Os diagramas mostram exemplos de aplicações correctas e incorrectas do imobilizador craniano Para obter o mais alto grau de estabilidade a direcçã...

Page 174: ...iente nas posições prona ou supina O adaptador de mesa fixa se à mesa de diagnóstico Excite 3 0T O imobilizador craniano MAYFIELD para RM radiografias é concebido para dar mais liberdade ao cirurgião na colocação dos pinos de fixação É possível evitar as áreas críticas do crânio com o braço oscilante giratório que roda a 360 para facilitar a aplicação Além disso o braço oscilante giratório pode ro...

Page 175: ...ispositivos de fixação roscados fornecidos para fixar o adaptador de mesa na posição devida 3 1 2 D Figura 2 Montagem do adaptador de mesa ATENÇÃO Certificar se de que o adaptador de mesa esteja bem fixo à mesa de operações NOTA Se se pretender o adaptador de mesa pode utilizar se sem os braços de extensão o que permite colocar o imobilizador craniano numa posição mais baixa sobre a mesa Ver a Fig...

Page 176: ...nte apropriado tal como indicado para o paciente Um braço osci lante para criança opcional está disponível Para determinar o braço oscilante a utilizar medir a cabeça do paciente tal como se ilustra na Figura 5 que se segue com o calibrador GE 428A1066 fornecido Em seguida colocar o calibrador indicando a largura da cabeça do paciente no gabarito de medida fornecido com este manual de instruções O...

Page 177: ...eve utilizar se com o paciente Inserir o pistão indicado no imobilizador tal como se ilustra na Figura 7 A extremidade do pistão deve posicio nar se da forma ilustrada Figura 7 Instalação do pistão 2 Montar o braço oscilante no imobilizador como ilustrado na Figura 8 C a l i p e r G a u g e T e m p l a t e im ag ination at work C h il d R o c k e r A s s e m b ly o p t io n a l S m a ll A d u lt R...

Page 178: ...nos para o crânio compatíveis com RM o mais dentro possível nos receptáculos para o pino existentes no braço oscilante e no lado do pino único do imobilizador Ver as Figu ras 9 e 10 mais adiante Utilizar apenas os pinos para o crânio descartáveis da marca MAYFIELD com este imobilizador NOTA Recomenda se ter sempre disponível um conjunto de pinos para o crânio de substituição 1 2 3 2 voltas O N P Q...

Page 179: ...o do braço oscilante Figura 10 Instalação do pino para o crânio no lado da ponta única do imobilizador NOTA Instalar os pinos para o crânio Assentar os pinos para o crânio de forma que não exista nen hum lacuna entre o rebordo do pino e a face do encaixe 1 1 1 ...

Page 180: ... uma força de 60 lbs 267 N para os adultos Recomenda se exercer uma força de 40 lbs 178 N para as crianças Todos os parâmetros de força ficam à discrição do técnico NUNCA ultrapassar uma força de 80 lbs 356 N Não apertar demasiado 1 Desbloquear o botão de fixação de modo que o braço oscilante possa rodar a 360 sem re strições O botão de fixação desbloqueia se fazendo o dar uma 1 volta completa ou ...

Page 181: ...único intersecta o centro da cabeça do paciente e do braço oscilante 4 Uma fixação correcta do crânio necessita da selecção do pistão e do eixo de engrenagem de comprimentos adequados Ver a Figura 12 mais abaixo O eixo de engrenagem deve inserir se quase alinhado com o lado exterior do encaixe roscado O pistão de comprimento adequado deve roscar se no eixo de engrenagem até que o pino para o crâni...

Page 182: ...izador Figura 13 6 Aumentar a força do imobilizador craniano fazendo avançar o aplicador de força até ao parâmetro desejado segundo se indica na leitura visual e depois fazê lo retroceder um quarto de volta Figura 14 NOTA A leitura visual do indicador do aplicador de força mostra ao cirurgião a força de imobili zação que está a ser aplicada 1 2 T ...

Page 183: ...o imobilizador craniano Uma força adicional de 80 lbs 356 N está disponível se necessário ADVERTÊNCIA ADVERTÊNCIA NÃO SE RECOMENDA uma carga superior a 80 lbs 356 N Aplicador de força Leitura visual Parafuso de orelhas Linha indicadora do parafuso de ajuste Força de imobilização 1 2 3 4 20 lbs 89 N 40 lbs 178 N 60 lbs 267 N 80 lbs 356 N ...

Page 184: ...apertar o parafuso de orelhas Agora o aplicador pode ser retirado Figura 16 NOTA Parar a rotação quando o parafuso de orelhas tocar o imobilizador craniano Uma rotação excessiva aumentará a força sobre o pino Figura 17 IMPORTANTE O aplicador de força deve ser retirado antes fazer a exploração num ambiente de RM Retirar o aplicador de força só depois do parafuso de orelhas estar instalado 11 4 0 2 ...

Page 185: ...8 2 Assim que se tenham colocado os pinos no paciente fazer rodar o imobilizador craniano de baixo da cabeça do paciente Figura 19 3 Fixar o braço oscilante na posição devida fazendo rodar o botão de fixação no sentido horário até que fique apertado O braço oscilante está agora totalmente fixo e o imobilizador craniano está bem fixo ao paciente ...

Page 186: ...xistam pelo menos 3 cm de espaço livre para a colocação da bobina de imagiologia de RM Figura 20 5 Verificar se existe o espaço livre adequado para a entrada do aparelho de RM com o gabarito de medida apropriado Ajustar a posição do paciente caso seja necessário Figura 21 3cm 3cm Bobina Bobina ...

Page 187: ...1 no imobilizador craniano de modo que possa convergir com o mecanismo deslizante transversal n 2 Ver a Figura 22 2 Apertar o botão de fixação do mecanismo deslizante n 2 fazendo o rodar no sentido horário 3 Manobrar a cabeça do paciente e o imobilizador craniano para a posição desejada e apropriada Figura 22 Montagem do imobilizador craniano no adaptador 4 Todos os botões de ajustamento amarelos ...

Page 188: ...do horário 7 Bloquear os dois botões de extensão n 5 e os botões de fixação lateral n 6 fazendo os rodar no sentido horário ATENÇÃO ATENÇÃO Assegurar se sempre de que todas as junções e mecanismos de fixação estejam seguros depois de terminar os ajustamentos Não fazê lo pode causar lesões graves ao paciente NOTA As extensões do adaptador têm um mecanismo que o impede de passar debaixo da superfí c...

Page 189: ...ontagem de componentes Montagem da unidade de navegação opcional 1 Prender a unidade do braço de navegação ao imobilizador craniano e segurá lo com o anel de fixação decagonal Figura 25 Montagem da unidade de navegação 1 2 4 3 S W ...

Page 190: ...i horário ADVERTÊNCIA ADVERTÊNCIA Não segurar nem utilizar o braço oscilante como alavanca ao des bloquear a unidade Isso pode danificar o braço oscilante ATENÇÃO ATENÇÃO Certificar se sempre de apoiar a cabeça do paciente ao desbloquear este sistema ou qualquer dispositivo semelhante Não fazê lo pode causar lesões graves ao paciente 2 Rodar o imobilizador craniano para a nova posição desejada 3 B...

Page 191: ...izada Seguir as instruções do fabricante do equipamento de angiografia Notas sobre a manutenção Antes de cada caso devem realizar se inspecções de rotina para ajudar a evitar qualquer proble ma imprevisto Recomenda se que se realizem as seguintes inspecções Bloquear e desbloquear o botão de fixação Em caso de dificuldades a unidade deve enviar se para manutenção para Service Department phone 877 4...

Page 192: ...s de novo 9 Assim que os componentes estejam limpos e secos voltar a montá los formando as mesmas unidades como as que se utilizaram para o procedimento Nota Os componentes devem voltar a montar se para guardá los nos seus estojos de armazenamento Se bem que não costume ser necessário nem recomendado o imobilizador craniano e o adaptador de mesa podem ser esterilizados inteiramente utilizando o mé...

Page 193: ... decorrentes da devolução à INTEGRA serão de responsabilidade do CLIENTE Sob esta garantia é responsabilidade exclusiva da INTEGRA a reparação ou a substituição a critério exclusivo da INTEGRA por conta da INTEGRA sob os termos desta garantia e acordos aplicáveis SOB NENHUMA CIRCUNSTÂNCIA A INTEGRA SERÁ RESPONSABILIZADA POR QUALQUER PREJUÍZO INCIDENTAL INDIRETO CONSEQUENTE OU PUNITIVO RELACIONADO ...

Page 194: ...g A Cincinnati Ohio 45227 Patente nos EUA 7 507 244 Incluir sempre o número de ordem de compra e uma descrição do problema por escrito Ou telefonar para o 877 444 1114 Só nos EUA Integra e o logotipo Integra são marcas comerciais registradas da Integra LifeSciences Corporation nos EUA e em outros países MAYFIELD é uma marca comercial registrada da SM USA Inc e é usada pela Integra sob licença 2017...

Page 195: ...Integra LifeSciences Services France SAS Immeuble Séquoia 2 97 allée Alexandre Borodine Parc Technologique de la Porte des Alpes 69800 Saint Priest FRANCE Phone 33 0 4 37 47 59 00 Fax 33 0 4 37 47 59 99 PL POLSKI Uchwyt kości czaszki typu MAYFIELD do badań MR RTG z łącznikiem Excite 3 0T A1117 WAŻNE INFORMACJE Należy dokładnie przeczytać Instrukcja obsługi ...

Page 196: ... Ostrzeżenie Produkt spełnia wymogi dyrektywy 93 42 EEC Producent Upoważniony przedstawiciel na Europę Sprawdzić instrukcje użytkowania Uwaga Prawo federalne US ogranicza sprzedaż tego urządzenia wyłącznie lekarzom lub na ich zamówienie Niektóre części składowe tego urządzenia nie są wskazane do użycia w śro dowisku rezonansu magnetycznego MR Numer katalogowy Data produkcji RRRR MM DD Numer partii...

Page 197: ...IELD do badań MR RTG z łącznikiem do stołu obejmuje F D E E A B A B C C G H Opis Numer części C D E F G H Mały zespół wahacza dla dorosłych Duży zespół wahacza dla dorosłych Zestaw aplikatora Zestaw uchwytu kości czaszki GE Pokrętło płytki przenoszenia 2 SZTUKI Łącznik do stołu Pediatryczny zestaw wahacza opcjonalny Zestaw montażowy dziesięciokątny opcjonalny 428A2030 428A2040 428A2020 428C1000 42...

Page 198: ...łok GE długi 2 SZTUKI Tłok GE krótki 2 SZTUKI Nagwintowany trzon połączenia krótki Mała śruba blokująca 2 SZTUKI Sześciokątne zęby połączenia 2 SZTUKI Ramię małego wahacza dla dorosłych Ramię dużego wahacza dla dorosłych Miarka Pierścień blokujący dziesięciokątny 2 SZTUKI Klucz tłoka Przyrząd do zwiększania nacisku 428A1019 428A2010L 428A1022B 428A1022A 428A2010S 428A1017 428A1015 428A1014A 428A10...

Page 199: ...ętło Nagwintowany trzon połączenia długi Tłok GE długi Małe pokrętło blokujące Sześciokątne zęby połączenia Pediatryczne ramię wahacza Pierścień blokujący dziesięciokątny 2 SZTUKI Zestawy nawigacji ramienia 2 SZTUKI 428A1019 428A2010L 428A1022B 428A1017 428A1015 428A1014C 428A1071 428A1083 S S I J N O V W W K G H Rys 1b Akcesoria opcjonalne ...

Page 200: ... tym produktem może spowodować ciężkie obrażenia ciała pacjenta Podczas używania niniejszego uchwytu czaszkowego w środowisku rezonansu magnetycznego należy stosować WYŁĄCZNIE nakłuwacze czaszki kompatybilne z badaniami metodą rezonansu magnetycznego Przyrząd do zwiększania nacisku NIE jest kompatybilny z badaniami metodą rezo nansu magnetycznego i należy go usunąć przed rozpoczęciem skanowania w ...

Page 201: ...wy pacjenta punktów ucisku elastyczności szyi i dostępu do docelowego miejsca oper acji Na powyższym schemacie owale reprezentujące głowę pacjenta mają zaznaczone linie środ kowe Schematy przedstawiają prawidłowe i nieprawidłowe zastosowania uchwytu kości czaszki Kierunek wskazywany przez pojedynczą szpilkę powinien przebiegać dokładnie wzdłuż punktu środkowego wyznaczonego przez linie środkowe gł...

Page 202: ...o stołu jest mocowany do stołu diagnostycznego Excite 3 0T Uchwyt do kości czaszki typu MAYFIELD do badań RM RTG ma na celu zapewnienie chirurgowi większej swobody w ustawieniu szpilek mocujących Uchwyt do kości czaszki typu MAYFIELD do badań RM RTG ma na celu zapewnienie chirurgowi większej swobody w ustawieniu szpilek mocu jących Ponadto obrotowe ramię wahacza może obracać się o 360 pod pełnym o...

Page 203: ...ne nagwintowane elementy mocujące do unieruchomienia łącznika stołu na miejscu 3 1 2 D Rys 2 Montaż łącznika stołu UWAGA Należy upewnić się że łącznik stołu jest odpowiednio przymocowany do stołu operacyjnego UWAGA Jeśli wskazane łącznik stołu można używać bez wysuwanych ramion umożliwiając montaż uchwytu kości czaszki w niższej pozycji na stole Patrz rys 3 UWAGA ...

Page 204: ...należy zmierzyć głowę pacjenta tak jak to pokazano na rys 5 poniżej za pomocą dostarczonej miarki GE 428A1066 Następnie umieścić miarkę wskazującą wielkość głowy pacjenta na szablonie dostarczonym wraz z instrukcją obsługi Szablon rozmiarów wskazuje czy należy zastosować małe czy duże ramię wahacza dla dorosłych Patrz rys 6 C a l i p e r G a u g e T e m p l a t e im ag ination at work C h il d R o...

Page 205: ...any tłok w ustawiony pionowo uchwyt jak pokazano na rys 7 Zakończenie tłoka powinno być ustawione zgodnie z rysunkiem 1 J I M K L lub lub Rys 7 Instalacja tłoka 2 Zamontować ramię wahacza w ustawionym pionowo uchwycie jak pokazano na rys 8 1 2 3 x2 O N P Q V lub lub Rys 8 Ramię wahacza zamontowane w uchwycie 3 Przymocować ramię wahacza do uchwytu kości czaszki za pomocą 2 obrotów małego pokrętła b...

Page 206: ...hwytu z pojedynczą szpilką Patrz rys 9 i 10 poniżej Wraz z tym uchwytem należy stosować wyłącznie jednorazowe szpilki do mocowania kości czaszki marki MAYFIELD UWAGA Zaleca się posiadanie zawsze zapasowego zestawu szpilek do mocowania kości czaszki 1 1 Rys 9 Montaż szpilek w ramieniu wahacza 1 Rys 10 Montaż szpilki po stronie uchwytu z pojedynczą szpilką ...

Page 207: ...ić szpilki tak aby nie było luzu pomiędzy ramieniem szpilki a powierzchnią otworu Rys 10a Prawidłowy montaż szpilki Należy osadzić szpilki tak aby nie było luzu pomiędzy ramieniem szpilki a powierzchnią otworu MACROBUTTON Ramię wahacza dla dorosłych Pediatryczne ramię wahacza ...

Page 208: ...nie siły 18 14 kg 178 N Użytkownik decyduje o wszyst kich ustawieniach siły NIGDY nie przekraczać 36 29 kg 356 N siły Nie dokręcać nadmiernie 1 Odblokować pokrętło blokujące aby ramię wahacza mogło się swobodnie obracać o 360 Pokrętło blokujące można odblokować obracając je przeciwnie do kierunku ruchu wskazówek zegara o jeden 1 pełny obrót o 360 2 Obróć ramię wahacza do pożądanej pozycji W przypa...

Page 209: ...łoka i trzonu połączenia o odpow iedniej długości Patrz rys 12 poniżej Trzon połączenia powinien być umieszczony niemal na równi z zewnętrzną powierzchnią nagwintowanej obudowy Tłok o odpowiedniej długości powinien być wkręcony do tłoka połączenia aż do zetknięcia szpilki z kością czaszki Dostępny jest klucz tłoka do wykorzystania w przypadku trudnego dostępu do tłoka Nagwintowana obudowa Trzon po...

Page 210: ...wanej siły nacisku uchwytu Przyrząd do zwiększania nacisku Odczyt wzrokowy Pokrętło Wskaźnik liniowy momentu obrotowego Siła uchwytu 1 2 3 4 9 07 kg 89 N 18 14 kg 178 N 27 22 kg 267 N 36 29 kg 356 N Rys 15 UWAGA Aby uzyskać niezależne unieruchomienie w przypadku pacjentów dorosłych zaleca się stosowanie siły minimum 27 22 kg 267 N uchwytu kości czaszki Na życzenie dostępna jest dodatkowa siła 36 2...

Page 211: ...leży dokręcać pokrętła Teraz można wyjąć przyrząd 11 Rys 16 UWAGA Należy przerwać obracanie gdy pokrętło zetknie się z uchwytem kości czaszki Nad mierne obracanie zwiększa nacisk wywierany na szpilkę 4 0 2 0 1 2 12 U Rys 17 WAŻNE Przyrząd do zwiększania nacisku należy usunąć przed rozpoczęciem skanowania w środowisku RM Przyrząd należy wyjąć dopiero po ustawieniu pokrętła ...

Page 212: ... rysunkiem Rys 18 2 Po unieruchomieniu pacjenta obracać uchwyt pod głową pacjenta Rys 19 3 Unieruchomić na miejscu ramię wahacza obracając pokrętło blokujące zgodnie z kierunkiem ruchu wskazówek zegara aż do dokręcenia Ramię wahacza jest teraz całkowicie zablokowane a uchwyt stabilnie zamocowany do pacjenta ...

Page 213: ...nić się że pozostawiono co najmniej 3 cm przestrzeń na umieszczenie cewki obrazowania MR 3cm 3cm Cewka Cewka Rys 20 5 Sprawdzić czy stół z pacjentem zmieści się w otworze magnesu za pomocą szablonu otworu W razie konieczności poprawić pozycję pacjenta Rys 21 ...

Page 214: ...nr 1 na uchwycie kości czaszki tak aby był zbieżny z mecha nizmem suwaka poprzecznego nr 2 Patrz rys 22 2 Dokręcić pokrętło blokady suwaka nr 2 obracając je zgodnie z kierunkiem ruchu wskazówek zegara 3 Ustawić głowę pacjenta i uchwyt kości czaszki w pożądanej i odpowiedniej pozycji 1 2 Rys 22 Montaż uchwytu kości czaszki do łącznika stołu 4 Wszystkie pokrętła regulacji na żółto muszą być sprawdzo...

Page 215: ...okować dwa pokrętła wysuwania nr 5 i boczne pokrętła blokady nr 6 obracając je zgodnie z kierunkiem ruchem wskazówek zegara UWAGA Zawsze po dokonaniu regulacji należy się upewnić że wszystkie połączenia i mechanizmy blokad są stabilne Niezastosowanie się do tego polecenia może być przyczyną poważnych obrażeń ciała pacjenta UWAGA Zastosowano blokadę obniżenia przedłużeń łącznika poniżej poziomu w c...

Page 216: ... nawigacji do uchwytu i zamocować pierścieniem blokującym dziesięciokąt nym 1 2 4 3 S W Rys 25 Montaż zestawu nawigacji 2 Sprawdzić czy stół z pacjentem zmieści się w otworze magnesu za pomocą szablonu otworu W razie konieczności poprawić pozycję ramienia nawigacji Rys 26 ...

Page 217: ...może spowodować uszkodzenie ramienia wahacza UWAGA Zawsze należy zapewnić podparcie głowy pacjenta podczas odblokowywa nia tego lub podobnego zestawu Niezastosowanie się do tego polecenia może być przyczyną poważnych obrażeń ciała pacjenta 2 Obrócić uchwyt czaszki do nowej pozycji 3 Zablokować pokrętła blokujące obracając je zgodnie z kierunkiem ruchu wskazówek zegara do oporu Widok z boku Widok z...

Page 218: ...Ostrożnie zdemontować wszystkie elementy składowe zarówno uchwytu kości czaszki jak i łącznika stołu 5 Za pomocą szczoteczki o miękkim włosiu i detergentu o neutralnym pH dokładnie szorować każdy element skład owy w celu usunięcia wszelkich śladów krwi lub zanieczyszczeń przeszkadzających w połączeniu lub poruszaniu 6 Opłukać każdy element w celu usunięcia śladów detergentu 7 Delikatnie osuszyć ka...

Page 219: ...ego nabywcy jednak nie dłużej niż do terminu daty wygaśnięcia podanego na etykiecie produktu Instrumenty chirurgiczne posiadają gwarancję braku wad materiałowych i wykonawczych w przypadku ich normalnego konserwowania i czyszczenia oraz użytkowania zgodnie z ich założonym przeznaczeniem Każdy produkt objęty gwarancją dostarczany przez spółkę Integra w ramach umowy leasingu wynajmu lub zakupu na ra...

Page 220: ...wiadczenia zabrania się też modyfikowania niniejszej Standardowej Gwarancji w dowolny sposób z wyjątkiem przypadku uzyskania na to pisemnej zgody od przedstawiciela spółki Integra Niniejszych ograniczeń dotyczących opracowywania gwarancji lub jej modyfikacji nie można znosić ani modyfikować ustnie ani w wyniku dowolnego działania Serwis i naprawa W sprawie serwisu i napraw poza Stanami Zjednoczony...

Page 221: ... com Integra LifeSciences Services France SAS Immeuble Séquoia 2 97 allée Alexandre Borodine Parc Technologique de la Porte des Alpes 69800 Saint Priest FRANCE Phone 33 0 4 37 47 59 00 Fax 33 0 4 37 47 59 99 CZ ČEŠTINA Upínadlo lebky MAYFIELD pro MR roentgen s adaptérem Excite 3 0T A1117 DŮLEŽITÉ INFORMACE Přečtěte si je prosím Příručka s instrukcemi ...

Page 222: ... Upozornění Výrobek splňuje požadavky směrnice 93 42 EHS Výrobce Zplnomocněný zástupce v Evropském společenství Přečtěte si návod k použití Upozornění Federální zákony USA dovolují prodej tohoto pros tředku pouze lékařům nebo na lékařský předpis Některé komponenty tohoto prostředku nejsou indikovány k použití v prostředí magnetické rezonance Katalogové číslo Datum výroby RRRR MM DD Číslo šarže Výr...

Page 223: ... roentgen se stolním adaptérem zahrnuje Vyobrazení 1 Součásti F D E E A B A B C C G H Popis Číslo součástky C D E F G H Jednotka kolébky pro malého dospělého Jednotka kolébky pro velkého dospělého Jednotka aplikátoru Jednotka upínadla lebky GE Knoflík pro překládací desku 2 kusy Stolní adaptér Jednotka kolébky pro dítě volitelná Desetihranná úchytná jednotka volitelná 428A2030 428A2040 428A2020 42...

Page 224: ...o součástky Šroub k dotažení prsty 4 kusy Úchytná dlouhá hřídel se závity Píst GE dlouhý 2 kusy Píst GE krátký 2 kusy Úchytná krátká hřídel se závity Malá uzavírací matice 2 kusy Šestihranné úchytné ozubení 2 kusy Rameno kolébky pro malého dospělého Rameno kolébky pro velkého dospělého Třmenový kalibr Desetihranné těsnění kusy Ovladač pístu Aplikátor síly 428A1019 428A2010L 428A1022B 428A1022A 428...

Page 225: ...O V S W Popis Číslo součástky Šroub k dotažení prsty Úchytná krátká hřídel se závity Píst GE dlouhý 2 kusy Malý uzavírací knoflík Šestihranné úchytné ozubení Rameno kolébky pro dítě Desetihranné těsnění 2 kusy Jednotky naváděcího ramena 2 kusy 428A1019 428A2010L 428A1022B 428A1017 428A1015 428A1014C 428A1071 428A1083 S S I J N O V W W K G H ...

Page 226: ...v této příbalové informaci může způsobit sklouznutí upínadla lebky a vážné zranění pacienta např laceraci pokožky hlavy frakturu lebky nebo dokonce smrt VAROVÁNÍ Při používání upínadla lebky v prostředí kde se používá magnetická rezonance používejte POUZE spony pro lebku kompatibilní s MRI VAROVÁNÍ Aplikátor síly NENÍ kompatibilní s MR a musí být vyjmut před snímkováním v pros tředí MR VAROVÁNÍ Fi...

Page 227: ...ienta musí být přijatelná pro chirurga a musí se při tom vzít v potaz anatomie pacienta tlakové body pružnost krku a přístup k chirurgickému cíli Ve výše uvedené tabulce jsou přes ovály které představují hlavu pacienta zakresleny osy Tyto diagramy ukazují příklady správné a nesprávné aplikace upínadla lebky Samostatná spona by měla směřovat přímo přes středový bod tvořený osami hlavy pacienta s tí...

Page 228: ...te 3 0T Konstrukce upínadlo lebky MAYFIELD pro MR roentgen poskytuje chirurgovi větší volnost při umisťování fixačních spon Vzhledem k tomu že se otáčivé rameno kolébky otáčí o 360 je možno se vyhnout kritickým oblastem lebky což usnadňuje používání tohoto upínadla Dále se otáčivé rameno může otáčet o 360 pod plnou lebeční silou což usnadňuje nastavení konečné polohy uchycení spony do kontaktní po...

Page 229: ...dávaných úchytů se závity zajistěte stolní adaptér na místě Vyobrazení 2 Uchycování stolního adaptéru UPOZORNĚNÍ UPOZORNĚNÍ Zkontrolujte zda je adaptér řádně uchycen k operačnímu stolu POZNÁMKA V případě potřeby je možno použít stolní adaptér bez prodlužovacích ramen což umožňuje aby se upínadlo lebky umístilo níže na stole Viz vyobrazení 3 3 1 2 D ...

Page 230: ...y máte použít změřte hlavu pacien ta pomocí dodávaného třmenového kalibru GE 428A1066 tak jak je to ukázáno na vyobrazení 5 níže Pak položte kalibr ukazující šířku hlavy pacienta na měřicí šablonu dodávanou s touto příručkou Tato šablona vám ukáže zda máte použít rameno kolébky pro malého nebo velkého dospělého Viz vyobrazení 6 Vyobrazení 5 Měření hlavy pacienta Vyobrazení 6 Pokládání kalibru na š...

Page 231: ...k je to zobrazeno na vyobrazení 7 Konec pístu by měl být v pozici uvedené na vyobrazení Vyobrazení 7 Instalace pístu 2 Namontujte rameno kolébky k upínadlo v pravém úhlu tak jak je to zobrazeno na vyobrazení 8 Vyobrazení 8 Rameno kolébky namontované k upínadlu 3 Uchyťte rameno kolébky k upínadlo lebky dvěma otáčkami malým uzavíracím knoflíkem NEUTAHUJTE jej nadměrnou silou 1 J I M K L nebo nebo 1 ...

Page 232: ...mostatnou sponu v upínadlu viz vyobrazení 9 a 10 níže Pro upínadlo používejte pouze spony pro lebku značky MAYFIELD určené k jednorázovému použití POZNÁMKA Doporučuje se abyste vždy měli k dispozici sadu náhradních spon pro lebku Vyobrazení 9 Instalace spon pro lebku do ramena kolébky Vyobrazení 10 Instalace spony pro lebku do strany upínadla pro jednu sponu 1 1 1 ...

Page 233: ...e tak tak mezi ukončením spony a vnitřkem zástrčky pro sponu nebyl žádný prostor Vyobrazení 10a Správná instalace spony pro lebku Spony usaďte tak tak mezi ukončením spony a vnitřkem zástrčky pro sponu nebyl žádný prostor Kolébka pro dospělé Rameno kolébky pro děti ...

Page 234: ...spělé se doporučuje síla 267 N a pro děti se doporučuje síla 178 N Všechna nastavení síly závisí na rozhodnutí uživatele NIKDY nepřesahujte sílu 356 N Neutahujte nadměrnou silou 1 Uvolněte uzavírací knoflík aby se rameno kolébky mohlo volně otáčet o 360 Uzavírací knoflík se uvolní otočením proti směru hodinových ručiček o jednu 1 kompletní otáčku neboli o 360 2 Otočte rameno kolébky do požadované ...

Page 235: ...ádná fixace lebky vyžaduje výběr pístu a úchytné hřídele řádné délky viz vyobrazení 12 níže Úchytná hřídel by měla být téměř zarovnaná s exteriérem pláště se závitem Do úchytné násady by měly být našroubována odpovídající délka pístu dokud se kolík pro lebku nedotkne lebky Ovladač pístu je dodáván pro použití v případech obtížného přístup k pístu Vyobrazení 12 5 Spony pro lebku by měly být pevně u...

Page 236: ...o lebku zvyšte nastavení aplikátoru síly na požadovanou hodnotu zobrazenou na ukazateli a pak ji uvolněte o čtvrtinu otáčky Vyobrazení 14 POZNÁMKA Viditelné hodnoty na aplikátoru síly poskytují chirurgovi informace o aplikované síle upínání 1 2 T ...

Page 237: ...užívání síly větší než 356 N SE NEDOPORUČUJE 7 Před sejmutím aplikátoru síly by se měl posunout šroub pro dotahování prsty tak aby se dostal do kontaktu s hranou vnitřku upínadla Po dosažení tohoto kontaktu šroub nedotahujte Ap likátor je nyní možno sejmout Vyobrazení 16 Aplikátor síly Hodnoty síly upínání Šroub pro dotažení prsty Linky indikátoru krouticího momentu Síla upínání 1 2 3 4 89 N 178 N...

Page 238: ...lo sílu na sponu Vyobrazení 17 DŮLEŽITÉ UPOZORNĚNÍ Aplikátor síly je nutno sejmout před snímkováním v prostředí MR Ap likátor síly sejměte teprve když je šroub pro dotažení prsty nastaven Nasazení upínadla lebky 1 Umístěte rám upínadla lebky na pacienta podle tohoto vyobrazení Vyobrazení 18 4 0 2 0 1 2 12 U ...

Page 239: ...y pod hlavu pacienta Vyobrazení 19 3 Zajistěte rameno kolébky na místě dotažením uzavíracího knoflíku Rameno kolébky je nyní plně uzamčené a upínadlo lebky je bezpečně přichycené k pacientovi 4 Zajistěte aby mezi lebkou a ramenem byly aspoň 3 cm aby tam bylo možno umístit cívku MR Vyobrazení 20 3cm 3cm Coil Coil ...

Page 240: ...Jednotka stolního adaptéru by měla být pevně uchycená ke stolu a všechny poziční kno flíky by měly být v otevřené poloze 1 Umístěte jednotku křížové podpěry č 1 na upínadlo lebky aby bylo zarovnané s posuvným mechanismem č 2 Viz vyobrazení 22 2 Utáhněte mechanismus posuvného uzávěru č 2 otáčením po směru hodinových ručiček 3 Nastavte hlavu pacienta a upínadlo lebky to požadovaná a přiměřené pozice...

Page 241: ...echny nastavitelné knoflíky žluté musí být zkontrolovány a dotaženy Vyobrazení 23 POZNÁMKA Pokud potřebujete rameno prodloužit je možno uvolnit dva uzávěrné knoflíky č 8 otáčením proti směru hodinových ručiček což umožní otočení prodlužovacích ramen do vyšší polohy 1 2 ...

Page 242: ... ručiček UPOZORNĚNÍ UPOZORNĚNÍ Zajistěte aby po dokončení nastavení byly všechny klouby a uza vírací mechanismy zajištěné Pokud byste to neudělali mohlo by dojít k vážnému poranění pacienta POZNÁMKA Prodloužení adaptéru nemohou projít pod horizontální polohou aby se zabránilo po tenciální srážce se stolem během snímkování V případě potřeby je možno toto zablokování změnit otočením uzavíracího knof...

Page 243: ...navigačního ramena k upínadlu lebky a zajistěte ji desetihranným uzavíracím prstencem Vyobrazení 25 Uchycení navigačního zařízení 2 Znovu zkontrolujte zda je dostatečný prostor pro matrici MR V případě potřeby upravte pozici jednotky navigačního ramene Vyobrazení 26 1 2 4 3 S W ...

Page 244: ...zení ramena kolébky UPOZORNĚNÍ UPOZORNĚNÍ Zajistěte abyste vždy podporovali hlavu pacienta při uvolňování tohoto systému nebo jakéhokoli podobného zařízení Pokud byste to neprovedli mohlo by to způsobit vážné poranění pacienta 2 Otočte upínadlo lebky do nové pozice 3 Uzavřete uzavírací knoflík otáčením a dotažením po směru hodinových ručiček Vyobrazení 27 Nastavovací knoflíky Pohled ze strany Pohl...

Page 245: ...eberte součásti upínadla lebky a stolního adaptéru 5 Jemným štětcem namočeným do saponátu s neutrálním pH důkladně vytřete každou součástku abyste odstranili všechny stopy krve nebo nečistot které by mohly bránit při připojení nebo pohybu 6 Všechny součástky opláchněte abyste z nich odstranili všechny stopy saponátu 7 Měkkým hadříkem každou součástku opatrně vysušte Při vysoušení součástek zkontro...

Page 246: ...louvy o leasingu pronájmu nebo prodeji na splátky a které budou vyžadovat servisní opravu v průběhu trvání této smlouvy o přenechání výrobku budou opraveny v souladu s podmínkami dané smlouvy Pokud vada nastane v průběhu záruční lhůty nebo v rámci doby platnosti smlouvy o přenechání výrobku kupující musí komunikovat přímo s centrálou společnosti INTEGRA Pokud kupující uplatňuje podmínky této záruk...

Page 247: ...opravy Pro servis a opravy mimo Spojené státy kontaktuje místního pověřeného zástupce společnosti In tegra Ve Spojených státech pošlete všechny nástroje na servis nebo opravu na adresu Integra 4900 Charlemar Drive Building A Cincinnati Ohio 45227 Patent v USA 7 507 244 Vždy uveďte číslo nákupní objednávky a popište problém Nebo zatelefonujte na číslo 877 444 1114 USA only Integra a logo Integra js...

Reviews: