3
Put the Adapter in the Computer
NOTE: If your network adapter is already installed, skip to the appropriate
operating system section.
NOTE: Some adapters are designed to be plugged in to the CNR slot on the
motherboard, rather than a PCI slot. This will be apparent when you install
the adapter.
NOTE: If you are replacing an existing adapter with a new adapter in
Windows* 95 or Windows 98, see the section Removing an Existing Adapter
in Windows 95 and Windows 98 later in this guide. For replacing an adapter
in Windows NT* or Windows 2000*, see the sections Removing an Existing
Adapter in Windows NT or Removing an Existing Adapter in Windows 2000
later in this guide.
1
Shut down Windows (if it’s running) by clicking the Start button, and then
clicking Shut Down.
2
Turn off the computer and unplug the power cord. Then, remove its cover.
WARNING: Turn off and unplug power to the computer before removing its
cover. Failure to do so could shock you and may damage the adapter or com-
puter.
3
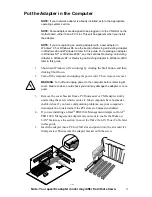
Remove the cover bracket from a PCI busmaster or CNR adapter slot by
unscrewing the screw which secures it. Most computers have busmaster-
enabled slots. If you have configuration problems, see your computer’s
documentation to determine if the PCI slots are busmaster-enabled.
4
If you are installing an Intel
PRO/100+ Management Adapter or Intel
PRO/100 S Management Adapter and you want to enable the Wake on
LAN* feature, see the section Connect the Wake On LAN Power Cable later
in this guide.
5
Insert the adapter into a PCI or CNR slot and push it into the slot until it’s
firmly seated. Then secure the adapter bracket with the screw.
PC-3919
Note: Your specific adapter model may differ from that shown.


