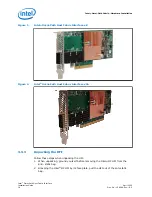
Handle the HFI only by its edges or the face plate. Do not allow the HFI or any of
its components to touch any metal parts.
3. After checking for visual damage, store the HFI in its anti-static bag until you are
ready to install.
Hardware Installation
This section contains hardware installation instructions for the HFI. When possible on a
multi-socket server, Intel recommends that you install the HFI on the first socket. This
eliminates unnecessary inter-socket communication for many applications and
workloads that schedule tasks using cores on the first CPU socket by default.
Hardware Installation for HFI with PCI Express Riser
Most installations will be in 1U and 2U chassis, which requires using a PCIe right angle
riser card. This results in an installation of the HFI that is parallel to the motherboard.
A taller riser card can be used if necessary. The HFI can connect to any of the
standard compatible PCI Express riser cards.
Installation Steps
NOTE
Change the server BIOS PCIe setting to AUTO. The Intel
®
OP HFI card will train itself
to PCIe GEN 3. For details on changing server BIOS, refer your server vendor
documentation.
To install the Intel
®
OP HFI with a PCIe riser card:
1. Shut down the power supply to the system into which you will install the Intel
®
OP
HFI.
2. Take precautions to avoid electrostatic damage (ESD) to the cards by properly
grounding yourself or touching the metal chassis to discharge static electricity
before handling the cards.
3. Remove the cover screws and cover plate to expose the system's motherboard.
For specific instructions on how to do this, follow the hardware documentation that
came with your system.
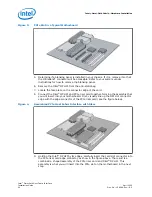
4. Locate the PCIe slot on your motherboard. Note that the PCIe slot has two
separate sections, with the smaller slot opening located towards the front (see the
figure below). These two sections correspond to the shorter and longer connector
edges of the HFI and riser.
3.4
3.4.1
3.4.1.1
Hardware Installation—Intel
®
Omni-Path Fabric
Intel
®
Omni-Path Host Fabric Interface
April 2020
Installation Guide
Doc. No.: H76466, Rev.: 8.0
19


