Hardware Installations and Upgrades
Intel® Entry Server Chassis SC5299-E UP/DP/WS/BRP User Guide
55
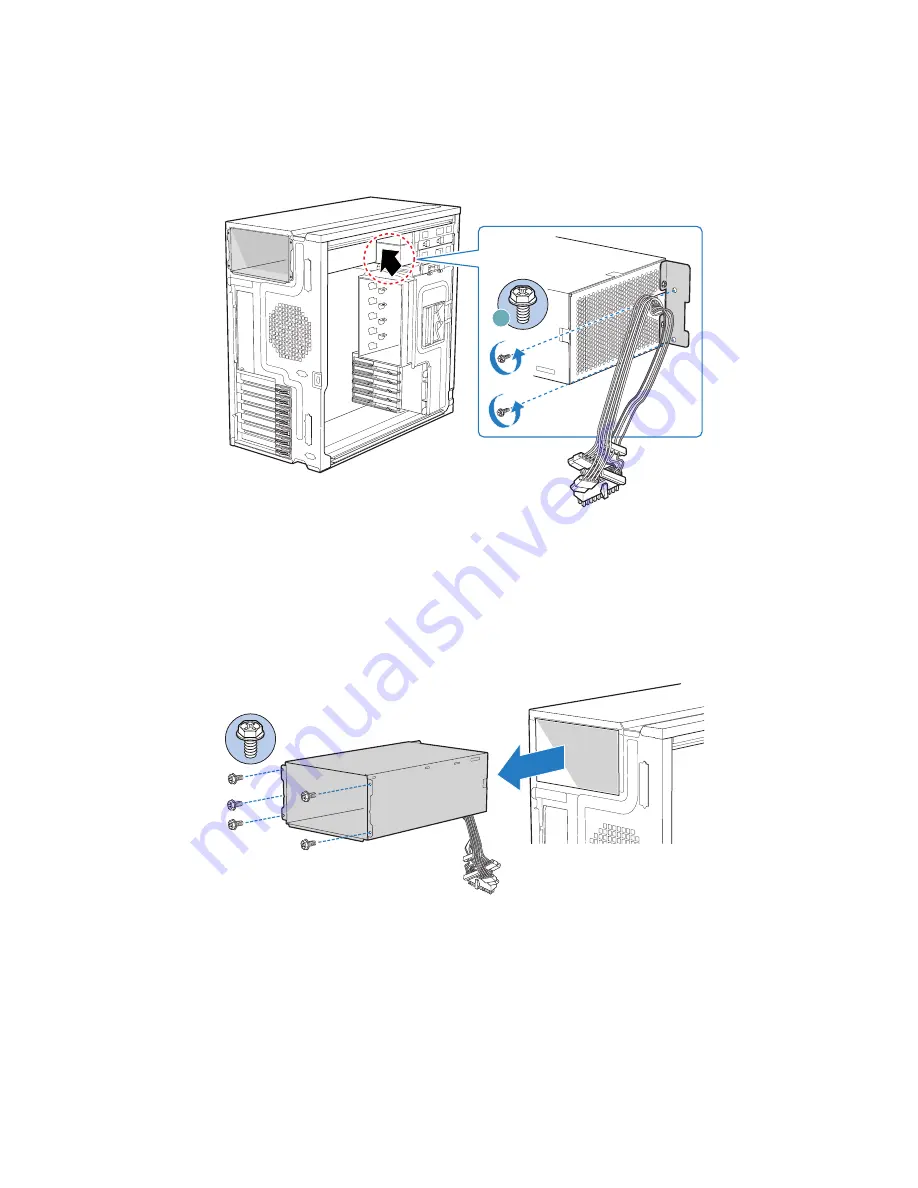
7. Remove two internal screws (see letter “A” in the following figure) securing hot swap
power supply cage to chassis.
Figure 69. Detaching Hot Swap Power Supply Cage from Inside of Chassis
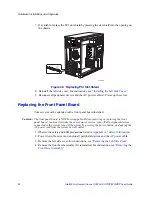
8. Remove five external screws securing back of power supply cage to chassis. Slide the
power supply cage out of the chassis.
Note:
You may have to work the power cables through slot sopenings with your free hand as you
remove the power supply cage from the chassis.
Figure 70. Detaching Hot Swap Power Supply Cage from Rear of Chassis
TP01761
A
TP01762
Summary of Contents for S3210SHLC - Entry Server Board Motherboard
Page 8: ...Preface viii Intel Entry Server Chassis SC5299 E UP DP WS BRP User Guide...
Page 16: ...xvi Intel Entry Server Chassis SC5299 E UP DP WS BRP User Guide...
Page 18: ...xviii Intel Entry Server Chassis SC5299 E UP DP WS BRP User Guide...
Page 30: ...Server Chassis Features 12 Intel Entry Server Chassis SC5299 E UP DP WS BRP User Guide...
Page 114: ...Technical Reference 96 Intel Entry Server Chassis SC5299 E UP DP WS BRP User Guide...
Page 139: ...Safety Information Intel Entry Server Chassis SC5299 E UP DP WS BRP User Guide 121 ITE ITE 5V...
Page 140: ...Safety Information 122 Intel Entry Server Chassis SC5299 E UP DP WS BRP User Guide...
Page 142: ...Safety Information 124 Intel Entry Server Chassis SC5299 E UP DP WS BRP User Guide...
Page 158: ...Getting Help 140 Intel Entry Server Chassis SC5299 E UP DP WS BRP User Guide...
Page 166: ...Warranty 148 Intel Entry Server Chassis SC5299 E UP DP WS BRP User Guide...


