Hot Swap Drive Cage Upgrade Install Instructions (optional)
Intel® Entry Server Chassis SC5299-E UP/DP/WS/BRP User Guide
75
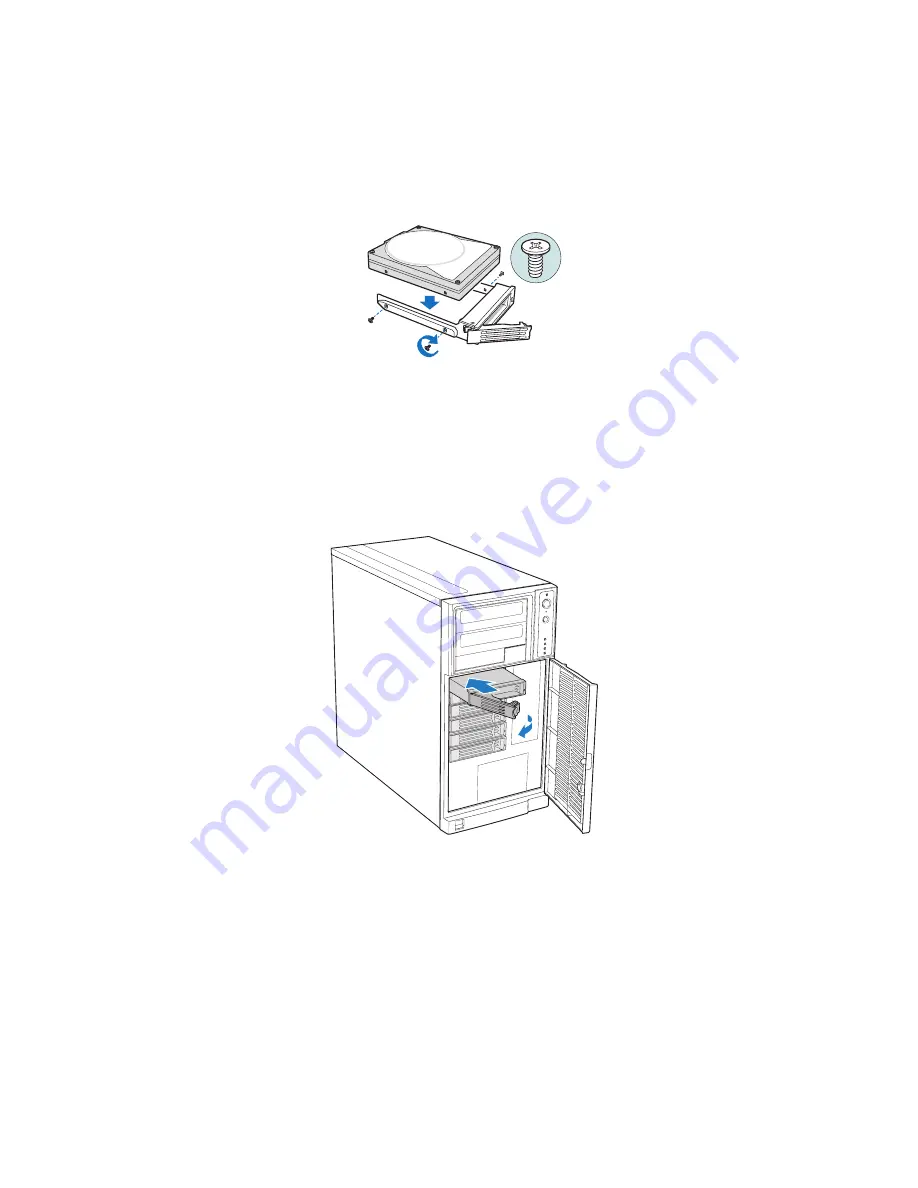
7. Align the holes in the drive to the holes in the drive carrier and attach the drive to the
carrier with the screws that were formerly attached to the plastic retention device.
Figure 93. Installing Hard Drive into Drive Carrier
8. With the black lever in the fully open position, insert the drive carrier into the hot
swap drive cage. The green latch at the front of the drive carrier must be to the left of
the drive cage. Do not push on the black drive carrier lever until the lever begins to
close by itself. Once the black drive carrier lever begins to close by itself, push on it to
lock the drive carrier into place.
Figure 94. Re-installing Drive Carrier in Hot Swap Drive Cage
TP00929
AF000313
Summary of Contents for S3210SHLC - Entry Server Board Motherboard
Page 8: ...Preface viii Intel Entry Server Chassis SC5299 E UP DP WS BRP User Guide...
Page 16: ...xvi Intel Entry Server Chassis SC5299 E UP DP WS BRP User Guide...
Page 18: ...xviii Intel Entry Server Chassis SC5299 E UP DP WS BRP User Guide...
Page 30: ...Server Chassis Features 12 Intel Entry Server Chassis SC5299 E UP DP WS BRP User Guide...
Page 114: ...Technical Reference 96 Intel Entry Server Chassis SC5299 E UP DP WS BRP User Guide...
Page 139: ...Safety Information Intel Entry Server Chassis SC5299 E UP DP WS BRP User Guide 121 ITE ITE 5V...
Page 140: ...Safety Information 122 Intel Entry Server Chassis SC5299 E UP DP WS BRP User Guide...
Page 142: ...Safety Information 124 Intel Entry Server Chassis SC5299 E UP DP WS BRP User Guide...
Page 158: ...Getting Help 140 Intel Entry Server Chassis SC5299 E UP DP WS BRP User Guide...
Page 166: ...Warranty 148 Intel Entry Server Chassis SC5299 E UP DP WS BRP User Guide...


