Local Control Panel Kit Installation Instructions
Local Control Panel Kit Install Guide
19
Installation Instructions for Intel® Entry Server Chassis
SC5299-E
Note: This section only applies to Local Control Panel kit installations for the Intel® Entry
Server Chassis SC5299-E. If you are installing a Local Control Panel kit into an Intel®
Server Chassis SC5300/SC5400, follow the instructions in
“Installation Instructions for
Intel® Server Chassis SC5300/SC5400” on page 2
. If you are installing a Local Control
Panel kit into an Intel® Entry Server Board SC5275-E, follow the instructions in
“Installation Instructions for Intel® Entry Server Chassis SC5275-E” on page 12
.
Remove Access Cover
When your chassis is upright (in a tower/pedestal position), and you are facing the front of
it, the access cover is on the left side.
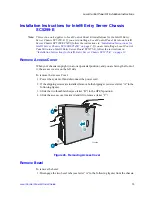
To remove the Access Cover:
1. Power the system off and disconnect the power cord.
2. If the shipping screws are installed, remove both shipping screws (see letter “A” in the
following figure).
3. Slide the two thumb latches (see letter “B”) to the OPEN position.
4. Slide the access cover rearward and lift to remove (letter “C”).
Figure 26. Removing Access Cover
Remove Bezel
To remove the bezel:
1. Disengage the two bezel tabs (see letter “A” in the following figure) from the chassis.
TP00559
B
C
A
A

