Hardware Installations and Upgrades
Intel® Entry Server Chassis SC5299-E DP/WS/BRP User Guide
29
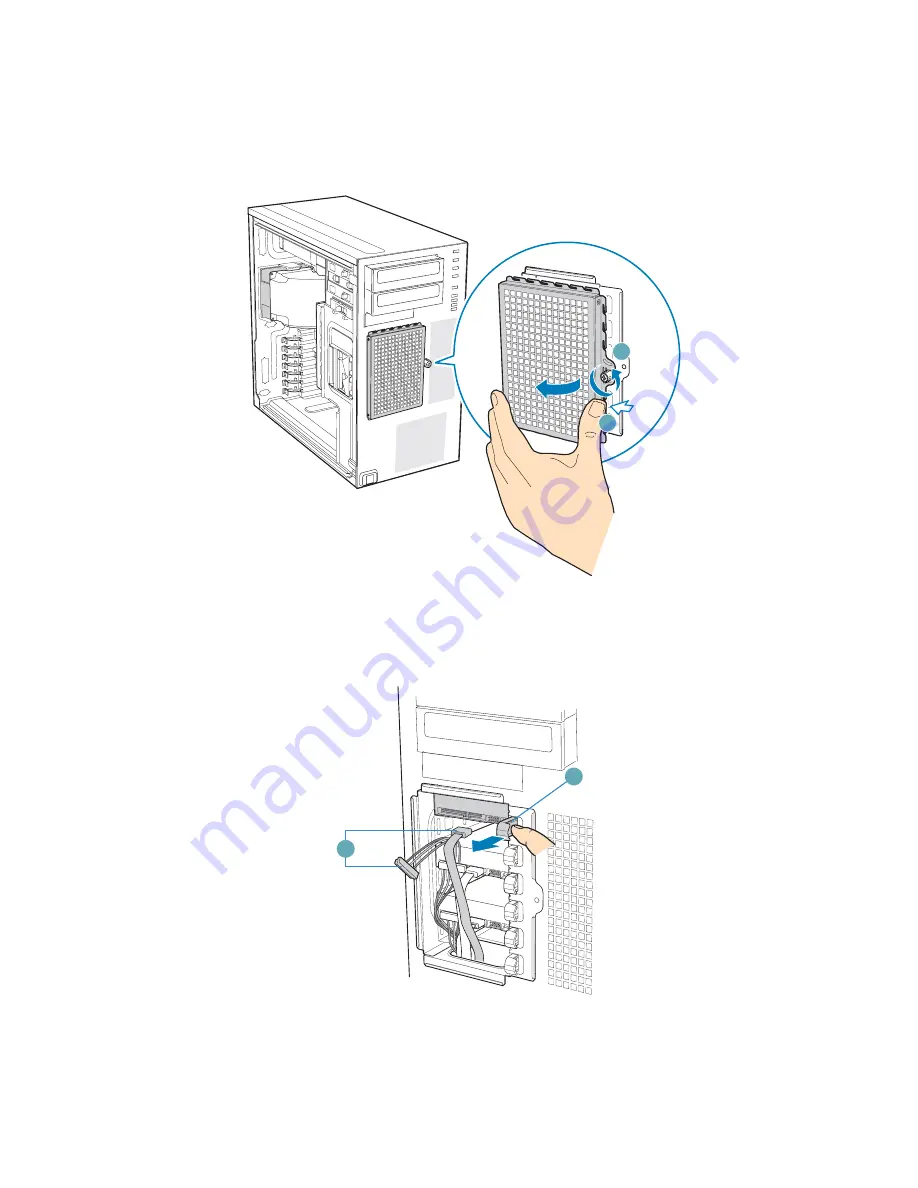
5. Loosen thumb screw (see letter “A” in the following figure). Apply slight pressure to
right side of drive bay access door and swing door outward (see letter “B”).
6. Disconnect the data and power cables from the hard drive to be removed (see letter
“A” in the following figure). Pull the drive latch forward (see letter “B”) to unlatch
the drive locking mechanism for the hard drive you want to remove.
Figure 32. Preparing Fixed Hard Drive for Removal
TP01869
A
B
AF000430
A
B
Summary of Contents for SC5299-E BRP
Page 8: ...Preface viii Intel Entry Server Chassis SC5299 E DP WS BRP User Guide...
Page 16: ...xvi Intel Entry Server Chassis SC5299 E DP WS BRP User Guide...
Page 18: ...xviii Intel Entry Server Chassis SC5299 E DP WS BRP User Guide...
Page 108: ...Technical Reference 90 Intel Entry Server Chassis SC5299 E DP WS BRP User Guide...
Page 133: ...Safety Information Intel Entry Server Chassis SC5299 E DP WS BRP User Guide 115 ITE ITE 5V...
Page 134: ...Safety Information 116 Intel Entry Server Chassis SC5299 E DP WS BRP User Guide...
Page 136: ...Safety Information 118 Intel Entry Server Chassis SC5299 E DP WS BRP User Guide...
Page 152: ...Getting Help 134 Intel Entry Server Chassis SC5299 E DP WS BRP User Guide...
Page 160: ...Warranty 142 Intel Entry Server Chassis SC5299 E DP WS BRP User Guide...


