Intel® Server System SR2500AL User’s Guide
39
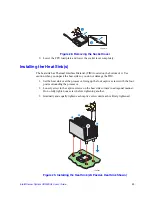
Figure 28. Removing the Socket Cover
9. Lower the CPU load plate and lower the socket lever completely.
Installing the Heat Sink(s)
The heat sink has Thermal Interface Material (TIM) located on the bottom of it. Use
caution when you unpack the heat sink so you do not damage the TIM.
1. Set the heat sink over the processor, lining up the four captive screws with the four
posts surrounding the processor.
2. Loosely screw in the captive screws on the heat sink corners in a diagonal manner.
Do no fully tighten one screw before tightening another.
3. Gradually and equally tighten each captive screw until each is firmly tightened.
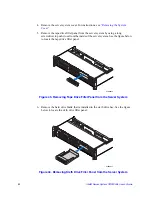
Figure 29. Installing the Heat Sink (2U Passive Heat Sink Shown)
TP02076
A
B
TP02077
2
3
1
4
Summary of Contents for SERVER SYSTEM SR2500AL
Page 6: ...vi Intel Server System SR2500AL User s Guide ...
Page 10: ...x Intel Server System SR2500AL User s Guide ...
Page 20: ...xx Intel Server System SR2500AL User s Guide ...
Page 22: ...xxii Intel Server System SR2500AL User s Guide ...
Page 46: ...24 Intel Server System SR2500AL User s Guide ...
Page 144: ...122 Intel Server System SR2500AL User s Guide ...
Page 158: ...136 Intel Server System SR2500AL User s Guide ...
Page 174: ...152 Intel Server System SR2500AL User s Guide ...
Page 186: ...164 Intel Server System SR2500AL User s Guide ...
Page 210: ...188 Intel Server System SR2500AL User s Guide ...


