background image

13

30 

min

After placing
the battery the sensor
stays in stabilization 
and the LED stays 
blinking. Note: do not 
register the
sensor on switch in this 
period, wait 50 sec so 
that the sensor enter 
mode continuous.

In this mode any 
detection o LED 
lights up and 
generates firing.

No


detects

mode

Stabili-

zation

50 

sec

Continuous

mode

Time the sensor remains on.

Economical mode

min

In this mode the 
sensor detects the first 
movement and gene-
rates a trigger, howe-
ver it goes into hiber-
nation and detects 
again after two minu-
tes without movement 
in the place, in the 
hibernation period the 
LED does not light.

In this 2 min 
period, if there is 
movement in 
place, the sensor 
waits for the last 
movement to 
start counting 
down the two 
minutes.

After 2 minutes of 
the last movement 
of the site, the 
sensor detects and 
generates a trip at 
the control panel.

With jumper JP2 open, the sensor will work in CONT (intelligent continuous) mode, operating as follows: After power-up, 
the sensor will work continuously for 30 minutes so that the installer can make all the adjustments to the sensor.
After this time the sensor goes into smart continuous mode.

Smart continuous mode operation

The sensor can transmit up to 3 consecutive shots, after the last shot, the sensor goes into HIBERNATION mode (low 
consumption mode without transmission to the alarm center) for 2 (two) minutes. The sensor will only detect and transmit 
a trigger again if there is 2 (two) minutes without movement in the environment. After the 2 (two) minutes the sensor will 
be able to transmit up to 3 consecutive shots within an interval of 135 seconds if there are movements. Right after the 3 
shots or an interval of 135 seconds, the sensor will enter the SLEEP period, that is, it needs to stay again for two minutes 
without movement to be able to detect and transmit a shot. During this period of hibernation the sensor will not transmit 
to the control panel, but the LED will light indicating that the sensor is detecting normally.
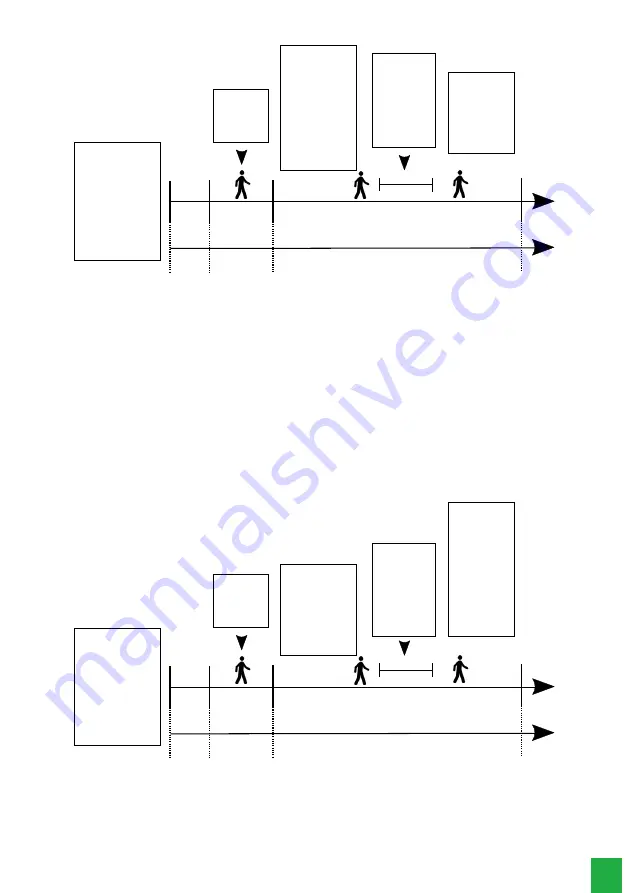
For a better understanding of the smart continuous mode, check the timeline below:

30 

min

After placing
the battery the sensor
stays in stabilization 
and the LED stays 
blinking. Note: do not 
register the
sensor on switch in this 
period, wait 50 sec so 
that the sensor enter 
mode continuous.

In this mode any 
detection o LED 
lights up and 
generates firing.

No


detects

mode

Stabili-

zation

50 

sec

Continuous

mode

Time the sensor remains on.

Smart continuous mode

min

In this mode the 
sensor can shoot and
to transmit up to 3 
times in a break
maximum of 135 
seconds before to 
enter the way of
hibernation.

In this period of 
2 min, if there is 
movement in the 
place, the sensor 
waits for the last 
movement to 
start counting 
the two minutes.

In the period of
hibernation only
the LED lights up
indicating that the
sensor is detecting
normally.
in this mode the 
sensor needs go 2 
minutes without
detect motion to 
return to shoot and
transmit to alarm 
central.

8.3.  IVP 4101 PET smart sensor supervision adjustment

The OOK/FSK jumper (JP3) is used to select the modulation. With jumper JP3 open the sensor is in supervised mode (FSK). 
With jumper JP3 closed the selected mode is unsupervised (OOK). The type of supervision to be used will depend on the 
receiver’s compatibility with the Control Panel.
Factory standard: unsupervised

Summary of Contents for IVP 4101 PET

Page 1: ...User manual IVP 4101 PET smart...

Page 2: ...e sensor has an integrated Temperature Sensor to offer the same detection sensitivity in different environments from 10 C to 50 C reducing the risk of false triggers DIGITAL technology SMD mounting In...

Page 3: ...reens or any object that blocks the scan Wireless communication technology when exposed to environments with high power radiation can suffer interference and have its performance impaired Example loca...

Page 4: ...done according to item 5 Configuring the sensor IVP 4101 PET smart for cards in version 4410350 5 and firmware 3 0 0 and item 8 Configuring the sensor IVP 4101 PET smart for cards version 4410350 4 a...

Page 5: ...nsor 9 5 2 Setting the operating mode of the smart IVP 4101 PET sensor 9 5 3 IVP 4101 PET smart sensor supervision adjustment 10 6 Low battery sensor 11 7 Test 12 8 Configuring the IVP 4101 PET smart...

Page 6: ...OK Anti jamming Immunity against interference from malicious signals 2 Characteristics Digital micro processed detection technology 2 levels of sensitivity 2 modes of operation CONT Continuous Intelli...

Page 7: ...d Pet Installation height h Less than or equal to 4 m Without the presence of a pet 1 8 to 2 m With the presence of a pet Greater than 4 m up to 12 m With the presence of a pet 2 1 to 2 2 m Without t...

Page 8: ...Oblongo Step 3 if the installation is done in the corner of the wall Use the holes indicated on the back cover Fixing location of the screws for installation in the wall corner Important the IVP 4101...

Page 9: ...is monitoring the environment until detecting 3 more events Note this mode of operation causes a greater consumption of battery power especially where there is a large number of people Trial period 15...

Page 10: ...tect and generate triggers in the central starting the cycle again Per odo de teste 15 min Per odo de estabiliza o Tempo em que o sensor permanece ligado Modo Cont nuo inteligente 2 min Ap s colocar a...

Page 11: ...ired adjustments follow the steps below Open the IVP 4001 PET smart Set the jumpers to the desired settings Take a trigger to effect changes to the sensor configuration Note do not register the sensor...

Page 12: ...d the sensor provides minimum sensitivity Factory default closed 8 2 Setting the operating mode of the smart IVP 4101 PET sensor Via the ECO CONT jumper JP2 select between intelligent continuous mode...

Page 13: ...3 consecutive shots within an interval of 135 seconds if there are movements Right after the 3 shots or an interval of 135 seconds the sensor will enter the SLEEP period that is it needs to stay again...

Page 14: ...ed to protection against harmful interference even from stations of the same type and may not cause interference to systems operating on a primary basis This is a product approved by Anatel the approv...

Page 15: ...arties foreign to the manufacturer b if the damage to the product arises from accidents disasters agents of nature lightning floods landslides etc humidity voltage in the electrical network excess vol...

Page 16: ...Support via e mail suporte intelbras com br Customer Service 0800 7042767 Where to buy Who installs it 0800 7245115 Produced by Intelbras S A Ind stria de Telecomunica o Eletr nica Brasileira Rodovia...

Reviews: