background image

5.1 Troubleshooting the 1TouchIQ2

9

Troubleshooting

1) Be Sure You Are Using Fresh Brand Name Batteries!!


The 1TouchIQ2’s internal circuitry and scanner requires a good source 
of power which is provided by the 4 AA batteries. Even when the audible 
low battery alarm is not enabled, occasionally the 1TouchIQ2 may not 
perform well due to insufficient power.  Since the internal power meter 
cannot always accurately determine the power level of the batteries, it is 
advised that the batteries are replaced with fresh, name brand batteries 
anytime a decrease in lock performance is noticed!

2) If the scanner is not reading certain fingerprints well:

- Try re-enrolling the user’s fingerprint.  Certain characteristics of a 
fingerprint may change over time requiring re-enrollment.

- When you are enrolling your fingerprint templates please remember to 
do the following:

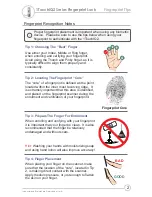
* Make sure you are putting the “Core” of your fingerprint on the 
scanner. (Refer to page 2 for more information)

* When enrolling multiple templates, try to slightly change the way you 
rest your finger on the scanner with each scan.  This will help the 
scanner detect slight variations in the way to place your finger on the 
scanner.

* Simply 

Place 

your finger on the scanner, do not 

Press Down

 too 

hard!  Pressing too strongly will cause the ridge patterns to flatten out, 
making it more difficult for the scanner to match the fingerprint!

* If it's cold outside, blow on your hands and rub them together. This 
will warm up your fingers causing the ridge patterns of your 
fingerprints to stand out more.

3) If the scanner lights up solid blue, but never accepts or rejects 

any fingerprint, and simply turns off after 10-20 seconds:

Please perform a Factory Default of the lock. (see page 10)

For more troubleshooting information visit:


http://video.fingerprintdoorlocks.com

1TouchIQ2 Series Fingerprint Lock

Intelligent Biometric Controls, Inc.

Summary of Contents for 1TouchIQ2 Series

Page 1: ...cking Door with a Pass Code 6 Unlocking Door from the Inside 6 Locking the Door 6 Enabling Disabling Passage Mode 6 5 Deleting Users 7 Deleting a Fingerprint User with a User ID 7 Deleting ALL Fingerp...

Page 2: ...on the lock Fingerprint pin or key access methods All weather operating temp 29 to 140 F Sliding weather cover triggers sensor to power on automatically Fingerprints will not be lost if batteries fail...

Page 3: ...your fingerprint it is important that your finger be clean It is also recommended that the finger be relatively undamaged and without scars Washing your hands with moisturizing soap and using hand lot...

Page 4: ...or example you have 2 temporary workers named Mary Adam You make Mary user 101 scan her index finger The lock will scan the fingerprint twice per template If you want to enroll another finger for Mary...

Page 5: ...ghts up for the second time You will hear a single beep if the enrollment is successful REPEAT You can keep adding fingerprints one after another at this stage HINT If a scan fails you will hear 3 bee...

Page 6: ...user or any other users please repeat the process stated above A fingerprint ID can NOT be the same as a pass code ID PRESS 1 Master Code 3 Digit ID New 8 Digit Pass Code Repeat New 8 Digit Pass Code...

Page 7: ...ides free egress It is impossible to prevent someone from exiting the building After you exit through the door or the door shuts behind you the 1TouchIQ2 automatically locks the latch HINT When enable...

Page 8: ...TE When successful the lock will make a solid single beep If unsuccessful it makes 3 quick beeps PRESS 2 Master Code Users 3 Digit ID Users 3 Digit ID Again NOTE When successful the lock will make a s...

Page 9: ...ime users get brand name new batteries like Energizer or Duracell 5 How often should I change the batteries If in a conventional home setting you will be able to get several thousand uses out of a set...

Page 10: ...o do the following Make sure you are putting the Core of your fingerprint on the scanner Refer to page 2 for more information When enrolling multiple templates try to slightly change the way you rest...

Page 11: ...ront lock body off the door NEXT Remove the back lock body off the door NEXT Reconnect the front back lock bodies by reconnecting the power cable NEXT Find the Reset button on the back of the front lo...

Page 12: ...hole and also through the hole in the Back Body above and right of the top screw in figure 4 Power pack runs on 4 AA batteries a 9V battery The Power cable adapter connects to the Black Battery pack o...

Page 13: ...Once magnetically attached simply pull the tool away from the lock and the Key Hole Cover should separate and remain attached to the tool For all technical issues please contact Video Help Files http...

Reviews: