background image

23


Model 523578:

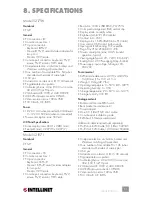
SPECIFICATIONS

• Rear bracket and extension kit 

• Power adapter 

• 6 ft. (1.8 m) PS/2 3-in-1 cable 

• 6 ft. (1.8 m) USB 3-in-1 cable 

• Console quick installation guide 

• KVM Switch Module user manual 

Additional cables required (sold separately): 

• PS/2 3-in-1 KVM Cable, 6 ft. (1.8 m): 502535 

• PS/2 3-in-1 KVM Cable, 10 ft. (3.0 m): 503303 

• USB 3-in-1 KVM Cable, 6 ft. (1.8 m): 502242 

• USB 3-in-1 KVM Cable, 10 ft. (3.0 m): 503327

Standards

• PS/2 

• USB 

• Compatible with Windows, MAC and Unix


General

• PC connections: 8 

• Console connections: 1 

• PC port connectors: keyboard, mouse, monitor:  

    HD15 x 8 

• Console port connectors: 

   -  Keyboard: PS/2 

   -  Mouse: PS/2 

   -  Monitor: HD15 female 

• Computer selection: via buttons, hotkeys and 

    Windows switching software client 

• Max. number of cascadable PCs: 64 (when  

    cascaded with models of same type) 

• OSD: yes 

• Automatic scan interval: 3, 8, 15, 30 seconds 

• Programmable scan pattern 

• Cable length max.: 30 m (100 ft.) at console;  

    15 m (50 ft.) at PC ports for PS/2; 5 m (16 ft.)  

    at PC ports for USB 

• VGA bandwidth: 1920 x 1440, DDC2B 

• LCD KVM drawer connector: CEN36 

• Video resolution: max. 1024 x 768 

• FCC Class B, CE, RoHS 


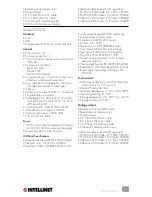
Power

• 12  V DC, 3 A (when connected to LCD drawer);  

    9 – 12 V DC, 500 mA (when not connected) 

• Power consumption: max. 500 mA 


LCD Panel Specifications

• Active display area: 376.32 x 301.056 (mm) 

• Pixel pitch (mm): 0.294 (H) x 0.294 (V) 

• Resolution: 1280 x 1024 @ 60/70/75 Hz 

• Color pixel arrangement: RGB vertical strip 

• Display mode: normally white 

• Brightness (cd/m^2): 250 (center) 

• Contrast ratio: 500:1 

• Display colors: 16.7M (RGB 8-bits data) 

• User control: OSD control (auto-saving) 

• Input signal: RGB analog, H/V separate 

• Plug-n-Play VESA: VESA DDC 1/2B 

• Power consumption (max): 40 W (normal    

    operation/typical) 

• Viewing angle (typical): -85 – 85(H); -85 – 85(V) 

• Backlight unit: 4 CCFLs edge-light (top/bottom) 

• Power supply input voltage: full range, 100 –  

    240 V AC 


Environmental

• KVM module dimensions: 40 (H) x 404 (W) x  

    114 (D) mm (1.6 x 15.9 x 4.5 in.) 

• Weight: 21.0 kg (46.3 lbs.) 

• Operating temperature: 0 – 50°C (32 – 122°F) 

• Operating humidity: 8 – 95% 

• Storage temperature: -20 – 60°C (-4 – 140°F) 

• Storage humidity: 95% RH 


Package contents

• Rackmount Console KVM Switch  

• Rear bracket and extension kit 

• Power adapter 

• 6 ft. (1.8 m) PS/2 3-in-1 cable 

• 6 ft. (1.8 m) USB 3-in-1 cable 

• Console quick installation guide 

• KVM Switch Module user manual 


Additional cables required (sold separately) 

• PS/2 3-in-1 KVM Cable, 6 ft. (1.8 m): 502535 

• PS/2 3-in-1 KVM Cable, 10 ft. (3.0 m): 503303 

• USB 3-in-1 KVM Cable, 6 ft. (1.8 m): 502242 

• USB 3-in-1 KVM Cable, 10 ft. (3.0 m): 503327

Summary of Contents for 521796

Page 1: ...RACKMOUNT CONSOLE KVM SWITCH USER MANUAL MODELS 521796 521871 523561 523578 INT 521796 521871 523561 523578 UM 0307 01 ...

Page 2: ...3 Operation 9 Push Buttons 9 On Screen Display OSD Operation 10 Hotkey Commands 13 4 Cascade Configuration 14 Connection 14 Changing the Configuration while Running 15 5 Multi Access Model 16 Connection 16 Operation 16 6 Sun Mac Keyboard Mapping 17 7 Troubleshooting 18 8 Specifications 21 2 CONTENTS section page ...

Page 3: ...modules come with a universal CEN36 connector for connection between the console drawer and a KVM switch module This modularized design offers maximum flexibility as you can choose and swap the modules to fit your needs A KVM switch module can also be used as an independent KVM switch This user manual shows you how to set up and operate the KVM switch For instructions on assembling and positioning t...

Page 4: ...t of consoles up to 100 ft away it s the ultimate tool for server management The variety of models of KVM switch modules available including the four INTELLINET NETWORK SOLUTIONS models addressed in this user manual present different computer interface options which are listed below and shown in the images that follow Standard models feature three connectors for PS 2 keyboard PS 2 mouse and monito...

Page 5: ...5 INTRODUCTION ...
Page 6: ...uration Single KVM Switch Module Configuration Combined with a console the KVM switch module can be connected to multiple computers with keyboard mouse and monitor cables as shown at right KVM Switch Module in Cascade Master Slave Configuration You can connect a second level of one or more KVM switches modules to a master unit Cascade configuration expands system ability allowing you to select comput...

Page 7: ...cluded with the switch to the computer mouse port then use PS 2 cables to connect the mouse to the KVM switch module Connect the computer s monitor cable to the HD DB 15 VGA connector NOTE This function is only available for PC 7 and PC 8 marked with two mice Hybrid PS 2 USB Models With a hybrid you can connect to a computer using either a PS 2 or USB port To a USB computer Use a USB A B cable to ...

Page 8: ...ou need is one PS 2 male to male cable connecting the KVM switch module and your laptop as shown below the Y adapter is not necessary However as some laptop computers do not follow the industry standard check your laptop s user manual for details Slim Models Models 521796 523561 and 523578 Use only the cables shown at right Connection from a slim KVM module to a PS 2 computer or a USB computer is ...

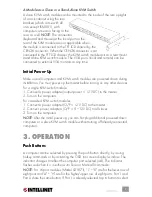
Page 9: ...ing on any other devices For a single KVM switch module 1 Connect a power adapter output power 12 V DC to the master 2 Turn on the computers For cascaded KVM switch modules 1 Connect a power adapter O P 12 V DC to the master 2 Connect power adapters O P 9 12V DC to all slaves 3 Turn on the computers NOTE After the initial power up you can hot plug additional powered down computers or a slave KVM s...

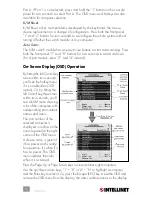
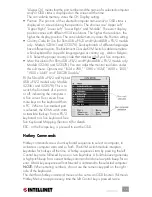
Page 10: ...splay OSD Operation By hitting the left Control key twice within two seconds you ll see the hotkey menu if it is enabled an OSD option Or by hitting the left Control key three times within two seconds you ll see a KVM menu showing a list of the computers with corresponding port numbers names and status The port number of the selected computer is displayed in red as on the console panel at the righ...

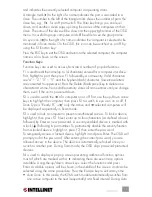
Page 11: ...it is powered down F2 is used to switch the N of a computer on or off First use the up down arrow keys to highlight the computer then press F2 to switch its eye icon on or off If Scan Type is Ready PC N only the active and N selected computers will be displayed sequentially in Scan mode F3 is used to lock a computer to prevent unauthorized access To lock a device highlight it then press F3 Next en...

Page 12: ...a particular computer s audio signal while operating other computers The non volatile memory stores the Audio Stick setting Scan Type This presents three further options Ready PC N lets you scan through active and N selected computers in Scan mode Ready PC lets you scan through active computers in Scan mode N Only lets you scan in Scan mode through any N selected computer regardless of computer po...

Page 13: ...ub menu Options are 1024 x 768 1280 x 1024 1600 x 1200 1920 x 1440 and DDC2B Disable F5 for Slim USB PS 2 and Hybrid USB PS 2 models only Models 523561 and 523578 This is to switch the Sun mark of a port on or off indicating the computer is a Sun server Sun servers have more keys on the keyboard than a PC When a Sun marked port is selected the KVM switch starts to translate the keys from a PS 2 ke...

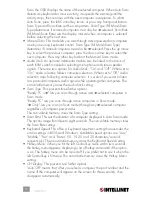
Page 14: ...an Manual Scan left Control Control F2 enables you to manually switch between active computers Press the up down arrows to select the previous or the next computer in sequence press any other key to abort Manual Scan To adjust Scan Rate left Control Control F3 set the duration before switching to the next computer in Auto Scan The KVM switch module sounds one to four beeps to indicate the scan int...

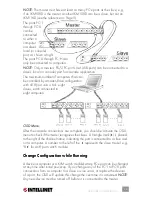
Page 15: ...h connected to eight computers OSD Menu After the cascade connections are complete you should re activate the OSD menu to check if the master recognizes the slaves A triangle mark 4 is placed to the right of the channel name indicating the port is connected to a slave and not a computer A number to the left of the 4 represents the slave model e g 84 for an 8 port switch module Change Configuration ...

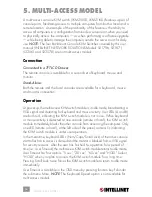
Page 16: ...adcasting a VGA signal and detecting for keyboard and mouse activity User LEDs A and B are both red indicating the KVM switch module is not in use When keyboard or mouse activity is detected at one console remote or local the KVM switch module immediately blocks the other console from accessing the computer Only one LED remote or local at the left side of the panel remains lit indicating the KVM s...

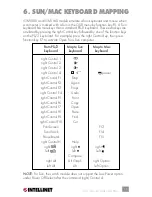
Page 17: ...switch module does not support the Low Power option under Power Off Select after the command right Control 4 17 SUN MAC KEYBOARD MAPPING From PS 2 Map to Sun Map to Mac keyboard keyboard keyboard right Control 1 right Control 2 right Control 3 right Control 4 power right Control F1 Stop right Control F2 Again right Control F3 Props right Control F4 Undo right Control F5 Front right Control F6 Copy...

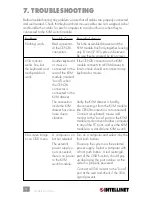
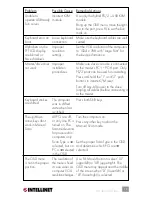
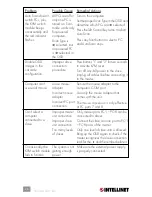
Page 18: ... KVM module the CEN36 connector is not connected Connect a keyboard mouse and monitor to the Local port on the KVM module and connect another computer to any of the PC ports and use the KVM module as a stand alone KVM switch Turn on a computer and select it by the front push buttons Power up the system via the external power supply Select a computer with a front push button A red rectangle part of...

Page 19: ...ss and hold the 1 and 2 push buttons to initiate K M reset Turn off any all power to the slave unplug all cables before connecting it to the master Press both Shift keys Turn the computers on Press any other key to abort the Manual Scan mode Set the proper Scan Type in the OSD and determine which PCs are N selected Use F4 More Position to select UL upper left or UR upper right The OSD menu may app...

Page 20: ...mouse adapter to the computer s COM port Use only the mouse adapter that comes with the unit The mouse conversion is only effective at PC ports 7 and 8 Only master ports PC 1 PC 8 can be connected to slaves Connect the slave console port to PC 1 PC 8 ports of the master Only one level of slave units is allowed Bring up the OSD again to check if the master recognizes the slave connection Look for t...

Page 21: ...ay VESA VESA DDC 1 2B Power consumption max 33 W normal operation typical Viewing angle typical 70 70 H 60 60 V Backlight unit 2 CCFLs edge light top bottom Power supply input voltage full range 100 240 V AC Environmental KVM module dimensions 40 H x 404 W x 114 D mm 1 6 x 15 9 x 4 5 in Weight 19 4 kg 42 7 lbs Operating temperature 0 50 C 32 122 F Operating humidity 0 95 Storage temperature 20 60 ...

Page 22: ...tions 8 Console connections 1 PC port connectors keyboard mouse monitor HD15 x 8 Console port connectors Keyboard PS 2 Mouse PS 2 Monitor HD15 female Computer selection via buttons hotkeys and Windows switching software client Max number of cascadable PCs 64 when cascaded with models of same type OSD yes Automatic scan interval 3 8 15 30 seconds Programmable scan pattern Cable length max 30 m 100 ...

Page 23: ...to LCD drawer 9 12 V DC 500 mA when not connected Power consumption max 500 mA LCD Panel Specifications Active display area 376 32 x 301 056 mm Pixel pitch mm 0 294 H x 0 294 V Resolution 1280 x 1024 60 70 75 Hz Color pixel arrangement RGB vertical strip Display mode normally white Brightness cd m 2 250 center Contrast ratio 500 1 Display colors 16 7M RGB 8 bits data User control OSD control auto s...

Page 24: ...duct Please contact your INTELLINET NETWORK SOLUTIONS dealer with comments or questions Copyright INTELLINET NETWORK SOLUTIONS All products mentioned are trademarks or registered trademarks of their respective owners www intellinet network com ...

Reviews: