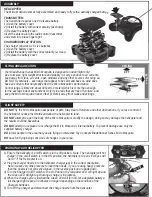
“Off”
(bottom)
“Full On”
(full up)
“Off”
(LED “ON”)
Ensure that the tail
rotor spins freely
PRE FLIGHT
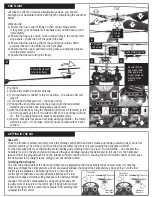
Just like the pilot of a full-size aircraft always does, you should
pre-flight your helicopter before each flight by completing the checklist
below:
Walk Around:
1) Ensure the rotors can tilt freely on their central hinge points.
If they bind, your helicopter will oscillate and you will have to land
immediately.
2) Ensure that there is not too much up/down play in the central rotor
drive shaft – check the fit of the upper tube cap
3) Ensure that the retaining clip for the central rotor drive shaft is
properly locked on the bottom of the helicopter
4) Ensure that the upper and lower drive gears are properly aligned
with the motor pinions
5) Ensure that the tail rotor spins freely
TILT
Central
Hinge
Point
TILT
TILT
TILT
TILT
Ensure that the
upper and lower
drive gears are
properly aligned
with the motor
pinions
Fit Upper
Tube Cap
Secure
Drive
Shaft
Lock Retaining Clip
Pre Flight
1) Extend the Radio Controller antenna
2) Turn the Radio Controller to the On position – the Green LED will
stay off
3) Turn the Micro Mosquito On – the Green LED’s
4) Position the Micro Mosquito on the ground with the tail pointed
towards you and the nose facing away. (as shown)
5) Arm the throttle by cycling the throttle control from off (bottom) to full
on (full up) and back to off, the Green LED on the Controller will turn
on – this is a safety feature to prevent accidental starts
6) Test the helicopter response but slowly applying throttle – the rotors
will start to spin – Do not take off until you are familiar with the next
section!
“ON” Position
“ON” Position
GETTING IN THE AIR
Take Off
Once the throttle is armed, smoothly move the throttle control (left hand stick marked up /down) upwards; the main rotors
will start spinning. The further you move the stick the faster the rotors will spin causing the helicopter to lift off.
For the best take-offs move the throttle control swiftly and smoothly but do not “jam” it to full throttle – do not allow the
helicopter to sit on the ground an spin because the gear will drag causing the helicopter to roll over . As the helicopter
takes off from the ground back off on the throttle control to reach a hover – leaving too much throttle control on will cause
the helicopter to fly straight to the ceiling in an uncontrolled climb.
Trimming the helicopter
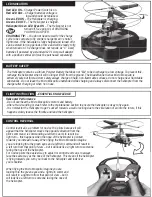
The Trim tab in the middle of the Radio Controller can be adjusted so that the helicopter does not spin when it is hovering.
After take off place the helicopter into a hover at a steady altitude, the body of the helicopter may be spinning. Turn the trim
control left to eliminate a clockwise (right) spin or turn the trim
control right to eliminate a counter-clockwise (left) spin.The trim
setting will change as throttle setting changes or the battery condition
changes, this can be compensated by using the right hand stick
to apply more or less turn to the left or right. If flying with constant
input on the right stick to prevent the helicopter from spinning then
re-adjust the trim control.
Helicopter
Spins Left
Transmitter
Trims Right
Helicopter
Spins Right
Transmitter
Trims Left
GETTING IN THE AIR -Continued
Hovering & Altitude Control
To gain altitude advance the throttle control forward. To descend, slowly move the throttle control backward.
Hover is controlled buy keeping the helicopter at a constant altitude, you may be required to use the FWD/BK or Left/Right
control to maintain the helicopter’s position.
FLYING TIPS!
- During your first flights keep the Micro Mosquito close to the ground so that you can safely cut the throttle and land without
damage if you become disoriented or lose control.
- To avoid unwanted oscillation avoid sudden control stick movements – always use smooth motion of the control sticks.
- Until you are comfortable with control reversal try to always keep the helicopter nose pointed away from you so that the
helicopter responds the way you expect it too.
- Expect flight times of 7 to 10 minutes from a fully charged battery.
- If the helicopter gets too close to a wall or ceiling you will notice that it gets sucked towards the surface, gently decrease the
throttle and land if this happened.
- Immediately cut the throttle when the helicopter lands to prevent it from bouncing around and tipping over.
- The control range is approximately 30 feet (10 meters) however, the presence of other electrical devices, electrical
wiring walls etc. may reduce this range
FLIGHT SCHOOL
Developing Advanced Flight Skills. Throttle Control – Developing Hover Skills
The purpose of this exercise is to develop good hover control – essential to flying a helicopter. Place the Micro Mosquito in the
center of a fairly large area – this will be your training zone. Increase the throttle to takeoff and hover at a target height of about
1 foot above the ground. Once in the air, trim the helicopter to eliminate any left / right spin with the trim control but do not touch
the left/right control stick (right hand stick). Focus on maintaining a stable hover – try not to let the helicopter move up or down
just hold the altitude steady. Maintain the hover for 5 seconds then land. Repeat 5 times, if the Micro Mosquito starts to drift off
center land immediately and manually reposition it in the center of the training zone. Once you are proficient at this increase the
target height by 1 foot and repeat the training exercise. You will be skilled at throttle control when you can determine the height
you want to hover at before taking-off and be able to climb and maintain the desired altitude without over or under shooting your target.
Forward & Backward Flight
To fly forward or backward, move the right hand control stick forward or backward respectively. Note that the Micro
Mosquito is intentionally design not to move forwards and backwards extremely fast. This prevents novice pilots from
becoming disoriented, flying into obstacles and losing control; it is also part of the design that makes the Micro Mosquito
so stable. When flying forward or backward your will need to constantly adjust the left/right heading (yaw) of the helicopter
using the right stick; the Micro Mosquito does not use a gyro or other electronic heading systems.
Landing
To make the heli descend, slowly move the throttle stick backwards. The Micro Mosquito will start to sink – your challenge
as a pilot is to let the heli decent slowly and smoothly to ensure a gentle landing. Applying a bit of throttle when the
helicopter is a couple of inches above the ground will help slow the descent rate even further. Immediately move the
throttle control to the down position when on the ground to completely stop the rotors
Throttle and Rotation (Yaw) Control
From a hover, intentionally put the Micro Mosquito in a spin by giving it a left or right turn command and then regain control.
Do not apply forward or backward control. Repeat 5 times, if the Micro Mosquito drifts to the edge of the training zone land
immediately and manually reposition it in the center of the zone. You will be skilled at combined Throttle/Rotation control
when you can maintain a hover altitude with the helicopter spinning and be able to stop the rotation with the helicopter
nose pointing in a pre determined direction without over or under shooting your desired heading.
FLIGHT SCHOOL _Continued
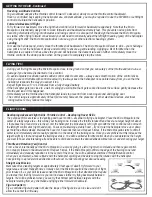
Figure-8 pattern
Fly a controlled figure-8 pattern. Make the loops of the figure-8 even in size and don’t
allow the center to drift away
Straight Line Mission
Mark takeoff and landing targets at approximately 3 feet apart. Takeoff, fly forward to your
target area and land. Repeat 5 times. Initially orient the Micro Mosquito in the direction of flight
prior to take off, as your skill increases orient the Micro Mosquito in other directions that require
you to steer first then fly forward. As your skill increases further try flying backwards between
targets. You will be proficient when you can fly the shortest path between targets with the
helicopter starting from any orientation and flying either forward or backward.
1.
2.
3.
4.
5.


