2 / 4
P/N 466-5560-
EN • REV A • ISS 04MAY20
7
EN: Installation Sheet
Description
The NXG-183x series of keypads offers a range of keypads for
the xGen and xGenConnect intrusion panel family. It offers a
multicolour user interface, with clear graphical display and
large buttons for ease of operation. A system can have up to
16 keypads installed.
The following keypad variants are available:
•
NXG-1830: White xGen keypad
•
NXG-1831: Anthracite xGen keypad
•
NXG-1832: White xGen keypad with integrated Mifare
card reader
•
NXG-1833: Anthracite xGen keypad with integrated Mifare
card reader
WARNING!
The equipment is not earthed. Any
external circuit connected to the equipment must be
located within the same building and connected to a
protective earthing conductor.
Wire insulation of cables connected to the equipment must
conform to IEC 60332-1-2 and IEC 60332-1-3 or IEC 60332-
2-2, depending on the wire cross sectional area, or IEC
TS 60695-11-21, regardless of cross sectional area.
Alternatively, such wires must comply with UL 2556 VW-1.
Keypad Installation
Ensure that the keypad is mounted on a flat, solid, vertical
surface such that the base will not flex or warp when the
mounting screws and bolts are tightened.
The keypad is connected to the control panel via the RS-485
xGen bus, up to 800 m from the control panel. It is
recommended to use two-pair twisted, shielded data cable, for
example, Belden 7201A, 3107A, or 9842. The shield of any
bus cable must be connected to system ground at one end
only. The keypad does not provide an earth connection for this
purpose.
Connections
Figure 5: Connections
(1) USBUP port
(2) DIP switch
(3) xGen bus connector
DIP switch
The DIP switch (Figure 5, item 2) is used to enable the xGen
bus termination.
•
DIP switch 1: 120 Ω xGen bus termination switch
•
DIP switch 2: For future use
To install the keypad, follow these steps:
1. Loosen the bottom screw. See Figure 1.
2. Gently press and release two clips located on the bottom
of the keypad. See Figure 2.
3. Tilt the keypad from the bottom and remove it from the
mounting plate. See Figure 3.
4. Use the mounting plate as a template to mark where the
bus cable should feed through the wall. See Figure 4.
5. Drill appropriate holes and feed the keypad bus cable
through the mounting plate.
The mounting plate must be mounted using at least 4
screws, using 3 mounting holes (Figure 1, items A), and
the pry-off tamper mounting hole (item B).
If necessary, cut one of the moulded cable knock-outs
(Figure 4, items C) to provide a cable entry from the top,
left, right or bottom side.
Keep a small cable loop in a dedicated space in the base
as shown in an example in Figure 6.
6. Screw the mounting plate to the flat mounting surface
using provided screws.
7. Connect the bus cable to the screw terminals on the
keypad. See Figure 5. Note that the connector is
pluggable (see an example in Figure 6).
Connect to POS, NEG, LAN+, and LAN
−.
Note:
IN and OUT are not used.
8. If the keypad is the last device on the xGen bus cable,
enable the xGen bus termination by moving the bus
termination switch (DIP switch 1) to the On position. See
also “DIP switch” above.
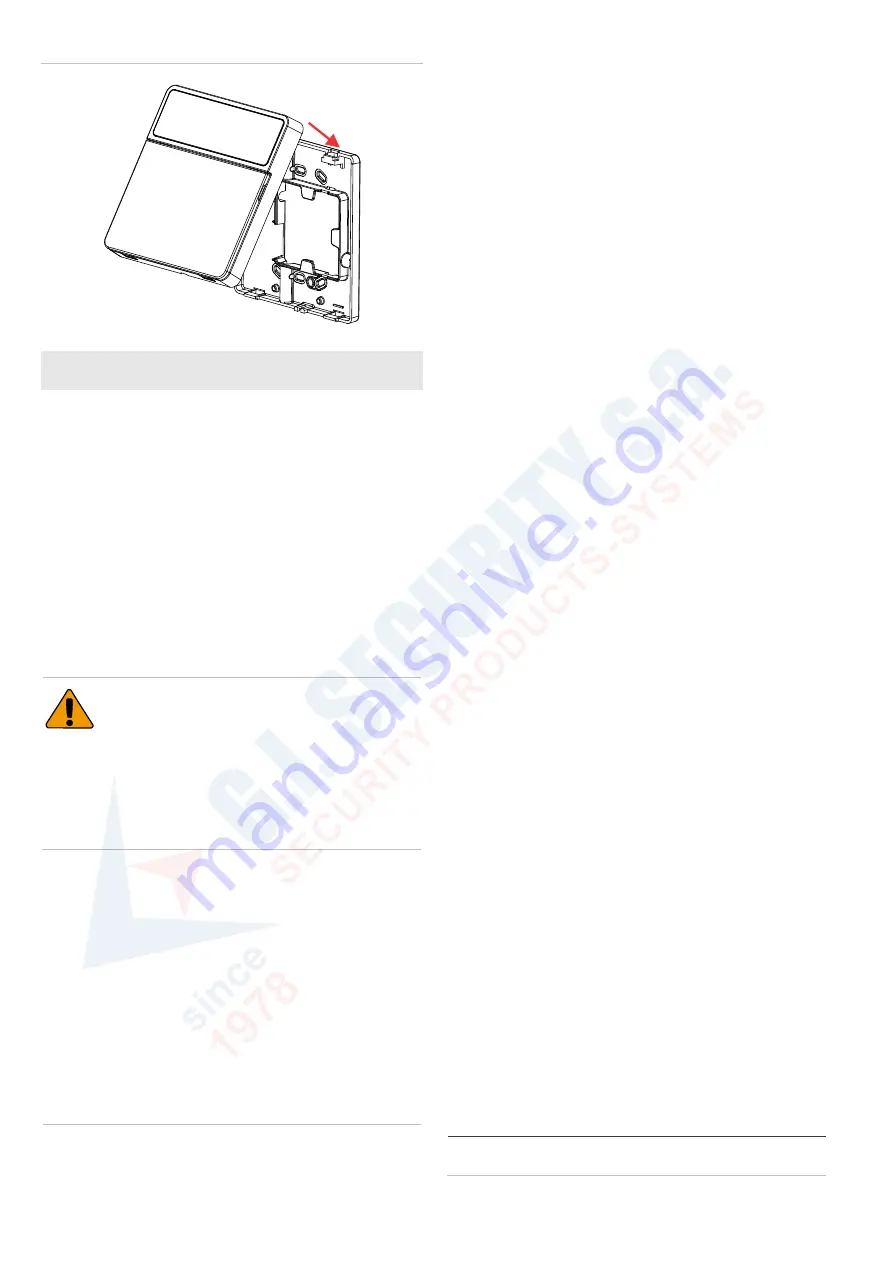
9. Attach the keypad to the mounting plate by sliding the top
of the keypad onto the clips located on the top of the
mounting plate. See Figure 7.
10. Gently push bottom side to attach the clips.
11. Tighten the bottom screw to fix the keypad to the mounting
plate.
For keypad programming, see
xGen Installation and
Programming Guide
.
See
NXG-183x Keypad User Manual
for keypad operation
details.
Firmware
The keypad is remotely upgradeable using DLX900, or locally
with the USBUP-EUR-V2 service tool via the USBUP port on
the keypad (Figure 5, item 1).
Specifications
Compatibility
xGen panel series
xGenConnect panel series


