background image


Parameter 

Description 


Hallway View 

To invert the 16:9 aspect ratio, enable the rotate function. This 
function is best used when installing the camera in a scene with a 
narrow angle of view. 

During installation, turn the camera to 90 degrees or rotate the  
3-axis lens to 90 degrees, and then set the rotate mode as 

ON

. A 

normal view of the scene with 9:16 aspect ratio that ignores 
needless information such as the walls appears.


Video Standard 

PAL(50Hz)

 and 

NTSC(60Hz)

 are selectable. Choose according to 

the video standard required. 


Capture Mode 

Set the required frame rate to meet the different demands of field of 
view and resolution. A higher frame rate may be needed in a 
location with a lot of movement (such as a money depot). 


Note: 

Click the 

Default

 button to return all the image settings to default values. 

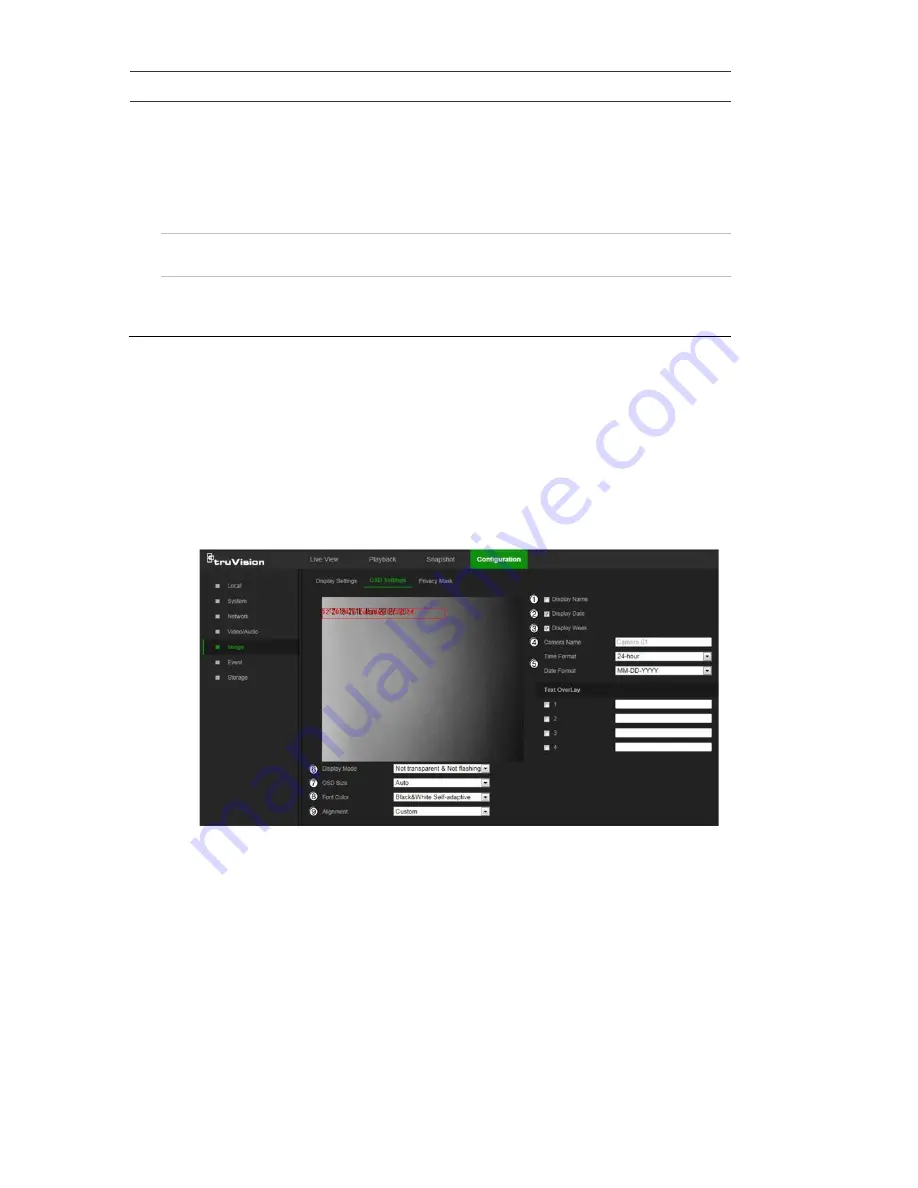
OSD (On Screen Display) Settings 

In addition to the camera name, the camera also displays the system date and time on 
the screen. How the text appears on screen can also be defined. 

To position the on-screen date/time and name: 

1.  From the menu toolbar, click 

Configuration

 > 

Image

 > 

OSD Settings


2.  Select the 

Display Name

 check box (1) to display the on-screen camera name. 

3.  Select the 

Display Date

 check box (2) to display the date/time on screen.  

4.  Select the 

Display Week

 check box (3) to include the day of the week in the on-

screen display. 

5.  In the 

Camera Name

 box (4), type the camera name.  

6.  Select the time and date formats from the 

Time format

 and 

Date format

 drop-down 

lists (5).  

7.  Select a display mode for the camera from the 

Display Mode 

drop-down list (6). 

Display modes include: 

28 

TruVision 81 Series IP Camera Configuration Manual 

Summary of Contents for RS-3231

Page 1: ...TruVision 81 Series IP Camera Configuration Manual P N 1073279 EN REV A ISS 12MAY17...

Page 2: ...nt may be trademarks or registered trademarks of the manufacturers or vendors of the respective products Manufacturer Interlogix 2955 Red Hill Avenue Costa Mesa CA 92626 5923 USA Authorized EU manufac...

Page 3: ...browser 5 Camera configuration 7 Configuration panel overview 7 System time 11 System service 13 Network settings 14 Video Audio 21 Image 24 Basic event 30 Smart event 38 Schedule settings 41 Storage...

Page 4: ...dress when using a temporary Wi Fi connection for installation 192 168 2 70 Subnet mask 255 255 255 0 Gateway address 192 168 1 1 Ports used Browser TruVision Navigator RTSP 554 RTSP 554 HTTP 80 Serve...

Page 5: ...s model number plus serial number Cameras have WPA2 PSK Wi Fi security settings enabled by default The camera s serial number is the unique default wireless password 192 168 2 70 is used for the defa...

Page 6: ...click Internet Options on the Tools menu 2 On the Security tab click the zone to be assigned to a website under Select a web content zone to specify its security settings 3 Click Custom Level 4 Change...

Page 7: ...n page 47 for further information To access the camera online 1 In the web browser enter the camera s IP address default is 192 168 1 70 Use the TruVision Device Finder tool a feature of the TruVision...

Page 8: ...this drop down list to select main stream or sub stream 10 Plug in switch Click this drop down list to select the plug in For IE users web components and QuickTime are selectable For non IE users web...

Page 9: ...transactions and other parameters such as upgrading the firmware This section contains images and descriptions of each of the configuration panel windows Local Use the Local window to manage the proto...

Page 10: ...s in playback mode System Use the System window to configure basic device information system time users security settings and other parameters such as upgrading the firmware System submenus Descriptio...

Page 11: ...enus Description 1 Wi Fi Defines Wi Fi and WPS settings and shows available wireless networks see Wi Fi on page 14 2 Basic settings Defines TCP IP DDNS Port and NAT settings see Basic settings on page...

Page 12: ...gs OSD settings overlay text and privacy mask See Image on page 24 for further information on setup Event Use the Event window to set up alarms by defining area settings arming schedules and linkage m...

Page 13: ...rage management network attached storage NAS configuration and snapshot configuration Storage submenus Description 1 Schedule settings Configure recording settings and snapshot captures for all availa...

Page 14: ...The time interval can be set from 1 to 10080 minutes or Set manually Select the Manual Time Sync radio button and then click to set the system time from the pop up calendar Note Select the Sync with c...

Page 15: ...These LEDs are selected by default Select or deselect Enable IR Light to turn the infrared LED indicator on or off Select or deselect LED indicator to turn the LED indicator s on or off See the camer...

Page 16: ...select it 4 Select Manage as the Network Mode 5 Make a selection from the Security Mode drop down list Not encrypted WEP WPA personal WPA enterprise WPA2 personal or WPA2 enterprise 6 Define encryptio...

Page 17: ...type the PIN code in the Router PIN Code box and click Connect to connect the camera to the wireless router 2 Click Save to save changes Basic settings Menu tabs Description 1 TCP IP NIC Type Select...

Page 18: ...gured properly for remote access Make a selection from the DDNS Type drop down list IPServer DynDNS ezDDNS or NO IP DynDNS Dynamic DNS Manually create a host name A user account must first be created...

Page 19: ...ayed under Host Name is the one created on the DynDNS web site ezDDNS Type the required host name in the Host Name box The default host name is the utc serial number The default server address is www...

Page 20: ...selected click on an external port number to change it by typing in a new port number Note If a non default external port number is assigned the network router settings must be configured accordingly...

Page 21: ...s selected select Use Camera Name Use Camera Number or Custom as the name of the child directory Snapshot Filing Interval Select a number of days to specify how many days of snapshots should be stored...

Page 22: ...ith attached alarm images Interval This is the time between two actions of sending attached snapshots Authentication If the email server requires authentication select this check box to use authentica...

Page 23: ...quired information in the popup window Download the certificate request and submit it to the trusted certificate authority such as Symantec or RSA for signature After receiving the signed valid certif...

Page 24: ...r fixed bit rate is used Variable produces higher quality results suitable for video downloads and streaming Video Quality Specifies the quality level of the image It can be set when variable bit rate...

Page 25: ...able The higher the bit rate setting the larger the audio file generated Audio Input MicIn is selectable for the connected microphone Input Volume Specifies the volume from 0 to 100 Environmental Nois...

Page 26: ...ualitydepending on the camera model or location background Adjust the brightness contrast saturation hue and sharpness of the video image using the Image menu Use this menu to also adjust camera behav...

Page 27: ...ht mode only Custom 24h Settings This is used when the camera is in an outdoor situation where the day and night is defined by the amount of daylight or a trigger via an alarm input Consequently no sc...

Page 28: ...time period Triggered by Alarm Input The camera switches to the day mode or the night mode after the alarm is triggered Sensitivity Only available when Auto D N switch mode is selected It defines the...

Page 29: ...sed on this information the camera continues to display all colors correctly even when the color temperature of the scene changes such as from daylight to fluorescent lighting Select one of the option...

Page 30: ...ney depot Note Click the Default button to return all the image settings to default values OSD On Screen Display Settings In addition to the camera name the camera also displays the system date and ti...

Page 31: ...the Text Overlay section This option can be used to display emergency contact details and or other information Each text line can be positioned anywhere on the screen To add on screen text 1 From the...

Page 32: ...is only triggered if it occurs during a programmed time schedule Select the level of sensitivity to motion as well as the target size so that only objects that could be of interest trigger a motion r...

Page 33: ...tion Advanced configuration provides more control over how motion is detected It permits setting the sensitivity level as well as the percentage of the motion detection area that the object must occup...

Page 34: ...parameters See Snapshot parameters on page 41 for further information Trigger Alarm Output Triggers external alarm outputs when an event occurs Select the check boxes next to individual alarm outputs...

Page 35: ...the Linkage Method tab to specify the linkage method for when an event occurs Select one or more response methods for the system when an alarm is triggered See Linkage methods on page 31 for details 1...

Page 36: ...ion of the object that must occupy the defined area to trigger an alarm 9 Click Save to save the changes for that area 10 Repeat steps 7 to 9 for each area to be defined 11 Click the Arming Schedule t...

Page 37: ...he time bars or click on a time bar to configure arming schedule times Note All scheduled times are based on the 24 hour clock Ensure that the correct time zone and daylight saving time settings have...

Page 38: ...or more response methods for the system when an alarm is triggered See Linkage methods on page 31 for details 9 Click Save to save changes To define alarm output 1 From the menu toolbar click Configu...

Page 39: ...figuration Event Basic Event Exception 2 Under Exception Type select an exception type from the drop down list 3 Click the Linkage Method tab to specify the linkage method for when an event occurs Sel...

Page 40: ...stem System Settings 5 Click Save to save changes 6 Click the Linkage Method tab to specify the linkage method for when an event occurs Select one or more response methods for the system when an alarm...

Page 41: ...drop down list 5 Set the sliders as follows Threshold This is the time threshold that the object remains in the region If the value is set as 0 the alarm is triggered immediately after the object ente...

Page 42: ...s Select one or more response methods for the system when an alarm is triggered See Linkage methods on page 31 for details 11 Click Save to save changes Cross line detection This function can be used...

Page 43: ...save changes 8 Click the Arming Schedule tab to edit the arming schedule Click and drag along the time bars or click on a time bar to configure arming schedule times Note All scheduled times are based...

Page 44: ...ent For example if an alarm triggered recording ends at 11 00 and the post record time is set as 5 seconds the camera records until 11 00 05 The post record time can be configured as 5s 10s 30s 1min 2...

Page 45: ...heck box to have snapshots uploaded to the FTP Also ensure that the Upload Snapshot check box in the Network Advanced Settings FTP tab is selected to upload snapshots to the FTP Select the Enable Even...

Page 46: ...illisecond second minute hour or day 6 Click Save to save changes To set up event triggered snapshots 1 From the menu toolbar click Configuration Storage Snapshot Snapshot Parameters 2 Check Enable Ev...

Page 47: ...oolbar click Configuration Storage Storage Management Storage Management 2 Select the check box next to the HDD No of the hard drive to be formatted 3 Define the quota percentage for snapshots and rec...

Page 48: ...on Storage Storage Management NAS 2 Click inside the NAS table to type the IP address and the file path of the network disk in the appropriate HDD No row 3 Select the hard drive mounting protocol NFS...

Page 49: ...word can be used by several users When creating a new user the user must be assigned a password There is no default password provided for all users Users can modify their passwords after they have bee...

Page 50: ...t window appears 3 Type a name in the User Name box 4 Assign the user a password Passwords can have up to 16 alphanumeric characters 5 Select the type of user from the Level drop down list The options...

Page 51: ...as their name password and permissions can be modified To modify user information 1 Select a user from the User List 2 Click the Modify button The user management window appears 3 Change the informat...

Page 52: ...Authentication drop down list select Enable or Disable to enable or disable the RTSP authentication 3 Click Save to save the changes IP address filter Use the IP address filter window to set access r...

Page 53: ...block the IP address after five failed user name password login attempts After the IP address is locked a user can log in to the device after 10 minutes To enable the illegal login lock 1 Click Config...

Page 54: ...or can import or export configuration files To import or export a configuration file 1 Click Configuration System Maintenance Upgrade Maintenance 2 Click Browse under Import Config File to select the...

Page 55: ...the device reboots automatically The browser is also refreshed To upgrade the firmware using TruVision Device Manager 1 Launch TruVision Device Manager Note Install TruVision Device Manager using the...

Page 56: ...Types Alarm Exception and Operation Minor type Each major type log has some minor types Date and Time Logs can be searched by start and end recording time Export Export the Log List to text or Microso...

Page 57: ...PTZ Control Remote Initialize HDD Remote Playback by File Remote Playback by Time Remote Get Parameters Remote Get Working Status Start Bi directional Audio Stop Bi directional Audio Remote Alarm Arm...

Page 58: ...m the drop down list in the top right corner of the login window 3 The camera comes with a user account with administrative rights for configuring all options on the camera The user name is admin and...

Page 59: ...click the button again Take a snapshot Take a snapshot of a scene when in live view Click the Capture button located at the bottom of the window to save an image The image is in JPEG format Snapshots...

Page 60: ...back and Single Frame playback 11 Timeline bar The timeline bar displays the 24 hour period of the day being played back It moves left oldest to right newest The bar is color coded to display the type...

Page 61: ...ture searching interface Use this menu to search for view and download the pictures stored in the camera s SD card or in network storage To search the snapshots 1 Make a selection from the File Type d...

Page 62: ...Detection cross line 40 intrusion 38 motion advanced mode 33 Display information on screen set up 28 E Email parameters set up 19 Encryption type set up 14 Event settings overview of event parameters...

Page 63: ...57 Recording schedule setup 42 ROI configuring 23 RTSP authentification 50 S SD card capacity 45 formatting 45 Security illegal login lock 51 IP address filter 50 RTSP authentication 50 Security mode...

Page 64: ...io settings overview of video audio parameters 9 W Web browser access the camera 5 interface overview 5 Web browser security level checking 4 Wi Fi parameters set up 14 WPS parameters set up 14 62 Tru...

Reviews: