Connecting to the Upline Network
3-23
3
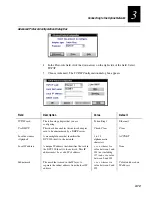
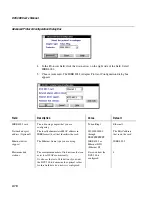
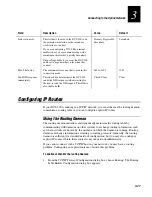
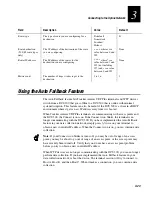
Field
Description
Value
Default
Route type
The type of route you are configuring for a
destination.
D=default
N=network
S=subnet
H=host
D
Route destination
(N, S, H route types
only)
The IP address of the destination of the route
you are configuring.
x.x.x.x
where
x
is a
value between 0 and
255
None
Router IP address
The IP address of the router for the
destination you are configuring.
y.x.x.x
where
y
is a
value between 1 and
223 (not including
127) and
x
is a value
between 0 and 255
None
Metric count
The number of hops it takes to get to the
destination.
1 to 16
1
Using the Auto Fallback Feature
The Auto Fallback feature lets Trakker Antares UDP Plus terminals and WTP devices
switch from a DCS 300 that goes offline to a DCS 300 that is online with minimal
system disruption. This feature can also be useful if the DCS 300 is a client in a DHCP
environment where it gets a new IP address every time it is booted.
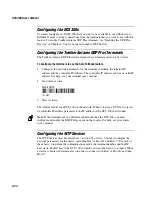
When Trakker Antares UDP Plus terminals are communicating with access points and
the DCS 300, the Connect icon is on. If the Connect icon blinks, the terminal is no
longer communicating with the DCS 300. If you have implemented the Auto Fallback
feature in your data collection network, simply press
L
twice on your terminal to
obtain a new controller IP address. When the Connect icon is on, you can continue data
collection.
Note:
If your Connect icon blinks or turns off, you may be out of range of an access
point, you may be about to go out of range of an access point, or the access point may
have recently been turned off. Verify that you do not have an access point problem
before you try to obtain a new controller IP address.
When WTP devices are no longer communicating with the DCS 300, you can no longer
perform data collection. If you have implemented the Auto Fallback feature in your
data collection network, reboot the device. The terminal session will try to connect to
Host A, Host B, and then Host C. When it makes a connection, you can continue data
collection.
Summary of Contents for DCS 300
Page 1: ...P N 067296 005 User s Manual DCS300 ...
Page 4: ...DCS 300 User s Manual blank ...
Page 16: ...DCS 300 User s Manual ...
Page 22: ...DCS 300 User s Manual ...
Page 23: ...Getting Started 1 ...
Page 24: ...DCS 300 System Manual blank ...
Page 42: ...blank ...
Page 43: ...Learning About the DCS 300 2 ...
Page 44: ...DCS 300 User s Manual blank ...
Page 68: ...blank ...
Page 69: ...Connecting to the Upline Network 3 ...
Page 70: ...DCS 300 System Manual 3 2 blank ...
Page 94: ...blank ...
Page 95: ...Connecting to the Intermec RF Network 4 ...
Page 96: ...DCS 300 System Manual blank ...
Page 134: ...blank ...
Page 135: ...Connecting to the 9180 and the Intermec CrossBar Network 5 ...
Page 136: ...DCS 300 System Manual blank blank ...
Page 158: ...DCS 300 System Manual blank ...
Page 159: ...Running Data Collection Browser 6 ...
Page 160: ...DCS 300 System Manual blank ...
Page 171: ...Running Terminal Emulation 7 ...
Page 172: ...DCS 300 System Manual blank ...
Page 209: ...Running Peer to Peer Applications 8 ...
Page 210: ...DCS 300 System Manual blank ...
Page 232: ...blank ...
Page 233: ...Running Terminal Sessions 9 ...
Page 234: ...DCS 300 System Manual blank ...
Page 258: ...DCS 300 System Manual 9 26 blank ...
Page 259: ...Running Screen Mapping 10 ...
Page 260: ...DCS 300 System Manual 10 2 blank ...
Page 269: ...Running Screen Mapping 10 11 10 Screen 3 Screen 4 Main Host Screen Screen 5 ...
Page 333: ...Troubleshooting 11 ...
Page 334: ...DCS 300 System Manual blank ...
Page 372: ...blank ...
Page 373: ...Specifications and Other Helpful Information A ...
Page 374: ...DCS 300 System Manual B 2 blank ...
Page 391: ...Upgrading the DCS 300 and Devices B ...
Page 392: ...DCS 300 System Manual blank ...
Page 411: ...How the DCS 300 Routes Transactions C ...
Page 412: ...DCS 300 System Manual blank ...
Page 430: ...blank ...
Page 431: ...Index I ...
Page 432: ...DCS 300 System Manual I 2 blank ...

