Chapter 2 — Connecting the Printer
PF2i and PF4i Mid-Range Printer User’s Manual
45
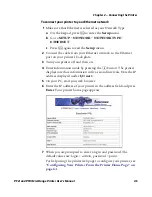
To connect your printer to your Ethernet network
1
Make sure that Ethernet is selected as your Network Type.
a
On the keypad, press
T
to enter the
Setup
menu.
b
Go to
SETUP
>
NETWORK
>
NETWORK TYPE
>
ETHERNET
.
c
Press
T
again to exit the
Setup
menu.
2
Connect the cable from your Ethernet network to the Ethernet
port on your printer’s back plate.
3
Turn your printer off and then on.
4
Enter Information mode by pressing the
I
button. The printer
displays interface information in five-second intervals. Note the IP
address displayed under
I/O net1
.
5
On your PC, start your web browser.
6
Enter the IP address of your printer in the address field and press
Enter
. Your printer home page appears.
7
When you are prompted to enter a login and password. The
default values are: login =
admin
, password =
pass
.
For help using the printer web page to configure your printer, see
“Configuring Your Printer From the Printer Home Page” on
page 64
.
Summary of Contents for EasyCoder PF2i
Page 1: ...PF2i PF4i Mid Range Printer User s Manual ...
Page 9: ...Contents PF2i and PF4i Mid Range Printer User s Manual ix I Index 171 ...
Page 10: ...Contents x PF2i and PF4i Mid Range Printer User s Manual ...
Page 14: ...Before You Begin xiv PF2i and PF4i Mid Range Printer User s Manual ...
Page 74: ...Chapter 2 Connecting the Printer 60 PF2i and PF4i Mid Range Printer User s Manual ...
Page 161: ...147 B Default Settings ...
Page 168: ...Appendix B Default Settings 154 PF2i and PF4i Mid Range Printer User s Manual ...
Page 185: ...171 I Index ...
Page 193: ......


