background image

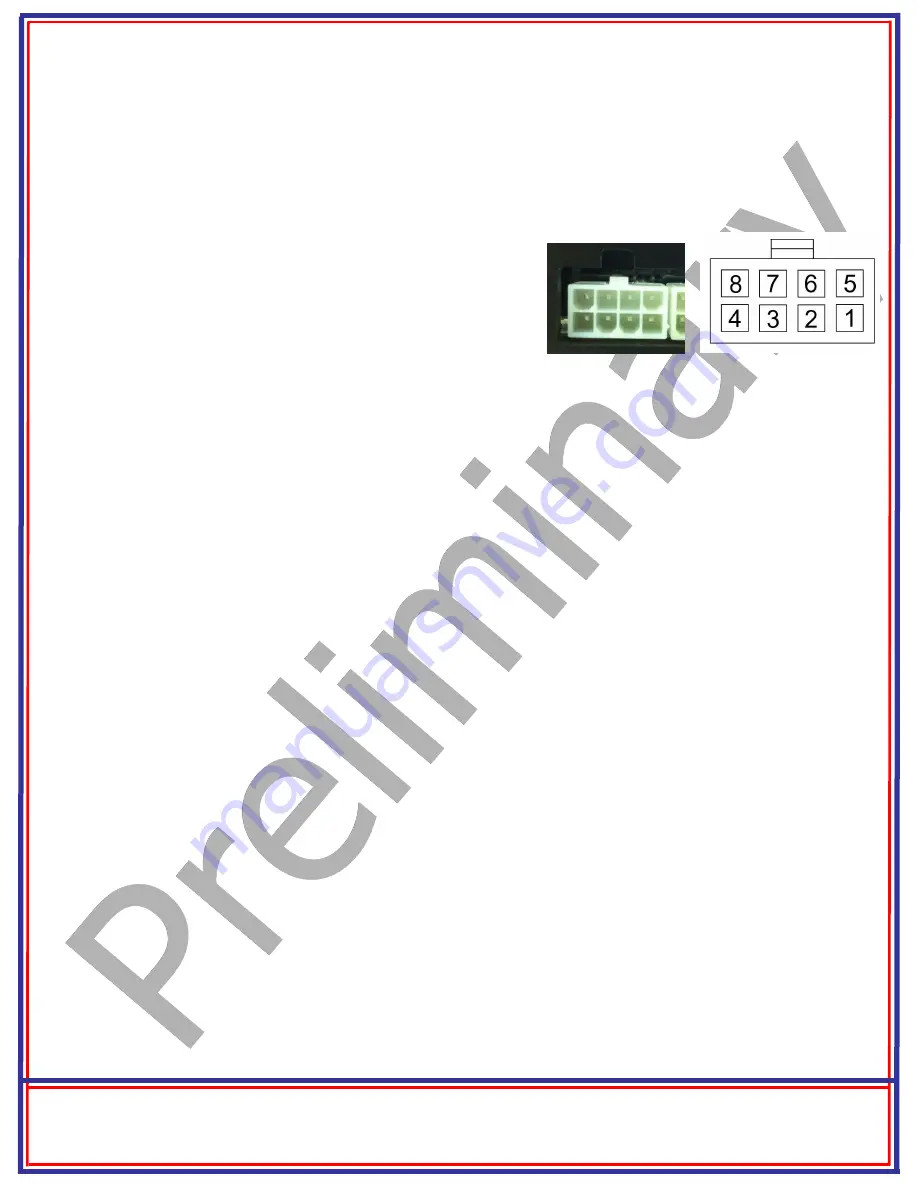
8-Pin PRPC Connector Pin-Out Definition 

Connector J4 contains the PRPC’s 8 low current output pins.  Each output is rated at 1/2A and is 
intended to drive relay coils or other low current loads.  Note that Pin 8 of the eight outputs is ac-
tive low (ground) while the rest are active high (12V).  

Note: when driving relays, a diode-

protected type must be used. InterMotive recommends DigiKey #PB682-ND Relay. 


The 8 outputs are defined as follows: 

• 

Pin #1 (Yellow wire) Configurable Output, Active High


• 

Pin #2 (White wire) Configurable Output, Active High 

• 

Pin #3 (Brown wire) Configurable Output, Active High 

• 

Pin #4 (Gray wire) Configurable Output, Active High 

• 

Pin #5 (Blue wire) Configurable Output, Active High 

• 

Pin #6 (Green wire) Configurable Output, Active High 

• 

Pin #7 (Orange wire) Configurable Output, Active High


• 

Pin #8 (Pink wire)  Configurable Output, 

Active Low*


Connect the desired outputs to vehicle equipment as needed.  Tape up 
unused leads.  When connecting to relays, use relays with appropriate 
kick-back suppression, such as Digikey #PB682-ND.  Unsuppressed relays 
will induce very high voltage spikes throughout modern vehicles sensitive 
computer electronics and should not be used, per Ford, GM, SAE, etc.   


The default configuration for the 8 outputs are as follows: 


• 

Pin #1 (Yellow wire)  Trans Range=Reverse - Flashing Momentary, 2 seconds On, 2 seconds Off 

• 

Pin #2 (White wire)   Transmission = Park 

• 

Pin #3 (Brown wire)   Left Turn Signal 

• 

Pin #4 (Gray wire)     Right Turn Signal 

• 

Pin #5 (Blue wire)      CTO* 

• 

Pin #6 (Green wire)    Any Door Open 

• 

Pin #7 (Orange wire)  Vehicle Speed > 76   

• 

Pin #8 (Pink wire)       Engine Running 


     *CTO = ((RPM/2)*#Cyl) = pulses per minute.  E.G. 600rpm = 2400 (8 cylinders)


8 Pin Output  

Back of Connector


InterMotive Inc. 
13395 New Airport Rd.  
Auburn, CA 95602 

Phone: (530)-823-1048 

Fax: (530)-823-1516 

Page 8 of 13


www.intermotive.net 

 products@intermotive.net 

PRPC501-A-090314-INS  

Summary of Contents for PRPC501-A

Page 1: ...be used This could drive a high temperature dash indicator Another output could be programmed to drive a warning buzzer lamp when the vehicle speed exceeds some limit such as 70mph Electric doors can...

Page 2: ...in stalled in 2 Click the Create Configuration button 3 This screen will come up 4 Configure as desired See the following page for more infor mation Press the Enter button after each entry Note CTO ca...

Page 3: ...using a momentary button as the only input condition and setting the Delays to zero Thus a load could be turned on by pushing a momentary button and turned back off by pushing the button a second time...

Page 4: ...ab and click on Device Manager In the De vice Manager window expand the Ports menu and the download cable will display as USB Serial Port Click the Open File button 1 Open the PRPC ims or configuratio...

Page 5: ...s to mount the module InterMotive Inc 13395 New Airport Rd Auburn CA 95602 Phone 530 823 1048 Fax 530 823 1516 Page 5 of 13 www intermotive net products intermotive net PRPC501 A 090314 INS PRPC Power...

Page 6: ...ctive High Pin 4 White wire Configurable Relay Output 3 Fuse 3 Fuse Selectable Active High Low Pin 5 White wire Configurable Relay Output 2 Fuse 2 Active High Pin 6 White wire Configurable Relay Outpu...

Page 7: ...added together the sum of these fuses must not exceed 20 Amps Note that the placement of fuse 6 will determine whether the output is active high or active low The use of fused outputs 5A or 5B is rec...

Page 8: ...onfigurable Output Active Low Connect the desired outputs to vehicle equipment as needed Tape up unused leads When connecting to relays use relays with appropriate kick back suppression such as Digike...

Page 9: ...lue White stripe Input 7 Active low Pin 8 Pink Black stripe Input 8 Active low Pin 9 Black White stripe Input 9 Active low Pin 10 Orange Black stripe Input 10 Active low Pin 11 Tan Black stripe Input...

Page 10: ...nk harness 6 pin connector is NOT connected to the PRPC501 module 2 Turn the vehicle key on engine off 3 Insert the Data Link harness 6 pin connector into the PRPC501 module 4 The PRPC s red fuse LEDs...

Page 11: ...tput the associated on board red LED will illuminate No fuse sensing is done on outputs that are not configured to turn on Low Current Outputs To enter LCO diagnostic mode momentarily press the red te...

Page 12: ...e on board red fuse LED s will light when a corresponding Input is active Fuse LED 1 2 3 4A 4B 4C 5A 5B Input 1 2 3 4 5 6 7 8 J3 Pin 1 2 3 4 5 6 7 8 6 9 9 7 10 10 8 12 12 Scrolling LED s This may indi...

Page 13: ...the PRPC fails any step in the Post Installation Test review the installation instructions and the loaded configuration by running the Graphical User Interface application If necessary call InterMotiv...

Reviews: