background image

513 01 3222 00

03/2015

Specifications are subject to change without notice.

INSTALLATION INSTRUCTIONS

R--410A Single--Package Air Conditioner

RAS036--072

NOTE

: Read the entire instruction manual before starting

the installation

TABLE OF CONTENTS

SAFETY CONSIDERATIONS

2

. . . . . . . . . . . . . . . . . . . .

Rated Indoor Airflow (cfm)

3

. . . . . . . . . . . . . . . . . .

INSTALLATION

6

. . . . . . . . . . . . . . . . . . . . . . . . . . . . . . .

Jobsite Survey

6

. . . . . . . . . . . . . . . . . . . . . . . . . . . . . . . .

Step 1 -- Plan for Unit Location

6

. . . . . . . . . . . . . . . . . .

Roof Mount

6

. . . . . . . . . . . . . . . . . . . . . . . . . . . . . . .

Step 2 -- Plan for Sequence of Unit Installation

7

. . . . . .

Curb--Mount Installation

7

. . . . . . . . . . . . . . . . . . . . .

Pad--Mount Installation

7

. . . . . . . . . . . . . . . . . . . . . .

Frame--Mount Installation

7

. . . . . . . . . . . . . . . . . . . .

Step 3 -- Inspect Unit

7

. . . . . . . . . . . . . . . . . . . . . . . . . . .

Step 4 -- Provide Unit Support

7

. . . . . . . . . . . . . . . . . . .

Roof Curb Mount

7

. . . . . . . . . . . . . . . . . . . . . . . . . .

Slab Mount (Horizontal Units Only)

7

. . . . . . . . . . .

Alternate Unit Support
(In Lieu of Curb or Slab Mount)

7

. . . . . . . . . . . . . .

Step 5 -- Field Fabricate Ductwork

9

. . . . . . . . . . . . . . . .

For Units with Accessory Electric Heaters

9

. . . . . .

Step 6 -- Rig and Place Unit

9

. . . . . . . . . . . . . . . . . . . . .

Positioning on Curb

10

. . . . . . . . . . . . . . . . . . . . . . .

Step 7 -- Convert to Horizontal and Connect

Ductwork

10

. . . . . . . . . . . . . . . . . . . . . . . . . . .

Step 8 -- Install Outside Air Hood

11

. . . . . . . . . . . . . . .

Economizer and Two Position Damper Hood
Package Removal and Setup — Factory Option

11

. .

Economizer Hood and Two--Position Hood

11

. . . . .

Step 9 -- Install External Condensate Trap and Line

12

. . .

Step 10 -- Make Electrical Connections

12

. . . . . . . . . . .

Field Power Supply

12

. . . . . . . . . . . . . . . . . . . . . . . .

Units with Factory--Installed
Non--Fused Disconnect

13

. . . . . . . . . . . . . . . . . . . . .

Units without Factory--Installed
Non--Fused Disconnect

14

. . . . . . . . . . . . . . . . . . . . .

All Units

14

. . . . . . . . . . . . . . . . . . . . . . . . . . . . . . . .

Convenience Outlets

14

. . . . . . . . . . . . . . . . . . . . . . .

Factory--Option Thru--Base Connections

15

. . . . . .

Units without Thru--Base Connections

15

. . . . . . . . .

Field Control Wiring

15

. . . . . . . . . . . . . . . . . . . . . . .

Thermostat

15

. . . . . . . . . . . . . . . . . . . . . . . . . . . . . . .

Unit without Thru--Base Connection Kit

15

. . . . . . .

Heat Anticipator Settings

16

. . . . . . . . . . . . . . . . . . .

Electric Heaters

16

. . . . . . . . . . . . . . . . . . . . . . . . . . . .

Single Point Boxes & Supplementary Fuses

17

. . . .

Single Point Boxes without Fuses

17

. . . . . . . . . . . .

Low--Voltage Control Connections

17

. . . . . . . . . . . .

EconoMi$er X (Factory--Installed Option)

17

. . . . . . .

Hot Gas Re--Heat Control Connections

18

. . . . . . . . . .

Hot Gas Re--Heat -- Space RH Controller

18

. . . . . .

Smoke Detectors

20

. . . . . . . . . . . . . . . . . . . . . . . . . . .

Step 11 -- Adjust Factory--Installed Options

20

. . . . . . . .

Step 12 -- Install Accessories

20

. . . . . . . . . . . . . . . . . . .

START--UP CHECKLIST

27

. . . . . . . . . . . . . . . . . . . . . . .

Summary of Contents for RAS036

Page 1: ...izontal and Connect Ductwork 10 Step 8 Install Outside Air Hood 11 Economizer and Two Position Damper Hood Package Removal and Setup Factory Option 11 Economizer Hood and Two Position Hood 11 Step 9 I...

Page 2: ...death WARNING signifies hazards which could result in personal injury or death CAUTION is used to identify unsafe practices which may result in minor personal injury or product and property damage NOT...

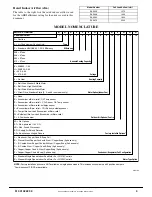
Page 3: ...r Cond Evap 3 phase only Condenser Evaporator Coil Configuration A Standard Single Speed Indoor Fan Motor For W7212 Controls B Standard Single Speed Indoor Fan Motor For W7220 Controls Motor Type Opti...

Page 4: ...4 513 01 3222 00 Specifications are subject to change without notice C150167 Fig 1 Unit Dimensional Drawing...

Page 5: ...513 01 3222 00 5 Specifications are subject to change without notice C150168 Fig 1 Unit Dimensional Drawing cont...

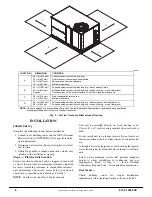
Page 6: ...ocal building codes and the NEC National Electrical Code ANSI NFPA 70 for special installa tion requirements 2 Determine unit location from project plans or select unit location 3 Check for possible o...

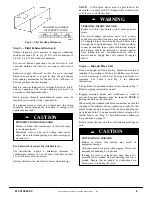
Page 7: ...to suit specific installation plan Step 3 Inspect unit Inspect unit for transportation damage File any claim with transportation agency Confirm before installation of unit that voltage amperage and ci...

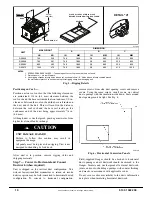
Page 8: ...TION OF CARRIER CORPORATION 1 DEC 2 DEC 3 DEC ANG MATERIAL AUTHORIZATION NUMBER TITLE 1041738 CURB ASY ROOF ENGINEERING MANUFACTURING 004 007 ENGINEERING REQUIREMENTS SIZE DRAWING NUMBER REV T 005 Y 0...

Page 9: ...code for use with electric heat PERSONAL INJURY HAZARD Failure to follow this warning could cause personal injury For vertical supply and return units tools or parts could drop into ductwork and cause...

Page 10: ...side on the condenser end of the unit being approximately 1 4 in 6 4 mm Although unit is weatherproof guard against water from higher level runoff and overhangs UNIT DAMAGE HAZARD Failure to follow th...

Page 11: ...Tray Qty 2 C08639 Fig 8 Economizer and Two Position Damper Hood Parts Location 4 Carefully lift the hood assembly with metal tray through the filter access opening and assemble per the steps outlined...

Page 12: ...LINE BASE RAIL OPEN VENT TO ROOF DRAIN DRAIN PLUG ROOF CURB SEE NOTE 2 51 MIN C08022 Fig 13 Condensate Drain Piping Details All units must have an external trap for condensate drainage Install a trap...

Page 13: ...t this point Discard the factory test leads see Fig 14 Connect field power supply conductors to LINE side terminals when the switch enclosure cover is removed to attach the handle C12284 Fig 16 Locati...

Page 14: ...llow this warning could result in personal injury or death Units with convenience outlet circuits may use multiple disconnects Check convenience outlet for power status before opening unit for service...

Page 15: ...st be within voltage range indicated on unit nameplate See Table 3 On 3 phase units voltages between phases must be balanced within 2 and the current within 10 Use the formula shown in the legend for...

Page 16: ...e Electric Heaters RAS units may be equipped with field installed accessory electric heaters The heaters are modular in design with heater frames holding open coil resistance wires strung through cera...

Page 17: ...6N P N 2 5610 4 REV 11 13 21 23 CONTROL BOX BUSHING SINGLE POINT BOX MOUNTING SCREWS FOAM BUSHING DRIP BOOT BRACKET MOUNTING SCREWS HEATER RELAYS POWER WIRES HEATER MOUNTING SCREWS C14253 Fig 26 Typic...

Page 18: ...provided in the unit corner post 2 Feed wires through the raceway built into the corner post see Fig 22 to the 24 v barrier located on the left side of the control box The raceway provides the UL requ...

Page 19: ...AS072 with Hot Gas Re Heat Dehumidification System Rc Rh W1 G Y2 C O W2 B Y1 OAT RRS SRTN HUM D1 D2 V Vg X C G W2 W1 Y2 Y1 R THERMIDISTAT Unit CTB THERMOSTAT Connection not required Hot Gas Re Heat FI...

Page 20: ...ncy control is desired connect a time clock or remotely controlled switch closed for Occupied open for Unoccupied sequence at terminals marked OCCUPANCY on CTB Remove or cut jumper JMP 2 to complete t...

Page 21: ...22 98 98 102A 4 9 6 5 13 6 15 6 24 26 30 30 22 24 96 96 26 29 30 30 24 26 98 98 103B 6 5 8 7 18 1 20 9 30 33 30 35 27 30 96 96 32 35 35 40 29 32 98 98 104B 7 9 10 5 21 9 25 3 34 39 35 40 31 35 96 96...

Page 22: ...5 6 24 26 30 30 23 24 106 106 26 29 30 30 26 26 108 108 103B 6 5 8 7 18 1 20 9 30 33 30 35 27 30 106 106 32 35 35 40 29 32 108 108 105A 12 0 16 0 33 4 38 5 49 55 50 60 44 50 106 106 51 57 60 60 47 52...

Page 23: ...37 41 40 45 33 37 135 135 105A 12 0 16 0 33 4 38 5 49 55 50 60 44 50 133 133 51 57 60 60 47 52 135 135 104B 104B 15 8 21 0 43 8 50 5 62 70 70 70 56 64 133 133 64 72 70 80 59 66 135 135 104B 105A 19 9...

Page 24: ...9 9 26 5 55 2 63 8 80 91 80 100 73 83 212 212 82 93 90 100 75 85 214 214 HIGH NONE 37 50 36 226 39 50 39 228 102A 4 9 6 5 13 6 15 6 37 37 50 50 36 36 226 226 39 39 50 50 39 39 228 228 104B 7 9 10 5 21...

Page 25: ...19 9 26 5 55 2 63 8 80 91 80 100 73 83 199 199 82 93 90 100 75 85 201 201 HIGH NONE 36 50 36 213 38 50 38 215 102A 4 9 6 5 13 6 15 6 36 36 50 50 36 36 213 213 38 38 50 50 38 38 215 215 104B 7 9 10 5...

Page 26: ...ced 3 Phase Supply Voltage Never operate a motor where a phase imbalance in supply voltage is greater than 2 Use the following formula to de termine the percentage of voltage imbalance Voltage Imbalan...

Page 27: ...OR LOCATION IN HOUSING ORIFICE AND VERIFY SETSCREW IS TIGHT j VERIFY THAT FAN SHEAVES ARE ALIGNED AND BELTS ARE PROPERLY TENSIONED j VERIFY THAT SCROLL COMPRESSORS ARE ROTATING IN THE CORRRECT DIRECTI...

Page 28: ...ION IN SUCTION PRESSURE 5 TO 7 PSI EXPECTED j B DISCHARGE PRESSURE UNCHANGED j C LIQUID TEMPERATURE DROPS TO 50 TO 55_F RANGE j D LSV SOLENOID ENGERIZED VALVE CLOSES j 6 SWITCH UNIT TO DEHUMID REHEAT...

Reviews: