Installing the Distribution
Module, DM12
Thank you for purchasing the Distribution Module, DM12.
This section describes its installation.
9.1 Installing your Distribution Module
Equipment, Tools and Skills
As the Installer, you must be qualified and authorized to do the
installation which requires mechanical and electrical knowledge.
Section
9
NOTICE
The module is to be installed in accordance with the
standards and regulations of authorities having
jurisdiction. Proper workmanship is essential to the proper
function and life of your module as well as protecting your
warranty.
9.2 Selecting the Module Location
The installation should consider the following:
•
Mounting location must be able to support double the gross
weight of the Distribution Module (i.e. 33 lbs. x 2 = 66
lbs./13 KG x 2 = 26 KG) and must be of a non-combustible
and non absorptive surface.
•
The module must be mounted in an area that provides
unrestricted access to the front panel (minimum of 6” top
clearance) with 3” clearance to all other module surfaces.
•
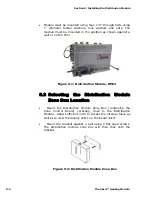
Module is 11”H x 14”W x 6.5” D. (27.9cm x 35.5cm x
15.2cm). See Figure 9-1: Distribution Module, DM12.
International Thermal Research
9-1
Summary of Contents for Diesel and AC Heating System for Recreational Vehicles and Yachts
Page 14: ...Section 1 Overview 1 8 The Oasis Heating Module...
Page 20: ...Section 2 Mounting the Oasis Heating Module 2 6 The Oasis Heating Module...
Page 28: ...Section 3 Installing the Exhaust System 3 8 The Oasis Heating Module...
Page 32: ...Section 4 Installing the Fuel System 4 4 The Oasis Heating Module...
Page 41: ......
Page 48: ...Section 7 Plumbing the System 7 6 The Oasis Heating Module...
Page 73: ......
Page 74: ...9...
Page 75: ...6 6 6 6 7K 8 0 7 4 7 4 7 8 9 7 8 9 7 8 9 7 8 9 D B 15C 8 D D H D 13 C 8 B B EC 8 D...
Page 76: ...Section 9 Installing the Distribution Module 9 14 The Oasis Heating Module...


