Section 9, Installing the Distribution Module
9.7 Distribution Module Zone Control
Board
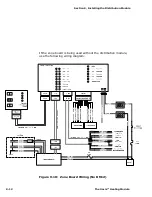
Multi-Pin Connectors
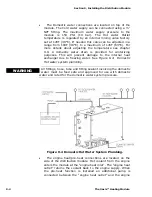
The Zone Control Board has four multi-pin connectors, see Figure
9-3: Plumbing for Five Zones Using the Distribution Module, that
are to be connected through connector cords (supplied) to the
matching multi-pin connectors as follows:
•
10 pin connector to Heating Module Remote Operating
Panel.
•
8 pin connector to Heating Module (connector cord
transitions to a 9 pin connector for the Heating Module).
•
12 pin connector to Distribution Module (connector cord
transitions to a 9 pin connector for the Distribution Module).
•
14 pin connector to thermostat and cabin fan connector
plug.
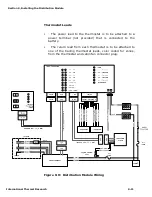
Cabin Fan leads
•
The positive (red) lead from each cabin fan is to be
attached to one of the trailing cabin fan leads, color coded for
zones, from the thermostat and cabin fan connector plug.
•
The negative lead from each cabin fan is to be attached to a
ground terminal (not provided) that is connected to a battery
ground.
•
The cabin fan 1 leads (orange) can supply up to a maximum
of 10 Amps. The other cabin fan leads 2-5 can supply up to a
maximum of 5 Amps each. The total current draw is not to
exceed 18 Amps for all cabin fan leads.
•
If the system requires higher amperage draws, install a
separate relay to power the fans. This relay will use the
existing fan circuit as a signal and must be wired to a
secondary power source (not the heater’s control board). See
Figure 5-3.
9-10
The Oasis™ Heating Module
Summary of Contents for Diesel and AC Heating System for Recreational Vehicles and Yachts
Page 14: ...Section 1 Overview 1 8 The Oasis Heating Module...
Page 20: ...Section 2 Mounting the Oasis Heating Module 2 6 The Oasis Heating Module...
Page 28: ...Section 3 Installing the Exhaust System 3 8 The Oasis Heating Module...
Page 32: ...Section 4 Installing the Fuel System 4 4 The Oasis Heating Module...
Page 41: ......
Page 48: ...Section 7 Plumbing the System 7 6 The Oasis Heating Module...
Page 73: ......
Page 74: ...9...
Page 75: ...6 6 6 6 7K 8 0 7 4 7 4 7 8 9 7 8 9 7 8 9 7 8 9 D B 15C 8 D D H D 13 C 8 B B EC 8 D...
Page 76: ...Section 9 Installing the Distribution Module 9 14 The Oasis Heating Module...

