background image

Section 8, Operating the Oasis

®

 Chinook Heating System  

International Thermal Research  


8-9 

8.9  Functions  of  the  Remote  Operating 

Panel 

·


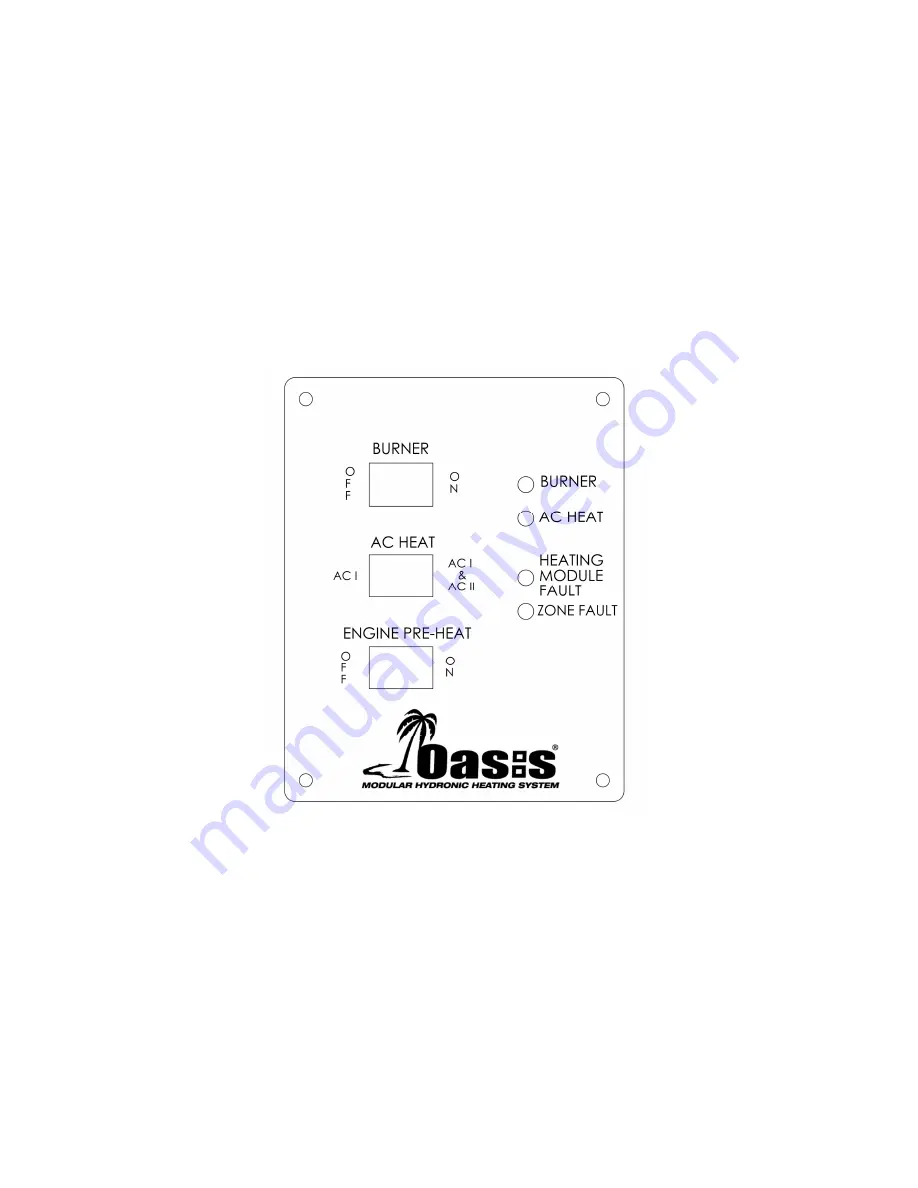
The  Oasis  Heating  System’s  Remote  Operating  Panel, 
Figure 8-4:    Remote  Operating  Panel,  contains  one  ON/OFF 

burner  switch,  one  triple  position  AC  element  switch,    one 
ON/OFF engine heat switch to control the optional engine pre-
heat  pump,  and  four  LED’s  indicating  Burner  activation,  AC 
element activation, heater fault, and zone fault.  


 Figure 8-4 Remote Operating Panel  


Burner Switch (Primary Heat Source)  

·


The burner switch on the remote panel controls the ON/OFF of 

the  diesel  burner.    The  Burner  LED  will  turn  on  when  the 
diesel  burner  has  been  activated,  and  will  remain  ON  while 
the burner cycles on and off. 

Summary of Contents for OASIS Chinook

Page 1: ...g System Installation and Operating Manual Diesel and AC Heating System for Recreational Vehicles and Mobile Homes CAN CSA C22 2 No 110 94 R2014 CSA B140 10 06 R2015 CSA B140 0 03 R2018 UL307A Edition...

Page 2: ...at com All rights reserved No part of this manual may be reproduced or transmitted in any form by any means electronic or mechanical including photocopying and recording information storage retrieval...

Page 3: ...em Model 2 2 2 3 Your Mounting Location 2 2 2 4 What NOT to Do 2 4 2 5 Oasis Chinook Mounting Procedure 2 4 2 6 Zone Control Board Mounting Procedure 2 5 2 7 Remote Operating Panel Mounting Procedure...

Page 4: ...System 6 1 6 1 Before You Begin 6 1 6 2 Oasis Chinook 12 VDC 6 2 6 3 Oasis Chinook 120 VAC 6 3 6 4 Wiring The Zone Control Board 6 4 Cabin Fan Leads 6 4 Thermostat Leads 6 5 6 5 What NOT to Do 6 5 Sec...

Page 5: ...5 Activating the Cabin Fan Heaters through the Thermostats 8 6 8 6 Activating the Potable Hot Water 8 6 8 7 Potable Water Temperature Adjustment 8 7 8 8 Activating the Engine Heat Pre heat 8 8 8 9 Fun...

Page 6: ...n s Aquastat 5 2 Figure 5 2 Mounting a Low Profile Cabin Fan 5 6 Figure 5 3 Installing a Relay for Add l Fan Amperage 5 6 Figure 6 1 System Wiring 6 2 Figure 7 1 Oasis Chinook Overview 7 3 Figure 7 2...

Page 7: ...ok Heating System is CSA UL certified only for installation into Recreational Vehicles Manufactured Homes and Mobile housing This section covers critical information you need to know before beginning...

Page 8: ...rmation for a proper installation A properly installed Oasis Chinook Heating System is essential for several reasons To ensure that you and or your customers receive satisfactory results and enjoy a w...

Page 9: ...hrough the use of its integral distribution pumps the Oasis Chinook Heating System has the ability to circulate the coolant fluid to all space heating areas It can also provide a supply of potable hot...

Page 10: ...ble of burning a wide variety of diesel based fuels CSA UL certified for diesel 1 and 2 Exhaust has minimal smoke and smell Fan assisted sealed combustion chamber is designed to use outside combustion...

Page 11: ...nstallation are Mounting location restrictions for the Oasis Chinook Heating System and exhaust outlet to reduce noise vibration heat loss etc Length routing and sizing of fluid lines air flow tubing...

Page 12: ...the heating system not supplied This list does not include optional equipment and accessories Standard tools normally available in a well equipped shop Approved fasteners for mounting the heater unit...

Page 13: ...the heating zones 1 6 Testing and Inspection After all components have been properly installed according to standard practices RVIA standards and the recommendations of this Installation and Operatin...

Page 14: ...Chinook Heating System Oasis Chinook Heating System weight when full 163 lbs Ventilation requirements Exhaust outlet location and maximum acceptable length including all 90 degree bends Refer to sect...

Page 15: ...outside case of the Oasis Chinook Heating System The serial number identifies the model type through the first series of letters and numbers 2 3 Your Mounting Location Your mounting location should co...

Page 16: ...tions The following are the minimum required clearances 12 top clearance 12 front clearance 0 clearance to all other Oasis Chinook Heating System surfaces Allow 1 clearance on the left and right side...

Page 17: ...o contain any unexpected leak Choose a sturdy surface in a location that won t be unduly affected by vibration and jarring from rough roads Ensure that the exhaust tubing can be properly and safely ro...

Page 18: ...Procedure Mount the Zone Control Box containing the Zone Control Board vertically close to the Oasis Chinook Allow sufficient room to access the internal fuses as well as to view the display LED s on...

Page 19: ...ote Operating Panel Mounting Procedure The Remote Operating Panel is mounted inside the Coach in an easy to access location An opening for the remote panel must be cut in the wall or mounting panel Th...

Page 20: ...Section 2 Mounting the Oasis Chinook Heating System International Thermal Research 2 7 Figure 2 5 Touchscreen Operating Panel Mounting...

Page 21: ...without coming in contact with air that can infiltrate the living areas See section 3 3 Never place any exhaust parts close to combustible material or through a combustible wall or ceiling without fir...

Page 22: ...r Installation You may use sweeping bends but each 90 bend is equivalent to two feet of exhaust piping For example if you use two 90 bends you must subtract 2 per bend from the maximum allowed 12 exha...

Page 23: ...integrity make repairs or replacements if necessary Appropriate exhaust insulation must be used to cover the entire length of any interior exhaust run Solid stainless steel exhaust tubing or approved...

Page 24: ...ocedure Figure 3 1 Installing the Exhaust System shows a standard setup for the down exhaust To install the exhaust system 1 Leave suitable air spacing to protect combustible materials use an exhaust...

Page 25: ...air intake adapter Drill a 2 hole through the side wall minimum maximum 2 wall thickness Insert the adapter and use 3 screws to mount it against the side wall Use a 32 gear clamp to attach the air in...

Page 26: ...Section 3 Installing the Exhaust System 3 6 The Oasis Chinook Heating System Figure 3 1 Installing the Exhaust System Figure 3 2 Exhaust Hole Location Mounting Template...

Page 27: ...ing System location The Oasis Chinook Heating System is not rated for use in an explosive environment Never share the fuel supply to the Oasis Chinook Heating System with any other fuel burning device...

Page 28: ...uring normal operation All fuel line connection points and hoses must use suitable clamps and or sealant and must be checked for leaks on the initial installation and also periodically as part of norm...

Page 29: ...gn material 4 4 Procedure To complete the fuel system installation 1 Install an inline fuel filter The optimal location is on a compartment wall next to the Oasis Chinook inline between the fuel tank...

Page 30: ...20 000 BTU h It comes with a 3 speed switch to control the speed of the fan For best results the fans should be mounted as close to the floor as possible They have a built in aquastat optional which t...

Page 31: ...ll not run the fans unless the coolant inside the Oasis Chinook tank is above 120F However during the initial startup the coolant in the lines will be lower than 120F until it has had a chance to mix...

Page 32: ...heat for the installed heater unit Fan Guards to protect the fan blades from damage recommended for fans installed in storage areas or other accessible areas where something could contact the fan blad...

Page 33: ...the mounting locations of your fans Locate the fans to evenly heat the specific zone Provision must be made to protect potable water lines from freezing Install fan at floor level or very near floor l...

Page 34: ...wire these up to the Zone Control Board in Section 6 Wiring The Electrical System 4 The Zone Control Board can control up to 5 zones The cabin fan 1 lead orange can supply up to a maximum of 10 Amps...

Page 35: ...Section 5 Installing Fan Heaters 5 6 The Oasis Chinook Heating System Figure 5 2 Mounting a Low Profile Cabin Fan Figure 5 3 Installing a Relay for Additional Fan Amperage...

Page 36: ...l Board Thermostats Cabin Fans To review the wiring for the Oasis Chinook Heating System refer to the wiring diagram shown in Figure 6 1 System Wiring All electrical connections and wiring must comply...

Page 37: ...wn Cabin Fan 5 Light Blue Harness 2044 50 5 feet Figure 6 1 System Wiring 6 2 Oasis Chinook 12 VDC The following apply to the 12 VDC connections of the Oasis Chinook There is one paired set of 12 VDC...

Page 38: ...er system is required for safe trouble free operation 6 3 Oasis Chinook 120 VAC The Oasis Chinook Heating System is equipped with two 1500 watt 120 VAC 60 Hz immersion elements The connections for the...

Page 39: ...l Board The Zone Control Board connects to the thermostats and cabin fans through a 14 pin plug with butt connect leads Cabin Fan leads The positive red lead from each cabin fan is to be attached to o...

Page 40: ...umper is not in place the zone control board uses Heating Loop 1 to supply coolant to Zones 1 and 2 and uses Heating Loop 2 to supply coolant to Zones 3 4 and 5 Zones 1 and 2 are calling for heat the...

Page 41: ...ue to a leak in the heat exchanger which could be caused if the fresh water in the system is allowed to freeze For an efficient Oasis Chinook Heating System operation you must Minimize heat loss from...

Page 42: ...tting must be fitted into the Oasis Chinook coolant return connection All connections must be tightened to a leak free condition using an appropriate thread sealant Hose and or tubing used to connect...

Page 43: ...Section 7 Plumbing the System International Thermal Research 7 3 Figure 7 1 Oasis Chinook Overview Figure 7 2 Plumbing Oasis Chinook For 5 Zones...

Page 44: ...han the preceding fan The temperature difference will be larger if the fan has a higher BTU output The Oasis Chinook should be filled and flushed prior to operation to remove any foreign debris Use he...

Page 45: ...ter should be plumbed so that fluid supply enters the bottom of the heating core and exits from the top This helps keep air from being trapped in the cabin fan core Ensure proper direction of flow Ref...

Page 46: ...be connected using NPT to PEX crimp fittings The maximum water supply pressure to the heater is 150 PSI 10 bar The Hot water Outlet temperature is regulated by an internal mixing valve factory set at...

Page 47: ...can be used to make the connection to the engine coolant hose Hot coolant from the engine enters the Oasis Chinook at the Engine Supply The Engine Return returns the coolant back to the engine This m...

Page 48: ...stem 1 Do not operate the Oasis Chinook Heating System until the proper water anti freeze solution has been added to the Oasis Chinook Heating System and all trapped air has been bled An inadequate mi...

Page 49: ...til the coolant lines are filled and the overflow bottle fills to the Minimum when cool level 4 When this level is reached turn OFF the filler pump and keep the bypass switch turned ON until the syste...

Page 50: ...provide a source of heat for all hydronic space heating needs Through the use of its integral distribution pumps the Oasis Chinook Heating System has the ability to circulate the coolant to all space...

Page 51: ...coolant tank that minimizes heat loss and optimizes heat recovery Domestic water flow switch for quick response to domestic hot water demand Low coolant level switch on the tank Quiet operation Low pr...

Page 52: ...ostic information 8 2 Operating Instructions for the Oasis Chinook Heating System The Oasis Chinook Heating System must be installed and connections made in accordance with the recommendations in this...

Page 53: ...ed ON power LED will turn ON to turn the DC electrical power to the main control board ON and is required to be left ON whenever heat is required The Zone Control board Figure 8 4 will be powered when...

Page 54: ...iesel burner will turn OFF If the Oasis Chinook Heating System coolant should cool down below this temperature range the burner will again commence firing and will continue until either the burner swi...

Page 55: ...o the Zone Control Board and calling for heat will cause the cabin fan controlled by that thermostat and loop pump to be enabled only if the coolant inside the Oasis Chinook is above 120F The Chinook...

Page 56: ...of incoming supply water and maintain the temperature to which it is set However in some cases the temperature of the incoming water and the flow rate demand of multiple faucets may limit the ability...

Page 57: ...ce the Oasis Chinook Heating System is within its set operating temperature range The engine will start to be preheated by the Oasis Chinook Heating System Engine Heat Used for Potable Water or Space...

Page 58: ...ition AC element switch one ON OFF engine heat switch to control the optional engine pre heat pump and four LED s indicating Burner activation AC element activation heater fault and zone fault Figure...

Page 59: ...re Burner LED Green When ON indicates the diesel burner has been activated AC Heat LED Green When ON indicates one or both of the 120 VAC immersion elements s are operating Heating Module Fault LED Re...

Page 60: ...ass button is for authorized service personnel only Reset Button The reset button when pressed resets the control board Power LED Green The power LED green turns ON when the power to the control board...

Page 61: ...e bypass jumper to the left of the largest relay on the board must be put in place If the series jumper is not put in place then the thermostats calling for heat in zones 3 4 and 5 will not activate t...

Page 62: ...ble water heat exchanger When the Burner is turned ON the Zone Control Board will turn on the Summer Pump and circulate hot coolant through the internal circuit to provide even heating in the coolant...

Page 63: ...fuse has been blown 8 12 Potable Water and Space Heating Priority By default the Zone Control Board is shipped with the heating priority set for potable hot water This means that when there is a call...

Page 64: ...lant hoses and fittings for leaks and integrity Check coolant level in the overflow bottle 3 4 full when hot Fill only when the system is COLD and in small quantities only to prevent overfilling Exhau...

Page 65: ...any apparent visual signs or operating symptoms The major components such as the air compressor fuel pump fuel nozzle and combustion air fan should be examined for wear and should be serviced or repla...

Page 66: ...as safe GRAS by the FDA in the Oasis Chinook Heating System Read and follow the anti freeze manufacturer s instructions for the type of anti freeze and mixture recommended for your application Note th...

Page 67: ...l Panel Burner switch on Remote Operating Panel ON Burner LED lit on Remote Operating Panel Main fuse or circuit breaker blown or tripped AC immersion elements do not activate Primary Electric Element...

Page 68: ...ernational Thermal Research 8 19 Burner Starts but Zone Faults Power LED on Zone Control Board glowing green Component matched LED pairings all glowing green on the Zone Control Board Fuse blown for o...

Page 69: ...luable reference if you need warranty repairs in the future Limited Warranty The following warranties are in lieu of all other warranties and conditions ITR makes no other warranties representations o...

Page 70: ...Product was originally purchased about a warrantable failure and to obtain prior written approval for warranty repair Original serial number on Product or electrical control board has been removed alt...

Page 71: ...n an authorized service person may be able to visit your coach or yacht to help troubleshoot problems and repair your Product Such service calls are at the Owner s expense Regardless you must obtain w...

Page 72: ...s given only in good faith as an accommodation to the customer Such information should not be relied upon without an independent verification of its applicability to the customer s particular situatio...

Reviews: